Our mission

GHL p4 unboxing and setup

this is for you @sfsuphysics:)
Will describe the unboxing and setup of the GHL p4, hopefully it will help people who are looking in to this controller.
Highly recommend taking a look at this link for a quick overview on how the controller work.

Also a good start for knoweldge and usecases is the knowledge base section in the GHL app or on their website

Finally they also have great videos for pretty much everything

In my opinion, based on my experience, the GHL p4 controller offer some of the best experience in term of quality, functions and ease of programming. I have used reef keeper and apex for years. But over the last 2 years i settled on the GHL products in general.
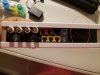
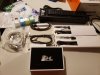
This is how the packaging look like. This is the mega package that comes with:

Manual and spec of each product

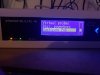
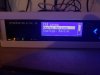
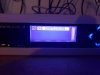
P4 controller. This box comes packed with tunctions without the need to buy modules or upgrades:
Built in: Salinity, PH, redox, temp,
Built in ATO function,
Built in flow meters interface,
Built in leak detection interface,
Built in 1-10V variable control,
Built in Aux port(breakout box),
Built in visual and audible alarm,
Built in configurable light control(ghl and 3rd party)
Built in configurable doser control(ghl and 3rd party),
Built in configurable pump control,
USB connectivity,
Power failure monitor port
and 2 expansion slots for future expansions).

The product also have 2 years warranty (typical controllers give 1 year)

Probs: Ph,salinity, temp and redox probs. What i like about the probs (beside the rock solid stability) is how long the cables that comes with it....

Calibration solutions for probs

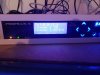
PAB cable (this is the data cable that connect the p4 to other devices like power bar, dosers, khd..etc)

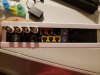
GHL power bar. One thing you can see is the power bar bit bigger than apex energy bar. If you read the spec you know why. GHL power bar is mighty and handle stringent electrical conditions. Examples
All 6 outlets can handle up tp 15A.. so any outlet can be used to chiller and heaters or combo on the same outlet
All outlets can handle up to 160A inrush or spike current..this is insane.. when energy bars suddenly stop working, usually an inrush or spike current occured and damaged the bar..or the relay itself is damaged.. this have happened to me twice over the years with both apex and reef keeper..

Finally the power bar give you power monitoring per socket out of the box...
 

Attachments

  • 20200812_210148.jpg
    20200812_210148.jpg
    84.3 KB · Views: 178
  • 20200812_210805.jpg
    20200812_210805.jpg
    104.5 KB · Views: 164
  • 20200812_210714.jpg
    20200812_210714.jpg
    67.4 KB · Views: 166
Last edited:
The P4 initial setup:

The initial setup literally took me 10min once I powerd on the p4.
Steps:
Power on
Connect your phone to ghl wifi
Open ghl connect app
Add p4
Go through the steps on the app and choose if you want to connect to your home wifi or use direct connection to the p4(like back in the days with kessil) or enable both local and remote
The app will first setup a ghl hotspot for you (this is for direct local connection), then it will connect your p4 to your home wifi

Once you add the p4 to the app
Add p4 remot access (you will need to get the ip address that your home wifi router gave the p4, you get the address from the app itself so it was simple)
Then connect to the p4..
Done.
Here is the video that take you thru it step by step. Just follow the video exactly and it will take 10min to set up.

Word of caution. If you are buying a used p4 or doser, make sure the original owner do a factory rest before you take the device otherwise the device will be setup to operate on the original owner wifi network and for you to do factory reset you will need to connect your pc to the p4 via the USB...
At the end of this, your p4 is accessible via direct connection or remotely. All is done through the phone or tablet ghl app or a computer if you like..
 

Attachments

  • 20200813_120512.jpg
    20200813_120512.jpg
    26.1 KB · Views: 156
  • 20200813_120128.jpg
    20200813_120128.jpg
    23.7 KB · Views: 155
  • 20200813_120145.jpg
    20200813_120145.jpg
    27.8 KB · Views: 151
  • 20200813_120200.jpg
    20200813_120200.jpg
    29.7 KB · Views: 144
  • 20200813_120212.jpg
    20200813_120212.jpg
    25.9 KB · Views: 175
  • 20200813_120402.jpg
    20200813_120402.jpg
    16.9 KB · Views: 175
  • 20200813_120419.jpg
    20200813_120419.jpg
    19.3 KB · Views: 151
Last edited:
Connecting power bar to the P4:

once p4 controller is setup, you can move to connect the power bar.
use the PAB cable to connect the power bar to the p4.
"The PAB interface is like the USB interface on the apex. You can connect devices to the p4, and you can also daisy chain from one device to the next."
Every ghl product gives 2 PAB connections to expand as you please.

Once you connect the PAB. Now you want to add the device you just connected (here we are adding the power bar) to the p4.

You do this through the p4 screen or the app Itself

I did it through the p4 cause it was super simple. here are the steps.
From the screen choose systems
Select configure PAB
Select assing PAB
You will see a list or any device that is connected to the p4. In my case I have the power bar only connected.
Select the device u want to add
Done.

Now your device (here the power bar) is added and you can access it through your app

Here is the video on how to do it through the app.
Also this is the manual page for more details
 

Attachments

  • 20200813_121228.jpg
    20200813_121228.jpg
    69.7 KB · Views: 163
  • 20200813_121343.jpg
    20200813_121343.jpg
    49.1 KB · Views: 187
  • 20200813_121331.jpg
    20200813_121331.jpg
    39.5 KB · Views: 147
  • 20200813_121948.jpg
    20200813_121948.jpg
    67.3 KB · Views: 165
  • 20200813_122104.jpg
    20200813_122104.jpg
    55.6 KB · Views: 169
  • 20200813_122113.jpg
    20200813_122113.jpg
    56.3 KB · Views: 144
  • 20200813_122121.jpg
    20200813_122121.jpg
    51.6 KB · Views: 147
Last edited:
Programing P4 outlets(example1, light control):

At this point you have connected probs and the power bar.
If you go to the app you will see probs reading and have access to all functions in the p4
The calibration of each prob is easy and straight forward. You can do it from the p4 screen or from the app.
Here is the calibration steps links

Its time to program your outlets.
You can program an outlet to react based on time or based on an input( prob reading, external digital input, kh value..etc)
Here are the steps to program an outlet to turn on the light during the photo period and turn it off at night...

From the app you first want to define the time (called timers)
From menu select proccess (this is where you can define all type of processes and conditions. For now am showing how to define the photo period)

Select a timer(say timer 1)
Select switch mode to name the timer if u want
Name the timer in the description
Select schedule
Select add
Define the start and end time of the event.
(Here i want my lights on from 10am till 8pm.)
Select which days u want the timer to be active. (I want every day.)
Click save.
Your timer is done.

Now you want to assign the timer to an outlet.
Select menu
Select switch channels
Select the outlet you want(here i wanted to use outlet 6)
Add description if u like (naming the outlet)
Select timer tap, and select the timer you prepared earlier (in our case timer 1)
Done.

Now the outlet will follow the timer and turn ON 10am then OFF 8pm..


Attachments

  • 20200813_123946.jpg
    20200813_123946.jpg
    27.4 KB · Views: 149
  • 20200813_124038.jpg
    20200813_124038.jpg
    19.8 KB · Views: 142
  • 20200813_124021.jpg
    20200813_124021.jpg
    32.6 KB · Views: 167
  • 20200813_123925.jpg
    20200813_123925.jpg
    27.4 KB · Views: 139
  • 20200813_123911.jpg
    20200813_123911.jpg
    33.2 KB · Views: 159
  • 20200813_123853.jpg
    20200813_123853.jpg
    27.2 KB · Views: 155
Last edited:
Thanks for writing this up @ofzakaria
I can provide some comparison with the Pmini to try and determine the limitations the smaller unit has. I also have a stand alone doser from them which creates some interesting opportunities due to the increase I/O of the SA doser.
 
Programming p4 outlets (example 2, temperature control)

lets setup up an outlet to react based on a prob reading.
Here is an example to setup an outlet for heater or chiller

From the ghl app, select the prob you want to control based of(just click on the prob reading).
Select temp
Set the nominal temp value(this is the temp level you want your tank to be at). I have it 78F
In the hysteresis section select the deviation that you want to have(the range diffrence at which you want the heater to start working)
I have it 0.3F
This means if the temp goes below 77.7 heater will be on, and if it went above 78.3 fan will be on.
Hit save.
This defined the function and range of the prob.

you now need to assign the function to a hardware (in this example an outlet)

Select menu
Select switch channels
Select the outlet you like(I selected outlet1)
Give it a name if you like in the description
Under function select the name of the prob (in this example its called temperature 1)
Then under it select cooler or heater(in my case this is a fan outlet so I selected cooler)
Hit save.
Done

Now this outlet will turn on, when temp go above 78.3 F based on my setting earlier

Here is the link that explain the procedure
 

Attachments

  • 20200813_130508.jpg
    20200813_130508.jpg
    39.5 KB · Views: 166
  • Screenshot_20200813-125148_GHL Connect.jpg
    Screenshot_20200813-125148_GHL Connect.jpg
    26.5 KB · Views: 155
  • 20200813_130618.jpg
    20200813_130618.jpg
    29.1 KB · Views: 146
  • 20200813_123925.jpg
    20200813_123925.jpg
    27.4 KB · Views: 151
  • 20200813_130945.jpg
    20200813_130945.jpg
    33.4 KB · Views: 181
  • Screenshot_20200813-130001_GHL Connect.jpg
    Screenshot_20200813-130001_GHL Connect.jpg
    23.5 KB · Views: 155
  • 20200813_130425.jpg
    20200813_130425.jpg
    32.9 KB · Views: 160
  • 20200813_130342.jpg
    20200813_130342.jpg
    27.8 KB · Views: 158
Last edited:
With the above 2 examples you can define any function you want, then assign it to a hardware like an outlet, or to a device that is connected to the p4 like a doser, fan, chiller, tester...etc

Honestly all this setting took me 10~15min.
It was intuitive once you realize how ghl control work which is:
1- Define a function
2- Assign the function to a hardware.

Done.
 
Last edited:
Through the app you can do the control you like like manually turning on off, set feed functions, set maintenance functions where you turn off equipments during your water change as ak example..etc.
The app is intuitive and easy to use..
 
U guy let me know if you want me to add any specific example to expand on this walk through. Most examples will be the same as the 2 above examples.
If the function is based on an input, follow the temp example
If the function is based on time, follow the light example.
For ATO and leak detection everuthing is ready for you, they have the funcrioms pre defined u just enable it.
 
Thanks for writing this up @ofzakaria
I can provide some comparison with the Pmini to try and determine the limitations the smaller unit has. I also have a stand alone doser from them which creates some interesting opportunities due to the increase I/O of the SA doser.
That would be awesome actually. So this thread evolve to GHL user manual of sort..
 
GHL Illumination Control for 3rd party lights using breakout board and a dimmable power supply
Required Hardware:

  • Profilux controller (I used a Pmini but this can certainly be done using a P4)
  • GHL breakout board
  • RapidLed nano dimmable driver


For my light bar I used the 1-10v port on my pmini and the GHL breakout board. My pmini has 2 of these ports while the p4 has 3. I then connected the breakout board to the dimmable power supply I got from RapidLed. I cut the wire on the led bar to put the + and - on the dimmable power supply.

with all the hardware connected I then went to the GHL app and created an illumination profile for the lights. I messed something up so the values are inverted but here is what it looks like:
0037E1EF-D857-4E31-A10A-BB74E6A472E4.png


Then I went to the 1-10v dimmable channels and set channel 1 and 2 to be set to illumination channel 2. This makes those variable power channel change based on the lighting schedule.
F797F421-030C-4620-A818-16210F4FF771.jpeg

And just like that my aliexpress 470nm blue light bars are dimmable! I then plugged the power supplies into the power bar so I can turn them on to start ramping up and off at the end of the day.
 
Last edited:
For my light bar I used the 1-10v port on my pmini and the GHL breakout board. My pmini has 2 of these ports while the p4 has 3. I then connected the breakout board to the dimmable power supply I got from RapidLed. I cut the wire on the led bar to put the + and - on the dimmable power supply.

with all the hardware connected I then went to the GHL app and created an illumination profile for the lights. I messed something up so the values are inverted but here is what it looks like:
View attachment 18378

Then I went to the 1-10v dimmable channels and set channel 1 and 2 to be set to illumination channel 2. This makes those variable power channel change based on the lighting schedule. View attachment 18379
And just like that my aliexpress 470nm blue light bars are dimmable! I then plugged the power supplies into the power bar so I can turn them on to start ramping up and off at the end of the day.
Do me a fav when you add a post have a title on top of the post that indicate what which product it is so the reader understand the diffrent products and not confused between them..
 
Do me a fav when you add a post have a title on top of the post that indicate what which product it is so the reader understand the diffrent products and not confused between them..
Updated it. I also can go back and organize this all once we write all the info.
GHL should hire us
 
Updated it. I also can go back and organize this all once we write all the info.
GHL should hire us
Right?!!
Sponsored reviews are very biased. How can you trust a review of a free product given for review.
I hope this guide demystify the usage of GHL products. I was so suprised how easy it os to setup and use the product when I first got it 2 years ago...
 
Well there's going to be some level of bias any way you slice it. If you pay for it yourself, there often is a bias that because you paid good money for it that it must be better than it actually is, and you can very often see this when "fan boys" defend a products faults sure they may acknowledge they exist but damnit you need to be more reasonable in accepting that they work.

It's why I largely don't trust reviews/star ratings/etc anymore, people get broken down into 2 big groups 1) something went wrong and you're furious and the company must pay! or 2) It works fine, please stop bugging me for a review, ok here you go 5 stars it works fine. There very often is no middle ground. I was thinking about this the other day as I went looking for a chinese restaurant to get take out, and saw a review of one with over 6000 ratings and a 4.3... like bullshit, 6000 people did not give you a rating, and there's no way that the average rating is very good/excellent. (I didn't get food there)
 
Back
Top