Jestersix

7.5 Gallon Bookshelf Nano

SeanMc

Supporting Member
May 31, 2023

I’m back in the hobby after a 17-year hiatus. I am working with several requirements: (1) It has to be a small, tidy nano that fits in an old built-in bookshelf. (2) I hate water changes, and I’m willing to throw money at anything that will reduce them or make them less painful. My hope is that a skimmer will help. (3) I want a clean design that fits with the room (my office). (4) I’d like to try SPS.

Equipment List:
7.5 gal rimless low iron tank
Tunze 9004 DC protein skimmer
Tunze 6020 DC powerhead
Tunze 3155 auto top off
Kessil A360 WE wide angle LED
Kessil Spectral X controller
Cobalt Aquatics Neo-Therm 50w heater

About me:
I had a 12g LPS and softie tank for about 18 months in about 2006. I kept two fish and a shrimp. The tank did well. It was actually overgrown pretty quickly. Towards the end I was having other people care for it and it had an unsightly cyano outbreak, but otherwise it chugged along just fine. I moved away, sold the tank, and dreamed about setting up another one someday.

Tank:
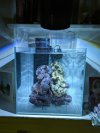
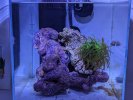
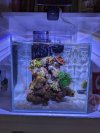
The tank itself is a low iron Mr. Aqua from BRS. It’s basically a cubic foot. It’s technically a 7.5 gal., but after live rock and all the equipment, it’s more like 5.25 gal of water volume. Small.

Lighting, Wiring, and the Tank Space:
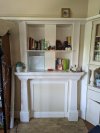
The location is a built-in bookshelf above a defunct fireplace in my apartment, a third-floor walkup in downtown Oakland. The built-in imposes several constraints. It’s small, there’s limited space above, and no space beneath it. I’ve posted pictures of my solution. For a light, I have a Kessil 360 wide angle on a gooseneck. I replaced the fan with a noctua fan. (FWIW that upgrade was a bit of a pain and required soldering that I’m not sure will last. It is much quieter but a lot of the noise comes from air being pushed out of the housing, so even a dead silent fan won’t result in a dead silent light. For me, the lower noise was still worth it.).

My partner, who is a little skeptical of this whole project, hates the mess associated with most aquariums. I wholeheartedly support this – especially since this is not my first tank and I’m at a “it goes in my house, so I want it to be nice” stage of my life.

Tank Background:
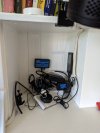
All electrical wiring runs through a single surge protector hidden behind the tank. With a 12” cubic tank, there is a 6” space behind it. I put an opaque white vinyl sheet on the tank’s rear wall so you can’t see the mess. Applying the vinyl was also a bit of a pain and I ended up doing it twice. My tips are: (1) be fanatical about cleaning the glass before you install it, because every speck of dust gets trapped and does weird things with the water and air bubbles and (2) spend the time with a new razor shaving off the edges where your hands go. I found that if there is even a little bit of overhang, it’s very very easy to catch your hand on it and peel it back. If a razor at a very flat angle can’t catch it, your wrist won’t either. The vinyl does not have a perfectly even color. Paint is probably technically the best way to do this, but it's a mess and much harder to change if you don’t like it. I’m not totally sure white is the right color considering all aquarium equipment is black, but my partner did not like the big black box in the built-in when I modeled it and I’m interested to see how we like it. So far it’s nice. Obviously, everything will be overgrown with purple coralline before too long. The little air bubble imperfections in the vinyl did not bother me – which surprised me – but if you really want an even background, vinyl may not be the solution for you.

Wiring:
I ran all the wiring through a loom for a cleaner look. I searched hard for loom that was not plastic and gross and eventually found a cotton loom. For my ATO and lighting/controller wiring, it was perfect. I used a ½” loom and it was snug. For the ATO I pushed the water tubing through first using a trick from threading car audio wiring in tight spaces (a zip tie taped the wire) because the tubing was a gummier material and did not want slide past the wire. The electrical wire is also stiffer and easier to push. The only visible wires are: (1) one for the surge protector behind the tank, (2) one for the lighting, and (3) one for the ATO. Even with the wiring behind the tank, the loom reduced the number of visible wires from 5 to 3 and gave me more control over their color and appearance. The built-in is a bright white, so I was desperate to avoid a mass of black wires. I finished the ends with white electrical tape. My partner didn’t like that look, so I finished that with a wrap of twine, which we liked better. I used a variety of 3M command strips for running string lighting that I was pretty happy with.

The wiring is all hidden behind the opaque vinyl background. That means a lot of things are essentially locked away, especially when the tank is full and heavy. There are 5 mechanical things: the powerhead, lighting, skimmer, ATO, and heater. Each wire has a loop with Velcro holding a bundle of wires. I left enough slack to pull the tank out and pull the controllers towards me. If I need to unplug the device, I can reach the DC plugs on the powerhead, skimmer, and ATO controllers. That way I don’t actually have to pull the plug out of the surge protector which is very hard to access. That may be hard to picture, but in short I want enough slack to pull the tank or piece of equipment towards me about a foot, but short enough that it fit in the nest behind the tank.

One thing I quickly learned after having the tank up for a few days was that I needed a little clip to hold the DC power plug while I did maintenance. By hanging the plug in a secure spot, I could always find it again. I dropped it a few times and because the rear of the tank is pretty inaccessible, it was a real pain to fish it out again. A small point, but a useful one, especially for trying to make maintenance as painless as possible.

Filtration:
Because I hate water changes, I got a protein skimmer. I’ve never had one before and I’m willing to accept that it’s not necessary, won’t get me out of any water changes, or is even downright harmful. I picked a Tunze 9004 dc, primarily because it is the least hideous in-tank I could find. There’s no sump or rear chamber, so it has to sit in the tank. The black monolith is fairly tidy and attractive. Tunze says it’s for 15 gal up to 80 gal. This tank is much smaller than that. It’s a bit of an experiment to over-skim like this but hopefully it will make maintenance easier and allow me to keep some SPS, which I’ve also never attempted.

Lighting:
Because of the tank’s unique location, I really wanted to use a gooseneck. Kessil LEDs seemed to be the obvious choice. I thought I would do a Kessil 80, but a good deal came up on a 360 wide angle, so I bought it and did the Noctua fan mod. Like all the other equipment on this tank, it’s overkill for a tank this small.

Bare Bottom:
I went with a bare bottom tank on the theory that it’ll be easier to clean. My last tank had sand and I thought it got kinda grubby and it kicked up a lot of sand during water changes. I used a white closed cell foam pad underneath. Again, the surface is not uniform, but I wasn’t bothered by its imperfections. The built-in is not as flat as I expected and does not sit totally flush, but with a tank this small, I don’t think it should be an issue, since it’s not a lot of force with about 5 gallons of water.

Auto-Top Off:
Because the tank is rimless and small, I wanted to use an ATO. My plan is to use a vase or other decorative vessel as the reservoir for the clean RO water. My first real question is whether a clay vase/pitcher will leach anything or otherwise not work for this purpose. I put in some distilled water in a clay vase and the TDS crept up to 14ppm over the course of a week. That seemed acceptable to me.

Any other solution has to have a mouth wide enough to fit the Tunze ATO pump (~2”). Glass defeats the point because I want to hide the pump. I don’t want to put anything on the ground, because my babies or cat will knock them over. If the vessel was sturdy enough and aesthetically nice enough, I would put one on the ground. Again, I used white cotton loom to hide the wires and tubing.

Water Changes:
I’m buying salter water from a LFS in Oakland. Mixing in my apartment seems like a real pain, so I’ve ruled it out for now. I also live on a third-floor walkup, so I don’t want to lug jugs of water any more than I have do. My hope is the skimmer will help.

Occupants:
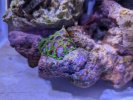
I don’t see getting any fish for a while, if ever. I don’t even know what would survive in a tank this small. I’d like a shrimp or something similar to add some life. Because the tank is so small, I’m willing to shell out for a very small number (4-6) of very nice corals.

Things I Used:
Noctua Fan for Kessil 360 12v 60mm fan

While Vinyl Background

Foam Tank Pad

Surge Protector

Techflex Cotton Sleeving 0.5" and 1"


PXL_20230531_020015931.jpg

PXL_20230531_020317056.jpg

PXL_20230531_220553822.jpg

PXL_20230531_220710443.jpg

PXL_20230531_220714531.jpg

PXL_20230531_220908422.jpg

PXL_20230601_011431609.jpg
 

Attachments

  • PXL_20230531_011610539.jpg
    PXL_20230531_011610539.jpg
    63.4 KB · Views: 72
  • PXL_20230531_220602010.jpg
    PXL_20230531_220602010.jpg
    54.8 KB · Views: 75
Last edited:
June 3, 2023

Added water and a few chunks of rock seeded with a couple pieces of live rock.

I’m very surprised by how quickly ATO water evaporates. I’m adding almost a liter/quart per day. My ~6 cup vase is slightly too small for me to leave over the weekend and not have to sweat it. It like 3 days of coverage and now I feel like 2 days at best.

PXL_20230604_022303690.jpg


PXL_20230604_022331188.jpg
 

Attachments

  • PXL_20230604_022303690.jpg
    PXL_20230604_022303690.jpg
    71.4 KB · Views: 107
  • PXL_20230604_022331188.jpg
    PXL_20230604_022331188.jpg
    67.4 KB · Views: 105
Last edited:
You could use a dosing pump with two heads to perform a constant slow drip auto water change. But, that would require another receptacle for the new and old salt water.

Doing a weekly or bi-weekly water change on such a small tank is not that difficult though. 1 gallon out, one gallon in and you’re good to go.
I like that thinking. That is definitely the dream. When I live in the right place or own a home, I will definitely be doing some version of that. I'd much rather turn a few knobs or keep a reservoir topped off than slosh buckets.

For this system, it's hard to find receptacles that are the right size. The vase I'm using is about 6 cups and it feels big for the ledge it's sitting on. I worry that even a gallon container would feel huge. I love the idea and if I can find a way to squeeze it into this space, I'd be interested in trying it. If I could remove the other side of the equation by draining dirty tank water into the plumbing that would really be worth it, because it'd both be one less thing to do and I wouldn't have to worry about it overflowing. The plumbing here is very far from the tank, unfortunately.

I have since gotten a battery operated submersible pump that has greatly reduced the pain of water changes. I can do them start to finish in five minutes, which I'm pretty happy with. It's faster than I can water my orchids, so it feels like winning. I'll post about how I put it together.

Nice build!
I would suggest a clear acrylic cover for it to reduce the need for ATO. The more you cover the top the less ATO you'll need. I think it makes a big difference.
That is definitely the correct way to reduce the need for ATO. The tradeoff, in my eyes, is it kind of muddies the clean rimless tank aesthetic. For this tank, because I'm prioritizing a clean design, I think the tradeoff weighs in favor of just staying on top of keeping the ATO reservoir full. When I go out of town (or while I spent a week in the hospital when my kids were born), I've used a gallon-sized mixing bowl. That gets me the extra volume I need at the tradeoff of an unsightly bowl. But, no one is home when I'm gone so that seems fine.
 
June 2, 2023

Update: I put the initial occupants in. A cotton candy type torch, two trochius snails, and a fire shrimp.

It’s a little nerve wracking to fork over torch money for a first coral, but it seems like they are basically hammers (I don’t remember many torches from 2005), which are hardy. I’m happy with the choice. I like the coral and its movement makes the tank immediately feel alive. I resisted a brief impulse to keep buying more, but I think if it was just the torch in the tank for several weeks or months, I’d be at peace with that.
PXL_20230620_180701612.jpg
 

Attachments

  • PXL_20230620_180701612.jpg
    PXL_20230620_180701612.jpg
    158.5 KB · Views: 85
Last edited:
June 23, 2023

The Tunze 9004 skimmer is continuing to pour large-ish bubbles out the back. My new theory is there’s a small hole in the housing where the magnet attaches. It’s supposed to click into a pair of plastic clips, but one of them was mangled. I understand the skimmer needs a few weeks to grow a film that seals the microbubbles in. However, the location at the back doesn’t make sense to me. It’s already been three weeks and the bubbles at the seam in the housing have died down somewhat but not the big bubbles in back. It’s a pain to pull the skimmer out, so I’m very reluctant to do that except as a last resort.

I put some Aquamend epoxy over the hole in the back where the magnet attaches (accessible when the cup is removed) and that helped somewhat but did not completely eliminate the big bubbles coming out the back. The microbubbles are getting better with time, but still more than I'd like.

I feel the skimming is better now that I've lowered the skimmer so that it's barely above the water line. It pulls a little waterfall through the grate and I have the air up at about the 12 o'clock position (~90% open). The skimate seems a bit on the wet side, but it still takes about a week to fill the cup.

I’m already having some doubts about the skimmer. It’s by far the most difficult piece of equipment, it’s comparatively noisy, and it’s as yet unproven how useful it is.
 
June 23, 2023 cont'd

The ATO gave me some problems. The model 3155 ATO does not have a button to temporarily turn it off. This put me in a pickle for the following reasons: (1) I can’t reach the plug, I can only unplug the whole system (i.e., lights, powerhead, etc.); (2) whenever the unit is turned on, it runs for several seconds. I think this is to prime the pump. The problem is the pump is already primed, so it just pumps in more water. In a normal tank, that’s a rounding error, but I was worried about the salinity in the small tank.

I eventually opened up the ATO box and turned off the audible alarm, which you do by moving a jumper on the circuit board. When I want to do a water change, I lift up the float sensor and put a really small fat rubber band underneath it. I used a really tight and fat rubber band from a bunch of broccoli. I don’t actually love this solution, since it’s still a little work to wiggle it onto the sensor. But, it does prevent the ATO from trying to refill the tank while I drain the dirty water out for a water change.

However, I did run into a problem with the 3155 in doing this. It seems that if you leave the float sensor up for too long, the control box will freak out and basically turn the unit off. To reset, pull the plug out of the control box and plug it back in to reboot it. For me, it’s yet another reason to be speedy about the water changes.
 
June 27, 2023

I added some more corals I got from BAR member Alexx. A slimeball anacropora, armor of god zoas, a purple and green-rimmed favia, and some orange zoas with yellow centers. We're off to the races. (I forgot to take pictures at this stage.)

I'm still having some new tank diatoms and GHA. Nothing too serious, but still not as clean as it could be.
 
July 22, 2023

Added some more corals (and took pictures this time).

Plating red montipora cap and a bubblegum montipora digitata.

I was very torn between a forest fire digi and the bubblegum. I'm not sure I made the right choice. The bubblegum definitely has a certain elegance under the full blue LEDs. But, it's not very orange under most light and it's hard to see at a distance. The forest fire digi seemed more brightly orange, which I liked, but I wasn't sure about the green base, since I want to be intentional about the green I put in the tank. Without a little restraint, my tank will be mostly neon green pieces.

The anacropora is doing well and starting to branch more thickly. The armor of god zoas have a couple new polyps. The torch is splitting into a third head.

However, the zoas with the yellow center and orange skirt aren't doing as great. One polyp dissolved and the rest don't want to open all the way. I'm not sure if this type just doesn't like to fully open or if they don't like something in my tank. Too dirty, not enough light or flow?? I'm not sure. Another polyp looks to be on its way out. They also got bumped around a few times as I had a hard time securing them to the rocks.

The GHA and diatoms still wax and wane. A few days ago, I stepped up water changes to ~20% every other day. I hope that eventually helps.

I also had to tackle the rockwork in a real way. Before, I was just trying to stack the rocks. However, things kept shifting and falling over in a way that was making me crazy. I tried Aquamend epoxy and superglue gel, but that wasn't strong enough and it took too long to cure.

Being totally new to hydraulic cements, I ended up using Nyos reef cement. It did ultimately work for me, but it was difficult to mix correctly and was pretty expensive. It sets very very quickly - within 5 minutes. That's a mixed blessing because you have to work very quickly and accurately. It worked for me because I really only needed to secure one joint, so the cost wasn't prohibitive, and the quick set made me sure I had it in the position I wanted. I would recommend this for a really important connection in a tank that's already wet and set up. It did work for me, but I wouldn't recommend it for everyone in every scenario.

I hated getting the rockwork setup. I'm very happy to be moving on from that part of the tank.

PXL_20230723_012100567.jpg
PXL_20230729_212023378.jpg
PXL_20230729_212054039.MP.jpg
 
Last edited:
Looking good! I'd say wait a bit for things to stabilize since that's a lot of corals that will be increasing your mineral consumption. How are you planning on supplementing with minimal water changes?

I think you might be ok without the skimmer too since you're running no fish and not feeding much. A bag of chemipure for a few days in between changes could help keep the water clear and reduce your evaporation compared to a skimmer.
 
July 22, 2023

Added some more corals (and took pictures this time).

Plating red montipora cap and a bubblegum montipora digitata.

I was very torn between a forest fire digi and the bubblegum. I'm not sure I made the right choice. The bubblegum definitely has a certain elegance under the full blue LEDs. But, it's not very orange under most light and it's hard to see at a distance. The forest fire digi seemed more brightly orange, which I liked, but I wasn't sure about the green base, since I want to be intentional about the green I put in the tank. Without a little restraint, my tank will be mostly neon green pieces.

The anacropora is doing well and starting to branch more thickly. The armor of god zoas have a couple new polyps. The torch is splitting into a third head.

However, the zoas with the yellow center and orange skirt aren't doing as great. One polyp dissolved and the rest don't want to open all the way. I'm not sure if this type just doesn't like to fully open or if they don't like something in my tank. Too dirty, not enough light or flow?? I'm not sure. Another polyp looks to be on its way out. They also got bumped around a few times as I had a hard time securing them to the rocks.

The GHA and diatoms still wax and wane. A few days ago, I stepped up water changes to ~20% every other day. I hope that eventually helps.

I also had to tackle the rockwork in a real way. Before, I was just trying to stack the rocks. However, things kept shifting and falling over in a way that was making me crazy. I tried Aquamend epoxy and superglue gel, but that wasn't strong enough and it took too long to cure.

Being totally new to hydraulic cements, I ended up using Nyos reef cement. It did ultimately work for me, but it was difficult to mix correctly and was pretty expensive. It sets very very quickly - within 5 minutes. That's a mixed blessing because you have to work very quickly and accurately. It worked for me because I really only needed to secure one joint, so the cost wasn't prohibitive, and the quick set made me sure I had it in the position I wanted. I would recommend this for a really important connection in a tank that's already wet and set up. It did work for me, but I wouldn't recommend it for everyone in every scenario.

I hated getting the rockwork setup. I'm very happy to be moving on from that part of the tank.
Since you went got all that rockwork solidified, you might want to think about what's going to happen when the corals grow out, particularly those zoas. If things grow successfully, they would be on the path to go all over your rockwork because it's connected. When they get to the point they're trying to walk off the plug might be time to move them or add another removeable rock they sit on. IMO putting those zoas on a little rock in the front right corner would look cool, and be a nice rule of three move.

Setup looks great though! IME tanks that size are pretty challenging, but they do look cool.
 
Looking good! I'd say wait a bit for things to stabilize since that's a lot of corals that will be increasing your mineral consumption. How are you planning on supplementing with minimal water changes?

I think you might be ok without the skimmer too since you're running no fish and not feeding much. A bag of chemipure for a few days in between changes could help keep the water clear and reduce your evaporation compared to a skimmer.
Thanks! I haven't heard of chemipure. I wonder if there's a way I could hide it somehow behind the rockwork. Clearer water and less evaporation sound like real plusses.

For supplementing, my hope was the water changes alone would add enough elements. My understanding is that insufficient trace elements don't really hurt the corals, but primarily result in slower growth - like a lower yield on a plant that isn't sufficiently fertilized. A slower growing coral would actually be desirable in a tank this small.

That said, I'm willing to be persuaded that dosing/supplementing is good or even necessary for this tank. However, because I'm after a somewhat low-touch/maintenance system, I would avoid supplementing if I can.

The water changes right now are about 100-200% per week. That's partly because I'm on parental leave now and fussing with the tank is a nice way to fill some downtime. In the future, I'd like to reduce that ~25-50% changes per week.

I was dosing live phyto (Reef Nutrition phyto feast) and I think I overdid it for a while. I was putting in 4-6 drops per night for about a week. I foolishly assumed that because I didn't see any immediate harm, that the higher phyto dosing was OK. Instead, obviously, it took a while to build visible results. I suspect that's why I'm having getting rid of the last GHA despite ~100% changes per week. Phosphates were 0.05 a few days ago.

Because of that, I plan to switch to AB+, which some local people seem to prefer over live phyto. I think I will still add phyto, just much less, like 2 drops per week or something like that.

I also feed the shrimp ~10-12 small pellets (1.2mm) nearly every night. So pellets and live phyto are the only inputs right now. FWIW despite it's beauty, I little regret getting such a reclusive tank occupant. I'd be open to suggestions on something that's a little more active - either as a co-occupant or I'd rehome the blood shrimp.

You are correct that I should let it stabilize but I'm trapped at home now and I have the bug real bad. I will try. No promises. Two weeks have gone by since that update (I've been keeping a journal, but not posting it contemporaneously).

Since you went got all that rockwork solidified, you might want to think about what's going to happen when the corals grow out, particularly those zoas. If things grow successfully, they would be on the path to go all over your rockwork because it's connected. When they get to the point they're trying to walk off the plug might be time to move them or add another removeable rock they sit on. IMO putting those zoas on a little rock in the front right corner would look cool, and be a nice rule of three move.

Setup looks great though! IME tanks that size are pretty challenging, but they do look cool.
That's a really good point. It's also one I don't have a great answer for.

The tension is I think the frag plugs are unsightly, but, as you correctly noted, I'm going to be in a pickle down the line when the zoas become established. I'm also interested in trying some colorful encrusting pieces like a chalice or monti and I'll have the same issue then.

I like the removable rock idea. On my old tank, I somehow acquired a few small shells that I encouraged the zoas to walk onto and I could then remove.

How would you acquire a small rock? I have some larger reef rocks I could smash with a hammer or drill or try to break up somehow. I'd want a rock that it still porous, like something from the ocean. Something that looks like it belongs in the tank. Also, would you epoxy or super glue it temporarily so that it stays in place? My concern is things get bumped and blown around quite a bit. I would want it to stay in place well enough to be encrusted and survive my bumbling maintenance, while still being able to pull it out with little force once the zoas have overgrown it.

Neat rule of 3s article BTW. Did you mean adding zoas to the viewer's right side or "tank-right" like a stage? Meaning underneath the torch/ in place of the favia? Or the bare part on the viewer's left side?

I'm up for the small tank challenge, partly because it's small tank or no tank right now. Hopefully, it doesn't prove too much for me.
 
I've been thinking about tank occupants, aggression, and encrusting corals.

I'm thinking of a peaceful section on the left with zoas and maybe a really nice, peaceful encrusting something. Then maybe a more aggressive section on the right either underneath the torch (which I understand is likely to win most fights) or in the rear behind the favia (which I understand is also quite aggressive and has long, mean looking sweepers at night).

There's not a lot of room left, so I'm willing to splash on something really really nice. I've never had an encrusting coral, which I'm a little interested in now. Open to suggestions. Kinda just dreaming.

PXL_20230729_212026840.MP.jpg


PXL_20230805_004221562.MP.jpg


Also, I understand that a really happy bubblegum monti will have green tips. Mine had one, but it's fading. I could increase the light intensity on the Kessil 360WE. Right now it peaks at 60% intensity. I could also increase the flow on the Tunze 6020 (a dc powerhead) from about 35% where it is now. The bubblegum monti is definitely growing, so I'm not that worried about it over all, but if I can bring back the green tip, then I'd like to.

I didn't update this, but I caught a starfish munching on my favia a couple weeks ago. I removed the offender but I was surprised that it did that. I left the other starfish in the tank.

PXL_20230805_002336886.MP.jpg
 

Attachments

  • PXL_20230729_212026840.MP.jpg
    PXL_20230729_212026840.MP.jpg
    77.8 KB · Views: 81
  • PXL_20230805_002336886.MP.jpg
    PXL_20230805_002336886.MP.jpg
    126.2 KB · Views: 88
Last edited:
Down the line you could probably just do a 1.5 gallon water change per week, that way a 5 gallon salt water jug will last you 3 weeks.

In my personal preference I’d put a nice Acan on the left arrow and a chalice on that right arrow spot. (Rainbow, Jellybean, etc). While you can always remove things down the line, I’d take your time to determine what you really want in there due to space constraints.
 
Not sure if you have any Nassarius snails? they help alot in stirring the sand bed since they chill down under it!
 
Down the line you could probably just do a 1.5 gallon water change per week, that way a 5 gallon salt water jug will last you 3 weeks.

In my personal preference I’d put a nice Acan on the left arrow and a chalice on that right arrow spot. (Rainbow, Jellybean, etc). While you can always remove things down the line, I’d take your time to determine what you really want in there due to space constraints.
This is great advice and definitely along the lines I was thinking. I appreciate the chalice recommendations. It's hard to tell which just photograph really well and which actually look cool IRL. Will happily take recommendations for other nice chalices and acans. I'm trying to be patient but I'd love to get something in at least one of those two spots in the next few weeks.

Also, has anyone used CaribSea FragZone Coral Mounts? On the one hand, it seems like a silly product, but I don't mind spending $10 if its going to be a better solution than trying to violently break apart some rocks. I'd be using it as a way to keep the spreading corals (zoas, chalice, etc.) under control.
 
Thanks! I haven't heard of chemipure. I wonder if there's a way I could hide it somehow behind the rockwork. Clearer water and less evaporation sound like real plusses.

For supplementing, my hope was the water changes alone would add enough elements. My understanding is that insufficient trace elements don't really hurt the corals, but primarily result in slower growth - like a lower yield on a plant that isn't sufficiently fertilized. A slower growing coral would actually be desirable in a tank this small.

That said, I'm willing to be persuaded that dosing/supplementing is good or even necessary for this tank. However, because I'm after a somewhat low-touch/maintenance system, I would avoid supplementing if I can.

The water changes right now are about 100-200% per week. That's partly because I'm on parental leave now and fussing with the tank is a nice way to fill some downtime. In the future, I'd like to reduce that ~25-50% changes per week.

I was dosing live phyto (Reef Nutrition phyto feast) and I think I overdid it for a while. I was putting in 4-6 drops per night for about a week. I foolishly assumed that because I didn't see any immediate harm, that the higher phyto dosing was OK. Instead, obviously, it took a while to build visible results. I suspect that's why I'm having getting rid of the last GHA despite ~100% changes per week. Phosphates were 0.05 a few days ago.

Because of that, I plan to switch to AB+, which some local people seem to prefer over live phyto. I think I will still add phyto, just much less, like 2 drops per week or something like that.

I also feed the shrimp ~10-12 small pellets (1.2mm) nearly every night. So pellets and live phyto are the only inputs right now. FWIW despite it's beauty, I little regret getting such a reclusive tank occupant. I'd be open to suggestions on something that's a little more active - either as a co-occupant or I'd rehome the blood shrimp.

You are correct that I should let it stabilize but I'm trapped at home now and I have the bug real bad. I will try. No promises. Two weeks have gone by since that update (I've been keeping a journal, but not posting it contemporaneously).


That's a really good point. It's also one I don't have a great answer for.

The tension is I think the frag plugs are unsightly, but, as you correctly noted, I'm going to be in a pickle down the line when the zoas become established. I'm also interested in trying some colorful encrusting pieces like a chalice or monti and I'll have the same issue then.

I like the removable rock idea. On my old tank, I somehow acquired a few small shells that I encouraged the zoas to walk onto and I could then remove.

How would you acquire a small rock? I have some larger reef rocks I could smash with a hammer or drill or try to break up somehow. I'd want a rock that it still porous, like something from the ocean. Something that looks like it belongs in the tank. Also, would you epoxy or super glue it temporarily so that it stays in place? My concern is things get bumped and blown around quite a bit. I would want it to stay in place well enough to be encrusted and survive my bumbling maintenance, while still being able to pull it out with little force once the zoas have overgrown it.

Neat rule of 3s article BTW. Did you mean adding zoas to the viewer's right side or "tank-right" like a stage? Meaning underneath the torch/ in place of the favia? Or the bare part on the viewer's left side?

I'm up for the small tank challenge, partly because it's small tank or no tank right now. Hopefully, it doesn't prove too much for me.
RE the 3s, I meant separate from the main rock. I think having a little rock with a little coral in the front corner (right on the picture) would be nice.

I thought the rear right (based on picture) was separate which made me think of 3s. With it currently all one rock stack it wouldn't necessarily apply.

While I'm not a fan of in tank frag racks, I think one of the magnetic rocks, stuck to the back and pointed out, might be neat. Though I'm not sure if any of those stick out very far out
 
August 15, 2023

I went on another buying spree at my LFS, High Tide Aquatics (which I really really like and will write something about soon).

Florida Ricordia peach
Acan lord red
Chalice orange
Zoanthids pink/red

PXL_20230822_165621547.jpg


PXL_20230822_160752625.MP.jpg

PXL_20230822_160658310.MP.jpg

PXL_20230816_023630590.MP.jpg

PXL_20230816_023626338.jpg

PXL_20230815_210538625.MP.jpg
PXL_20230815_210507681.MP.jpg


I'm very happy with the colors from this batch. The red acans are very bright and the chalice has a nice orange with pink highlights. High Tide had some really nice stuff and I encourage everyone to strongly consider them. My only hesitation is the zoas look great in the blue LED light but are probably the least spectacular in the white light. In a tank this small, I can't say for sure I'll keep them, but I'm enjoying them for now.

The ridcordia is a very flourescent peach color. The pictures almost capture it, but it's more striking in person. I enjoyed seeing it in person, as I don't think I would have gotten it just based on an internet picture. PS High Tide still had a few of these when I was there and they were not expensive, but I checked a couple weeks later and they were gone.

The tank seems to be humming along now. The torch is almost three heads. The favia is healed and growing. The armor of god zoas are now 5 up from 2 heads. The yellow and orange zoas are finally stabilizing. They're open more, the losses have stopped (2 heads), and a new one is forming. The anacropora is branching thickly. The monti cap is growing very quickly. The bubble gum monti is propbably the only one that there's any doubt about. There are quite a few big copepods.

PXL_20230815_210502113.MP.jpg

PXL_20230815_210559959.MP.jpg

PXL_20230822_160738408.MP.jpg


I started using AB+ (a little less than 1ml per day) and I'm adding a drop of phyto twice a week. PO4 is around 0.06-0.02. I don't test for anything else. I have a few nitrate kits in case something in the tank looks bad. I'm basically using PO4 as a proxy for "dirty" and relying on large percentage water changes. Maybe that's naive.

I'm still a little concerned about being able to prune and maintain everything long term, but that feels like a solvable problem and I have a few ideas already. I bought some FragZone rocks that unfortunately aren't going to work for me. The purple color is too different from what my rockwork looks like. If I had a sump, I'd hide them away until they were well-seasoned, but I don't, so I'm going to have to give these away to someone who can actually use them. I plant to smash up some rubble, glue it in place, and remove and replace when my encrusting corals grow too far. I figure I'll snap the plating monti by hand, bone cutters for the SPS, and try to donate everything else to someone with a bandsaw.

I got a magnetic rock from BRS. I got the Reef Rax small. It seemed to create some space where there wasn't anything I want to use it for soft corals like GSP or xenia that provide movement but otherwise grow too aggressively to put on my rockwork. My hope is with the magnetic rock, I'll be able to keep it isolated and remove it to prune it for maintenance. A very good suggestion by @richiev.

I also added a bag of Chemi-pure behind the rockwork. So far, it hasn't noticeably changed the clarity of the water. I also can't tell if it's affecting the phosphate either. I put it in near the end of my water changing campaign to stamp out the algae. The PO4 was already around 0.04. I'm a little worried it will become a detritus trap. There may also come a time when I can't access that spot because a coral's in the way. But, so far so good.

On that note, I feel like I am winning the battle against the algae. There's less of it and what remain looks anemic and thin.

The Tunze skimmer continues to pour bubbles out the back in the same place by the magnet. It otherwise seems to be working well. The skimate is tea-like and the cup collects a film within a day or two. I just scrub it with a tooth brush in the sink, which only takes a minute or two. It's still the loudest thing in the tank. So far, I'm keeping it, but whenever I take it out for a full servicing, I'll try to seal that spot more aggressively. It's also missing the bottom magnet (I didn't realize there are supposed to be two), which would maybe reduce the noise by reducing the rattle. That route is more time, money, and difficult maintenance, but if it makes it quieter I'll do it.
 
Back
Top