Part of moderating the forum, I hope I can provide some nice FAQ answers. I am no professional, but I take a lot of time researching my findings, and with a little experimenting can try to contribute as much as possible to this forum.
My first FAQ will be "How to shoot macro". I will include SLR and point and shoot information here.
[size=16pt]What is Macro?[/size]
Macro is a term used to describe "life-size magnification". When we think of micro, we think of tiny things, while macro are larger things. This is sort of counter intuitive with photography. We're taking pictures of small things with macro lenses right? So it should be called micro? Not really. What we are trying to do, is take a picture of an object, such that when it appears on our computers or film, it is exactly the same size as it is in real life. In essence we're capturing detail as if we were looking at an object with our own eyes! So pretend you put a paly frag right up to your eyeball (which is TOTALLY what you should NEVER do because they may have palytoxin, thus use a macro lens =), those with good sight still will see all the tiny details of the paly. That is 1:1 magnification from our eyes. So it's actually making the photo larger, life size, thus macro. Nikon calls macro, micro sometimes, cuz they're goofy. That's the only explanation I have for that =P Ok let's get on with it.
[size=16pt]Myths[/size]
I need a SUPER camera with SUPER lenses! It will cost me THOUSANDS! - This is totally wrong. No camera can realistically ever get perfect detail of a 1:1 magnifcation of an object. No matter how good. There are a handful of very good methods of getting macro or near macro shots for a couple hundred dollars. Then there are ways to get the best detail and the best macro with even a 4:1 magnification (more than life-size).
... more myths added soon.
[size=16pt]Equipment[/size]
Here is a very good list of techniques and equipment needed for macro. Each has it's goods and bads. The information was mostly taken from Wikipedia and other various pages, including some of my own input.
Key of Symbols
$ - how expensive, the more $$ the more expensive
# - Distortion, the more #, the more distortion
* - Collective rating for reef tank shot purposes
PS - Includes Point and Shoot cameras
SLR - Includes SLR cameras
--
[size=14pt]Macro Lenses[/size]
Cost: $$$$ - $$$$$
Distortion: #
Reef Rating: *****
Camera types: SLR
[size=12pt]Description[/size]
Using a special-purpose lens called a macro lens (some manufacturers like Nikon call it a micro), having a long barrel for close focusing. A macro lens might be optimized to provide its best performance at a magnification of 1:1. Some macro lenses, like the Canon MP-E 65 mm f/2.8, can achieve even better magnification— up to 5:1 macro, bringing the structure of small insect eyes, snowflakes, and other minuscule but detailed objects into striking focus. However, it is more common for a photographer to use a "standard" ( 1:1 ) macro lens, like the Canon EF 100mm f/2.8 Macro USM or Nikon 105mm f/2.8 1:1 Macro lens.
[size=12pt]Reef Tank Considerations[/size]
This is by far the best way to get a macro photo, and best way to get a little more magnification (short of using a microscope). The longer the focal range, the further you can be from the subject. This is GREAT for a reef tank. 105mm is doable to get closer objects at 1:1, while further subjects will still be pretty close. 150mm is really good for reef tanks, and the more rare 200+mm macro lenses are even better. These lenses have almost no distortion, have the best quality, and work right out of the box. No weird hacking needed.
[size=12pt]Summary[/size]
Description: A macro lens is made specifically for macro photography, thus is the best lens for macros, especially in reef tanks. They provide 1:1 magnification in most cases, in some digital slr's, they provide slightly more because of sensor size (see our sensor size section for more info). A canon lens actually provides 5:1 magnification (very difficult to use). From expensive to sell the house prices.
Pros:
- The least amount of distortion of all macro options
- Gives you 1:1 and in most Digital SLR gives you a bit more than 1:1
- Reef tanks you don't need to be super close to subjects
Cons:
- Cost is expensive
- All your friends will want to borrow the lens =)
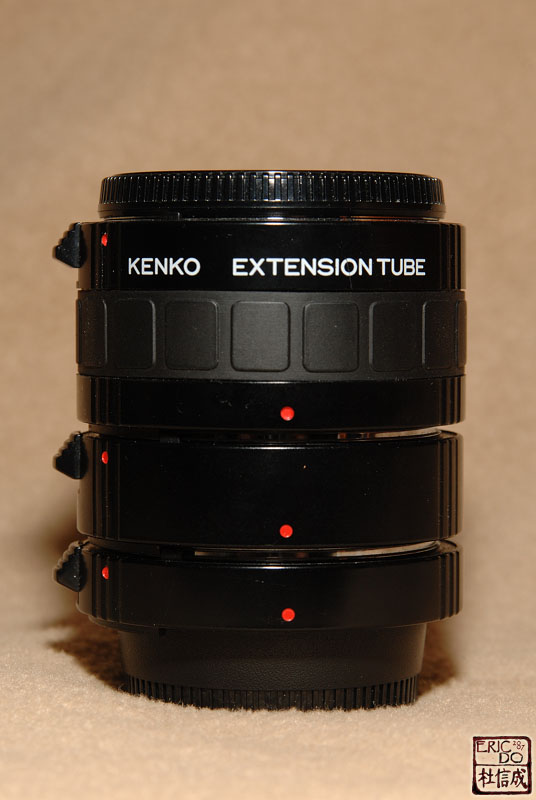
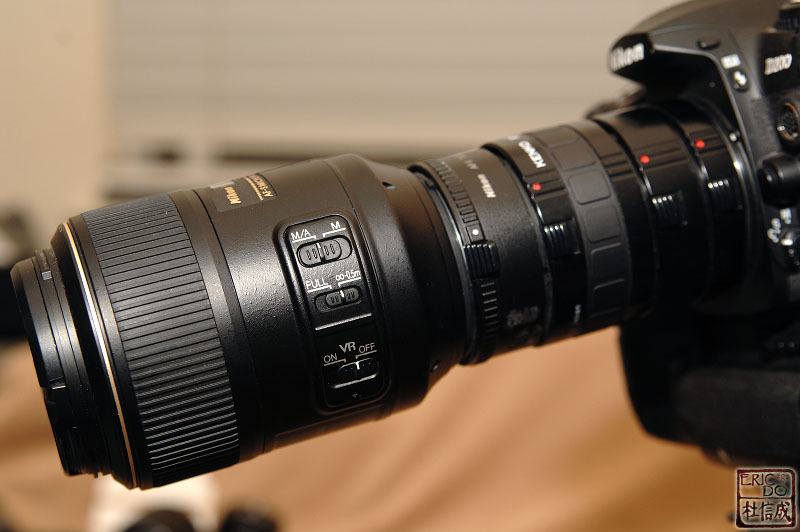
[size=14pt]Extension Tubes[/size]
Placing an extension tube between the camera body and the lens. The tube has no glass in it; its sole purpose is to move the lens farther from the film or digital sensor. The farther the lens is from the film or sensor, the closer the focusing distance (and the greater the magnification) and the darker the image. Tubes of various lengths can be stacked together, allowing for increasing levels of magnification while simultaneously decreasing working distance. With tubes attached, the camera will often lose the ability to focus to infinity.
[size=14pt]Bellows[/size]
Using a bellows attachment between the camera body and the lens to extend the lens to film plane distance. Similar to an extension tube, but adjustable.
[size=14pt]Auxiliary aka Close-Up lens aka Diopters[/size]
Cost: $
Distortion: ###
Reef Rating: **
Camera types: PS and SLR
[size=12pt]Description[/size]
Placing an auxiliary close-up lens in front of the camera's taking lens. Inexpensive screw-in or slip-on attachments provide close focusing at very low cost. The quality is variable, with some two-element versions being excellent. This method also works with cameras that have built-in lenses, which means this is a viable option for non-slr cameras. These lenses add diopters to the optical power of the lens, decreasing the minimum focusing distance, and allowing the camera to get closer to the subject.
[size=12pt]Reef Tank Considerations[/size]
This is an option that does increase magnification, but will add a bit of distortion and deprecate (which varies and might not be a problem at all) the quality of the photo. You also change the focal length such that you need to be much closer to your subject. This will be bad in cases where your subject is not right up against the glass of the tank, not allowing you to get close enough for best magnification, though distance varies depending on diopter, and may not be a problem for you at all.
[size=12pt]Summary[/size]
Description: A close-up lens (or diopter) enables the camera to focus closer than it normally can, which means you have to be closer to the object. The image will appear larger in the frame because you can get closer to it, giving you more macro. A diopter is, in fact, a magnifying glass.
Pros:
- Fairly Inexpensive compared to other options.
- Works well, can be stacked for more magnification
- Is an option for all lenses, even for ones built in on point and shoots
- You can stack them, meaning add more diopters on top of each other (always stack highest magnification closest to lens).
Cons:
- You have to be much closer to your subject which may pose a problem in a reef tank since your subjects won't be very close to the glass.
- More glass that your image needs to go through (which is added by a diopter) means quality is deprecated a bit. But this amount may be negligible.
[size=14pt]Teleconverters[/size]
Attaching a telephoto extender between the camera body and the lens. A 1.4× or 2× teleconverter gives a larger image, adding macro capabilities.As with an extension tube, less light will reach the film or sensor, and a longer exposure time will be needed. However, working distance remains the same as without the teleconverter.
[size=14pt]Smaller film / Sensor[/size]
Using a smaller film or sensor. Placing a rollfilm adaptor on a 4×5 view camera can give a macro image. Likewise, using a digital camera with a cropped sensor will yield the appearance of more magnification. Enlarging a small portion of a 35 mm negative or slide also results in a larger image. Photographers might debate whether this is true macro photography, but semantics aside, it can result in a frame-filling photograph that is as large as the original subject.
[size=14pt]Reversing a cheap non macro lens [/size]
[size=12pt]("Poor Man's Macro")[/size]
Cost: $ to $$
Distortion: ##
Reef Rating: ***
Camera types: SLR
[size=12pt]Description[/size]
Reversing the lens using a "reversing ring", which is a special adapter attaches to the filter thread on the front of a lens and makes it possible to attach the lens in backwards. Excellent quality results up to 4x lifesize magnification using fairly cheap, "standard" (not specially designed for macro) lenses can be produced.
Recommended lens would be a 50mm with as big of an aperture as possible, meaning a F/1.8 or less would be best. This is because the aperture is the size of the hole that allows light to come in from, if the hole is smaller (F/22 is a smaller hole than F/1.8) you'll get a shadow, thus a small circle of the image, while the rest is shadowed. So you'll need something with as big of an aperture as possible (as small of a F stop rating as possible). 50mm F/1.8, or 50mm F/1.4's would be the best lenses. Nikon has a 50mm F/1.8D for $100.
When you reverse the ring, usually all your automatic abilities can't be used, such as auto focus, and other electrically controlled functions. For cameras with all-electronic communications between the lens and the camera body, such as Canon EOS, reversing rings are available which allow all camera functions, including open aperture metering, to be used.
When used with extension tubes or bellows a relatively cheap but highly versatile macro system can be assembled.
[size=12pt]Reef Tank Considerations[/size]
The rear element of the lens is exposed, which means it's VERY easy to damage the glass, so bumping into your tank would definitely give some kind of damage unless it's a super small tap. With a 50mm reversed, you'll need to be about 1.5" away from the subject to get the most magnification.
[size=12pt]Summary[/size]
Description: A reversed normal lens, such as a 50mm F/1.8, is mounted backwards on a SLR body with a special adapter. This basically magnifies the object like a very high quality Diopter. The bigger the aperture rating on the lens, the better. The reverse lens acts as a powerful (about +25) and high quality diopter.
Pros:
- Fairly Inexpensive compared to other options, almost free if you already have the lens.
- A very high quality version of a diopter, but still within budget.
- You can use a lens you already have, only buying an adapter, or buy a very nice 50mm lens and use it regularly and for macros.
Cons:
- You have to be much closer to your subject which may pose a problem in a reef tank since your subjects won't be very close to the glass.
- Exposed rear element without rigging a "lens hood", making your lens very prone to permanent damage
- Vignetting, which means a shadow that appears on the edges of your lens, will be more pronounced with lenses with smaller apertures if you choose a smaller aperture lens.
[size=14pt]Macro lens + reversed lens[/size]
Reversing a lens of lesser focal length in front of a normally mounted lens using a very inexpensive "macro coupler," which uses two male filter threads to join lenses. This method allows most cameras to maintain the full function of electronic communication with the normally mounted lens for features such as open-aperture metering. Magnification ratio is calculated by dividing the focal length of the normally mounted lens by the focal length of the reversed lens (i.e., when a 50 mm lens is reverse mounted on a 200 mm lens a 4:1 magnification ratio is achieved). The use of automatic focus is not recommended due to the extra weight of the reverse-mounted lens. Attempted use of automatic focus with this technique could result in damage to the camera or lens. Working distance is significantly reduced as compared to the original lens.
[size=16pt]Technique[/size]
In this section I will be providing the most common and popular techniques that are tried and true. I will only give you the best ways (which is not necessarily the most expensive) to go about your macro shots, rather than alternatives that will "work" but are really unnecessary given the right knowledge provided. Of course techniques cannot be done without equipment, so understand that reading this section won't necessarily allow you to go right now and take photos with what you have, but to give you guidelines on how to prep, efficiently, easily, and inexpensively (inexpensive is definitely subjective to everyone's own opinions, so I will mention how expensive they are).
[size=14pt]Setting Up for the Reef Tank[/size]
[size=12pt]Tripod[/size]
Basics
Tripods are absolutely necessary for our reef tanks if you want to do nice 1:1 or near 1:1 macro photography. Even if it might look "ok" to you, you can make it 100 times better with a tripod. Reason is, even with our 400+watt hqi systems, it's still not bright enough. Think about a long pole that you're holding at one end. If the subject you're taking a photo of is at the end of the pole, and the pole is your lens, think about your movements. Any tiny movement at your end, will be multiplied by how long your pole is. In HIGH light situations like midday in your garden, your shutterspeed will be SO fast that it is fast enough such that your own movements won't affect the photo as much. So unless you're outside shooting flowers at noon on a sunny day, use a tripod for macro shots! Tripods can go for $14 at target. Prices range from $14 to over $1000, but you don't need anything over $14 unless you get real fancy.
Advanced
If you want to get fancy and take top down shots, I would recommend horizontal adapters for the nicer tripods. Some tripods allow for the center column to be mounted horizontally. This allows you to mount you camera and for it to reach out sideways, thus you can mount your camera to look straight down into the tank. Good for clam tanks, open top tanks, and tanks that aren't too wide =)
Macro focusing rails are also great equipment for going 1:1. Your focusing basically determines how 1:1 you are. So usually people set their focus at 1:1, and move the tripod around to get their subject in the perfect focus. Doing this is difficult, since at that magnification, the slightest movements are GIGANTIC. A macro focusing rain uses gears to slightly move your camera closer and further, side to side, thus giving you the most minute focusing and positioning. This is a must for people doing 1:1 focusing with very shallow DOF (which is controlled by aperture. The bigger the aperture, the shallower DOF). DOF basically says how much of the field is in focus. So the big apertures will blur everything except the point you focused on, while small will do the exact opposite. If your aperture is HUGE, then you'll need EXTREMELY fine adjustments.
[size=12pt]Camera/Lens Settings[/size]
To get the most lifesize magnification, set your lens focus to 1:1. Then move your camera / tripod around until you get the focus in the right spot on your subject. Macro focusing rails help with this.
... more additions to this soon.
[size=12pt]Positioning[/size]
Basics Always shoot FLUSH with the glass. Any angles for acrylic / glass tanks will give you more distortion. So flush meaning your lens is exactly parallel to the plane of glass/acrylic you're shooting through. Never shoot at an angle. If you're getting glare, the use of a polarizer may help, but avoid any super bright and harsh lights.
[size=12pt]Lighting and Flash[/size]
For reef tanks, don't do use a flash. It will glare off the glass/acrylic, and the surface of the water on top down. That is why you need a tripod, such that you don't need a flash to increase the lighting to increase shutter speed.
[size=12pt]White Balance[/size]
This is a HUGE subject when it comes to photos of the colors of our reefs. I will explain this more soon and how to achieve the best white balance.
TO BE CONTINUED! I will add a lot of information to this. At the moment it's a big work in progress, with a bit from wikipedia. More to come soon, I promise.
My first FAQ will be "How to shoot macro". I will include SLR and point and shoot information here.
[size=16pt]What is Macro?[/size]
Macro is a term used to describe "life-size magnification". When we think of micro, we think of tiny things, while macro are larger things. This is sort of counter intuitive with photography. We're taking pictures of small things with macro lenses right? So it should be called micro? Not really. What we are trying to do, is take a picture of an object, such that when it appears on our computers or film, it is exactly the same size as it is in real life. In essence we're capturing detail as if we were looking at an object with our own eyes! So pretend you put a paly frag right up to your eyeball (which is TOTALLY what you should NEVER do because they may have palytoxin, thus use a macro lens =), those with good sight still will see all the tiny details of the paly. That is 1:1 magnification from our eyes. So it's actually making the photo larger, life size, thus macro. Nikon calls macro, micro sometimes, cuz they're goofy. That's the only explanation I have for that =P Ok let's get on with it.
[size=16pt]Myths[/size]
I need a SUPER camera with SUPER lenses! It will cost me THOUSANDS! - This is totally wrong. No camera can realistically ever get perfect detail of a 1:1 magnifcation of an object. No matter how good. There are a handful of very good methods of getting macro or near macro shots for a couple hundred dollars. Then there are ways to get the best detail and the best macro with even a 4:1 magnification (more than life-size).
... more myths added soon.
[size=16pt]Equipment[/size]
Here is a very good list of techniques and equipment needed for macro. Each has it's goods and bads. The information was mostly taken from Wikipedia and other various pages, including some of my own input.
Key of Symbols
$ - how expensive, the more $$ the more expensive
# - Distortion, the more #, the more distortion
* - Collective rating for reef tank shot purposes
PS - Includes Point and Shoot cameras
SLR - Includes SLR cameras
--
[size=14pt]Macro Lenses[/size]
Cost: $$$$ - $$$$$
Distortion: #
Reef Rating: *****
Camera types: SLR
[size=12pt]Description[/size]
Using a special-purpose lens called a macro lens (some manufacturers like Nikon call it a micro), having a long barrel for close focusing. A macro lens might be optimized to provide its best performance at a magnification of 1:1. Some macro lenses, like the Canon MP-E 65 mm f/2.8, can achieve even better magnification— up to 5:1 macro, bringing the structure of small insect eyes, snowflakes, and other minuscule but detailed objects into striking focus. However, it is more common for a photographer to use a "standard" ( 1:1 ) macro lens, like the Canon EF 100mm f/2.8 Macro USM or Nikon 105mm f/2.8 1:1 Macro lens.
[size=12pt]Reef Tank Considerations[/size]
This is by far the best way to get a macro photo, and best way to get a little more magnification (short of using a microscope). The longer the focal range, the further you can be from the subject. This is GREAT for a reef tank. 105mm is doable to get closer objects at 1:1, while further subjects will still be pretty close. 150mm is really good for reef tanks, and the more rare 200+mm macro lenses are even better. These lenses have almost no distortion, have the best quality, and work right out of the box. No weird hacking needed.
[size=12pt]Summary[/size]
Description: A macro lens is made specifically for macro photography, thus is the best lens for macros, especially in reef tanks. They provide 1:1 magnification in most cases, in some digital slr's, they provide slightly more because of sensor size (see our sensor size section for more info). A canon lens actually provides 5:1 magnification (very difficult to use). From expensive to sell the house prices.
Pros:
- The least amount of distortion of all macro options
- Gives you 1:1 and in most Digital SLR gives you a bit more than 1:1
- Reef tanks you don't need to be super close to subjects
Cons:
- Cost is expensive
- All your friends will want to borrow the lens =)
[size=14pt]Extension Tubes[/size]
Placing an extension tube between the camera body and the lens. The tube has no glass in it; its sole purpose is to move the lens farther from the film or digital sensor. The farther the lens is from the film or sensor, the closer the focusing distance (and the greater the magnification) and the darker the image. Tubes of various lengths can be stacked together, allowing for increasing levels of magnification while simultaneously decreasing working distance. With tubes attached, the camera will often lose the ability to focus to infinity.
[size=14pt]Bellows[/size]
Using a bellows attachment between the camera body and the lens to extend the lens to film plane distance. Similar to an extension tube, but adjustable.
[size=14pt]Auxiliary aka Close-Up lens aka Diopters[/size]
Cost: $
Distortion: ###
Reef Rating: **
Camera types: PS and SLR
[size=12pt]Description[/size]
Placing an auxiliary close-up lens in front of the camera's taking lens. Inexpensive screw-in or slip-on attachments provide close focusing at very low cost. The quality is variable, with some two-element versions being excellent. This method also works with cameras that have built-in lenses, which means this is a viable option for non-slr cameras. These lenses add diopters to the optical power of the lens, decreasing the minimum focusing distance, and allowing the camera to get closer to the subject.
[size=12pt]Reef Tank Considerations[/size]
This is an option that does increase magnification, but will add a bit of distortion and deprecate (which varies and might not be a problem at all) the quality of the photo. You also change the focal length such that you need to be much closer to your subject. This will be bad in cases where your subject is not right up against the glass of the tank, not allowing you to get close enough for best magnification, though distance varies depending on diopter, and may not be a problem for you at all.
[size=12pt]Summary[/size]
Description: A close-up lens (or diopter) enables the camera to focus closer than it normally can, which means you have to be closer to the object. The image will appear larger in the frame because you can get closer to it, giving you more macro. A diopter is, in fact, a magnifying glass.
Pros:
- Fairly Inexpensive compared to other options.
- Works well, can be stacked for more magnification
- Is an option for all lenses, even for ones built in on point and shoots
- You can stack them, meaning add more diopters on top of each other (always stack highest magnification closest to lens).
Cons:
- You have to be much closer to your subject which may pose a problem in a reef tank since your subjects won't be very close to the glass.
- More glass that your image needs to go through (which is added by a diopter) means quality is deprecated a bit. But this amount may be negligible.
[size=14pt]Teleconverters[/size]
Attaching a telephoto extender between the camera body and the lens. A 1.4× or 2× teleconverter gives a larger image, adding macro capabilities.As with an extension tube, less light will reach the film or sensor, and a longer exposure time will be needed. However, working distance remains the same as without the teleconverter.
[size=14pt]Smaller film / Sensor[/size]
Using a smaller film or sensor. Placing a rollfilm adaptor on a 4×5 view camera can give a macro image. Likewise, using a digital camera with a cropped sensor will yield the appearance of more magnification. Enlarging a small portion of a 35 mm negative or slide also results in a larger image. Photographers might debate whether this is true macro photography, but semantics aside, it can result in a frame-filling photograph that is as large as the original subject.
[size=14pt]Reversing a cheap non macro lens [/size]
[size=12pt]("Poor Man's Macro")[/size]
Cost: $ to $$
Distortion: ##
Reef Rating: ***
Camera types: SLR
[size=12pt]Description[/size]
Reversing the lens using a "reversing ring", which is a special adapter attaches to the filter thread on the front of a lens and makes it possible to attach the lens in backwards. Excellent quality results up to 4x lifesize magnification using fairly cheap, "standard" (not specially designed for macro) lenses can be produced.
Recommended lens would be a 50mm with as big of an aperture as possible, meaning a F/1.8 or less would be best. This is because the aperture is the size of the hole that allows light to come in from, if the hole is smaller (F/22 is a smaller hole than F/1.8) you'll get a shadow, thus a small circle of the image, while the rest is shadowed. So you'll need something with as big of an aperture as possible (as small of a F stop rating as possible). 50mm F/1.8, or 50mm F/1.4's would be the best lenses. Nikon has a 50mm F/1.8D for $100.
When you reverse the ring, usually all your automatic abilities can't be used, such as auto focus, and other electrically controlled functions. For cameras with all-electronic communications between the lens and the camera body, such as Canon EOS, reversing rings are available which allow all camera functions, including open aperture metering, to be used.
When used with extension tubes or bellows a relatively cheap but highly versatile macro system can be assembled.
[size=12pt]Reef Tank Considerations[/size]
The rear element of the lens is exposed, which means it's VERY easy to damage the glass, so bumping into your tank would definitely give some kind of damage unless it's a super small tap. With a 50mm reversed, you'll need to be about 1.5" away from the subject to get the most magnification.
[size=12pt]Summary[/size]
Description: A reversed normal lens, such as a 50mm F/1.8, is mounted backwards on a SLR body with a special adapter. This basically magnifies the object like a very high quality Diopter. The bigger the aperture rating on the lens, the better. The reverse lens acts as a powerful (about +25) and high quality diopter.
Pros:
- Fairly Inexpensive compared to other options, almost free if you already have the lens.
- A very high quality version of a diopter, but still within budget.
- You can use a lens you already have, only buying an adapter, or buy a very nice 50mm lens and use it regularly and for macros.
Cons:
- You have to be much closer to your subject which may pose a problem in a reef tank since your subjects won't be very close to the glass.
- Exposed rear element without rigging a "lens hood", making your lens very prone to permanent damage
- Vignetting, which means a shadow that appears on the edges of your lens, will be more pronounced with lenses with smaller apertures if you choose a smaller aperture lens.
[size=14pt]Macro lens + reversed lens[/size]
Reversing a lens of lesser focal length in front of a normally mounted lens using a very inexpensive "macro coupler," which uses two male filter threads to join lenses. This method allows most cameras to maintain the full function of electronic communication with the normally mounted lens for features such as open-aperture metering. Magnification ratio is calculated by dividing the focal length of the normally mounted lens by the focal length of the reversed lens (i.e., when a 50 mm lens is reverse mounted on a 200 mm lens a 4:1 magnification ratio is achieved). The use of automatic focus is not recommended due to the extra weight of the reverse-mounted lens. Attempted use of automatic focus with this technique could result in damage to the camera or lens. Working distance is significantly reduced as compared to the original lens.
[size=16pt]Technique[/size]
In this section I will be providing the most common and popular techniques that are tried and true. I will only give you the best ways (which is not necessarily the most expensive) to go about your macro shots, rather than alternatives that will "work" but are really unnecessary given the right knowledge provided. Of course techniques cannot be done without equipment, so understand that reading this section won't necessarily allow you to go right now and take photos with what you have, but to give you guidelines on how to prep, efficiently, easily, and inexpensively (inexpensive is definitely subjective to everyone's own opinions, so I will mention how expensive they are).
[size=14pt]Setting Up for the Reef Tank[/size]
[size=12pt]Tripod[/size]
Basics
Tripods are absolutely necessary for our reef tanks if you want to do nice 1:1 or near 1:1 macro photography. Even if it might look "ok" to you, you can make it 100 times better with a tripod. Reason is, even with our 400+watt hqi systems, it's still not bright enough. Think about a long pole that you're holding at one end. If the subject you're taking a photo of is at the end of the pole, and the pole is your lens, think about your movements. Any tiny movement at your end, will be multiplied by how long your pole is. In HIGH light situations like midday in your garden, your shutterspeed will be SO fast that it is fast enough such that your own movements won't affect the photo as much. So unless you're outside shooting flowers at noon on a sunny day, use a tripod for macro shots! Tripods can go for $14 at target. Prices range from $14 to over $1000, but you don't need anything over $14 unless you get real fancy.
Advanced
If you want to get fancy and take top down shots, I would recommend horizontal adapters for the nicer tripods. Some tripods allow for the center column to be mounted horizontally. This allows you to mount you camera and for it to reach out sideways, thus you can mount your camera to look straight down into the tank. Good for clam tanks, open top tanks, and tanks that aren't too wide =)
Macro focusing rails are also great equipment for going 1:1. Your focusing basically determines how 1:1 you are. So usually people set their focus at 1:1, and move the tripod around to get their subject in the perfect focus. Doing this is difficult, since at that magnification, the slightest movements are GIGANTIC. A macro focusing rain uses gears to slightly move your camera closer and further, side to side, thus giving you the most minute focusing and positioning. This is a must for people doing 1:1 focusing with very shallow DOF (which is controlled by aperture. The bigger the aperture, the shallower DOF). DOF basically says how much of the field is in focus. So the big apertures will blur everything except the point you focused on, while small will do the exact opposite. If your aperture is HUGE, then you'll need EXTREMELY fine adjustments.
[size=12pt]Camera/Lens Settings[/size]
To get the most lifesize magnification, set your lens focus to 1:1. Then move your camera / tripod around until you get the focus in the right spot on your subject. Macro focusing rails help with this.
... more additions to this soon.
[size=12pt]Positioning[/size]
Basics Always shoot FLUSH with the glass. Any angles for acrylic / glass tanks will give you more distortion. So flush meaning your lens is exactly parallel to the plane of glass/acrylic you're shooting through. Never shoot at an angle. If you're getting glare, the use of a polarizer may help, but avoid any super bright and harsh lights.
[size=12pt]Lighting and Flash[/size]
For reef tanks, don't do use a flash. It will glare off the glass/acrylic, and the surface of the water on top down. That is why you need a tripod, such that you don't need a flash to increase the lighting to increase shutter speed.
[size=12pt]White Balance[/size]
This is a HUGE subject when it comes to photos of the colors of our reefs. I will explain this more soon and how to achieve the best white balance.
TO BE CONTINUED! I will add a lot of information to this. At the moment it's a big work in progress, with a bit from wikipedia. More to come soon, I promise.
") thanks for offering!
thanks for offering!