You are using an out of date browser. It may not display this or other websites correctly.
You should upgrade or use an alternative browser.
You should upgrade or use an alternative browser.
Gimmito's 450 gal L-shaped tank
- Thread starter gimmito
- Start date
sfsuphysics
Supporting Member
did you flatten a side of the rocks at all? I did that with a test project, that way they lie more flat against the back.. and also easy to mount.
sfboarders
Guest
gimmito said:I have a tap and die set...when you coming over to help with the aquascaping ?")
Whenever man. Can I bring my snorkeling gear?
sfsuphysics said:did you flatten a side of the rocks at all? I did that with a test project, that way they lie more flat against the back.. and also easy to mount.
Mike,
Some are flat and some have the flat side w/a side that projects (like the ones Marco Rocks sells). Got pics of that project you mentioned ?
Is that what you used Jon ? How hard is it to tap and die into acrylic ?JAR said:Titanium is better than fiberglass.
sfboarders said:gimmito said:I have a tap and die set...when you coming over to help with the aquascaping ?
Whenever man. Can I bring my snorkeling gear?
Sure thing...I think Jessie wants to get in there with his boy for a photo op also.
sfsuphysics
Supporting Member
Don't have too many detailed pictures, I started the project then stopped as it as plans changed with the anemone tank..gimmito said:sfsuphysics said:did you flatten a side of the rocks at all? I did that with a test project, that way they lie more flat against the back.. and also easy to mount.
Mike,
Some are flat and some have the flat side w/a side that projects (like the ones Marco Rocks sells). Got pics of that project you mentioned ?
Basically I sliced a bunch of older rock on the wet tile saw to give them a flat edge, drilled a few holes at odd angles into acrylic (this allows the stuff to actually grip), used hydrolic cement and smacked them into place. Now I had to wait for the cement to harden before doing the next layer, basically went like a jigsaw puzzle finding the right sized rock for the space available. Really thinking of doing this same thing for the next (ahem) tank, not sure if I have sufficient rock for that though
Anyways, here's the pics, click on thumbnails for larger versions, don't want to mess up your thread
Acrylic overflow on tank

Sliced side of a rock, Obviously I'm limited to the width of the saw blade.

The first piece to test... and yeah its on their pretty solid... removing this will be a PITA

The bottom row, things line up.. the hope is that coraline fills in the gaps

The rest of the rock, not all of it is attached, this is worse than laying tile, you need to make sure each piece fits, and that the overall look doesn't look too "faked"

You can use an angle grinder to cut the rock/flatten it; if the rock is wet much better to keep a big cloud of dust flying everywhere, of course little water helps too, just plug the grinder to a GFCI for little safety.
I've used taps on acrylic and work OK, no issues just go slow.
I've used taps on acrylic and work OK, no issues just go slow.
sfsuphysics said:Don't have too many detailed pictures, I started the project then stopped as it as plans changed with the anemone tank..gimmito said:sfsuphysics said:did you flatten a side of the rocks at all? I did that with a test project, that way they lie more flat against the back.. and also easy to mount.
Mike,
Some are flat and some have the flat side w/a side that projects (like the ones Marco Rocks sells). Got pics of that project you mentioned ?
Basically I sliced a bunch of older rock on the wet tile saw to give them a flat edge, drilled a few holes at odd angles into acrylic (this allows the stuff to actually grip), used hydrolic cement and smacked them into place. Now I had to wait for the cement to harden before doing the next layer, basically went like a jigsaw puzzle finding the right sized rock for the space available. Really thinking of doing this same thing for the next (ahem) tank, not sure if I have sufficient rock for that though.
Anyways, here's the pics, click on thumbnails for larger versions, don't want to mess up your thread
Acrylic overflow on tank
Sliced side of a rock, Obviously I'm limited to the width of the saw blade.
The first piece to test... and yeah its on their pretty solid... removing this will be a PITA
The bottom row, things line up.. the hope is that coraline fills in the gaps
The rest of the rock, not all of it is attached, this is worse than laying tile, you need to make sure each piece fits, and that the overall look doesn't look too "faked"

Very nice, sounds like we similiar ideas on the rockscaping. This part will be my toughest challenge to make it look real and not to fake.
xcaret said:You can use an angle grinder to cut the rock/flatten it; if the rock is wet much better to keep a big cloud of dust flying everywhere, of course little water helps too, just plug the grinder to a GFCI for little safety.
I've used taps on acrylic and work OK, no issues just go slow.
How about a heavy duty wet saw ?
xcaret said:** I don't think you can thread fiberglass rods, could be wrong, however, you can use PVC threaded fittings and stick the rod in the couplings with epoxy to secure it.
Another potential rockscaper.
Just kidding about the titanium.
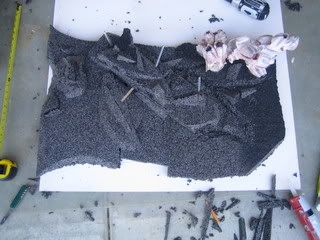
This is what I did.
I'm making a custom background for the tank out of this cool black styrofoam stuff that I got a while ago.
I wish I could find more of it. The sheet is about 1 inch thick and pretty dense. The really great thing about it is that it is permeable. Water pours right through it.
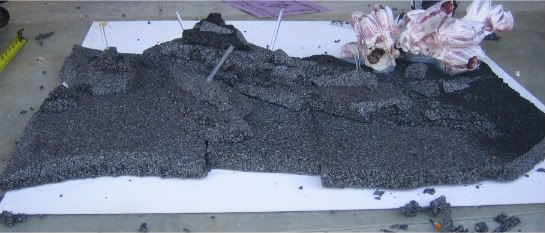 I am cutting chunks of it and gluing it together with silicone to get some different profiles. I stuck some lucite rods in it by drilling holes. Then I can hang live rock from the back of the tank!
This is what I did.
I'm making a custom background for the tank out of this cool black styrofoam stuff that I got a while ago.
I wish I could find more of it. The sheet is about 1 inch thick and pretty dense. The really great thing about it is that it is permeable. Water pours right through it.
sfsuphysics
Supporting Member
I would think you wouldn't want a permeable material, being as you don't want to get all sorts of gunk and crap stuck in it.. basically a huge sponge that you can't remove.JAR said:The sheet is about 1 inch thick and pretty dense. The really great thing about it is that it is permeable. Water pours right through
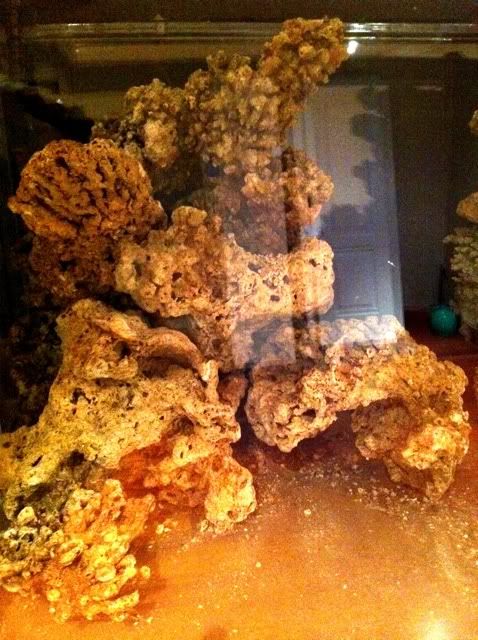
I started the rockscaping on the left side of the main display. I wanted to create alot of caves and overhangs for the fish to swim through. Let me know what you guys think. I'm probably going to have to buy some of the half cut Marco Rock to do the right side. I'm just not getting the look I want with what I have.
sfboarders
Guest
Were you able to thread the fiberglass rods? How tall is that structure?