Neptune Aquatics

Please take a look at my stand, not sure if we did it right (lots of pictures)

So my GF's dad and I built a stand this weekend. Took us a while, her dad is handy with tools and woodworking but I'm not quite sure we understood the dynamics of building an aquarium stand. I was looking through that 70+ page thread on RC about building stands and a few things made me a little un-easy.

built1.jpg

So the tank is 38.5" long x 36.5" tall x 25.5" wide. the frame was built with 2x4's

built2.jpg

The corners were notched with a jigsaw and then glued and drilled with 2 big ass screws

built3.jpg

Pic above shows screws in red

built4.jpg

Big screw was drilled out about an inch and placed on the top of that beam

This is where my concern is.
The stand was built to fit the cubby hole it is going in, not the dimensions of the tank. According to the thread on RC the 4 corners should be on the 4 vertical legs of the stand so the weight is verticle only in the legs.

built5.jpg

This picture shows without the 3/4" plywood top where the stand would be "pushing down"

built6.jpg

This is with the 3/4" plywood top installed just for reference.

built7.jpg

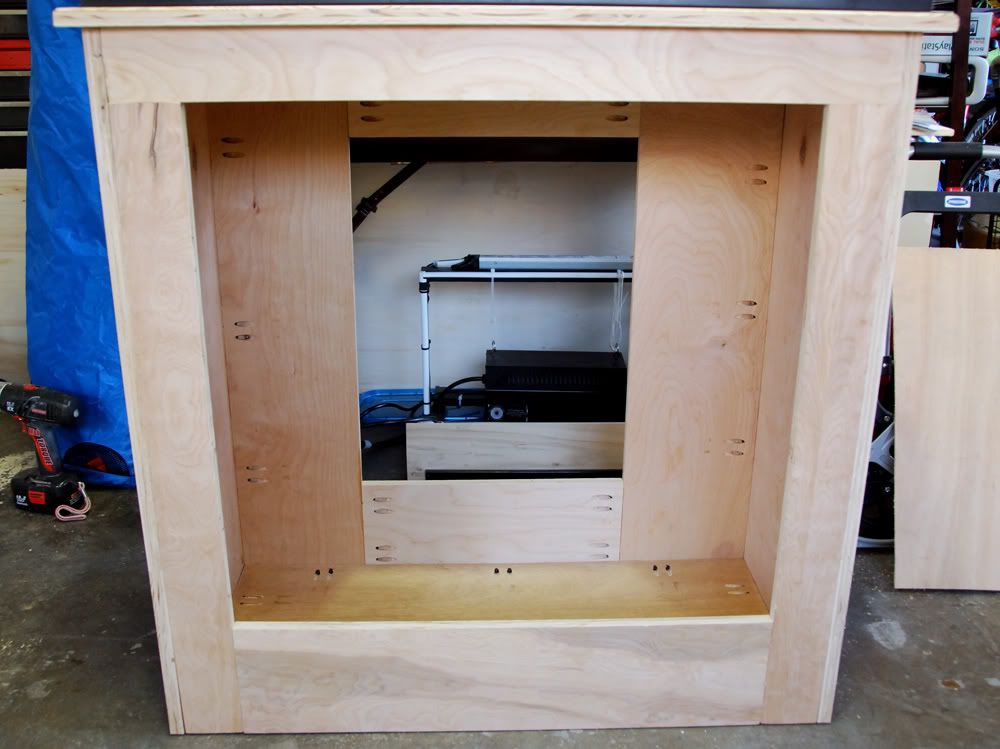
The whole stand was skinned with 1/4" plywood

built9.jpg

Looking up from inside the cabinet

built10.jpg

Installed in the cubby hole

built11.jpg

Another angle.

built12.jpg

If I were to center the tank on the stand (which I wasn't planning on doing because I wanted the Vortechs on the side) this is where the tank would sit without the top on.

built13.jpg


In your experience is this anything to be worried about? I don't think any screws are taking any shear force on them. I think the GF's dads thought when doing it this way was to more evenly distribute the weight of the tank throughout the whole stand and not the four corners.

I'm am assuming it will be ok. The 3/4" plywood on top is braced by 4 additional lateral beams. Every joint is glued nicely, for the screws we drilled pilot holes for all of them and recessed them with one of those bits, the 1/4" skin was glued and nail gunned in all over the place.

Anything to be concerned about?

Thanks much all! Hopefully this will be ok so I sand it and stain it this week.

Jay
 
One more thing to add, each of the top four corners were braced with 2 metal braces, so a total of eight braces used on each corner on the underside of the short piece of wood going width wise.

Also, now that I look through the post, I can't remember if the notches were on the inside or the outside of the tank:

built14.jpg


it's quite possible the notches are this way instead of originally shown above. If so, any more, less or equal concern?
 
Well I'm usually one for over engineering a design, and as such they don't look as "pretty" as manufactured stands.

A few concerns I would have, as you mentioned the sheering of the screws since it seems that's all that's holding up the weight of the tank. Typically you want to have the tank over the legs so all the weight going down gets distributed directly into the legs, and none of it on the screws. But.... with 3/4" plywood on top (overkill IMO :D) and the size of the tank, it most like won't be a problem.

Another issue, re: shear, is the 2x4 studs on the sides are not resting on the legs at all, only screwed in, this would probably worry me a tad more, because you only have the tank resting on the front 2x4 (not even the back), so what that means is most of the weight on the top is being distributed to the screws (via shearing stresses) then that to the legs. If it were me, and you absolutely wanted to go with this design, I would at a minimum put 2 edges of the tank (opposite ones) on beams that are resting directly on the legs, and not relying on screws.

Or at the very least, toss another 2x4 under the side beams (basically give it 3 legs on either side) you can toss them in, and they won't provide any lateral strength but they will carry the load of the side beams such that it's off the screws.
 
If it's like the last pic, I would add 4 more 2x4 to support the front and back crossbars. I would also use 1/2 or 3/4 plywood for the back. It help holding the stand together better. JMO... I like to over build thing a bit :D ..
 
Made this sketchup for ease of explaining:

colored.jpg


Mike, the 3/4" top (not installed yet) was my idea. I know it's way overkill, my thought was that it would distribute the weight evenly over the whole top of the stand.

Now that you say that about the "red" beams, that is all shear force, so a 2x4 under that attached to the other red one would lessen that force right? Or now that I type this wouldn't that just transfer the shear force to the "red" one below it, hoping the floor takes off some or most of the force? Also, the red studs are connected to the blue studs via some like 2" steel brackets (4 screws in each bracket) as well as 2 long screws and glue that go through the blue tip.

Phong, your saying to put in some 2x4's below the green studs? I could do that in the back but my plan with the front was to have it as open as possible so I could have a large working area underneath the tank. There is really nothing stopping the front crossbar from sagging too....


I'll take some pictures of it tonight when I get home. I hope to god I can make this stand work. I spent about $100 and all weekend making it.

EDIT

And thank you guys for responding!
 
Looks solid to me, most people overbuild their stands which is a major annoyance to me because I have to work on them. If you are sheeting the top with 3/4 I wouldn't worry too much about sheer as the weight will be evenly distributed.

Glue and screw ;), skin the back and sides solid and it will be like a rock.
 
In my opinion (as a contractor) you have built a very solid strong stand.
No worries! A+. I'm assuming you used waterproof glue. A- if not.
Jon
 
If it's like the colorful pic then I wouldn't worry too much. I still add a 1/2 plywood in the back for more support.
If it's like the one below, yeah add 2x4 to support the green crossbars.
http://badbread.net/mb/fishtank/built14.jpg

For $100, you could buy some 3/4" plywood and make a stand out of that.. I paid under $100 for high quality plywood for the stand below. I had plenty of extra pieces too ..
stand-2.jpg


40and12.jpg
 

Mike, the 3/4" top (not installed yet) was my idea. I know it's way overkill, my thought was that it would distribute the weight evenly over the whole top of the stand.

Well the main reason I say it's overkill is if you have to buy a full 4x8 sheet, it'd suck if you use only a quarter of that :D If you go that route I'd say go for 1/4" or even thinner and simply stack it to get the thickness, but that's my inherent cheapassness that makes me use everything possible with as little waste as possible. :)

Now that you say that about the "red" beams, that is all shear force, so a 2x4 under that attached to the other red one would lessen that force right?
Well a 2x4 under that in a vertical fashion (like a leg) would remove that shear force on the screws and turn it into a compression force on the leg

Or now that I type this wouldn't that just transfer the shear force to the "red" one below it, hoping the floor takes off some or most of the force?

Yes the force would go from the compression of your new "leg" to the red on the bottom, but judging by your photos that's flush with the ground so it won't have any shearing


Also, the red studs are connected to the blue studs via some like 2" steel brackets (4 screws in each bracket) as well as 2 long screws and glue that go through the blue tip.

That will add more strength, but it will still result in shearing stresses along each of those contact points.

That's not to say it'll work, you have to understand when I talk about all these different forces along the screws, I'm talking about a no top option, with a 3/4" of material, you'll help distribute that load quite a bit. In fact I'm not sure what the strength of screws for sheering, I have however seen them break due to severe load (in a non-tank setting).

I also wouldn't even bother skinning the stand as Phong suggests, ordinarily I would simply to add lateral strength, however the fact that it's wedged in that cubby hole the walls will give you all the strength you want... except maybe forward... but your brackets will probably help with that.
 
Thanks for all the replies everyone, makes me feel a whole lot better about the whole thing!

As promised, pictures of the actual stand:

Caulked the inside with bathtub caulking so when there's a spill it doesn't seep under the stand.
DSCN0037.JPG


750ml wine bottle for scale
DSCN0038.JPG


Picture of the notched joints, screwed and glued heavily. You can also see the bracket on the bottom left.
DSCN0040.JPG


Cut 3/4" plywood floor caulked up
DSCN0041.JPG


Top of the stand
DSCN0042.JPG


Jeremy aka Fabio, thanks, I wanted to make it so working inside the stand was as easy as possible.

Patchin, thank you! I used google sketchup(free download), it's super easy to use and makes stuff look a lot harder to do than it really was.

Jon, thanks! I did use waterproof wood glue. It was the most expensive one at Home Depot, green label stuff, forgot the name.

Bluevoodoo, thanks!

Phong, you made that whole stand out of Plywood?

Mike, we did buy a 4' x 8' sheet, figured I could use the other half as a work bench seeing that I don't have one in the garage.
 
That looks good Jay.. Are you going to paint or stain it?

Yeah all plywood. Ian's stand is make out of plywood also. It's very strong. You see most commercial stand are make out of partial board or plywood.
 
tuberider said:
Looks solid to me, most people overbuild their stands which is a major annoyance to me because I have to work on them. If you are sheeting the top with 3/4 I wouldn't worry too much about sheer as the weight will be evenly distributed.

Glue and screw ;), skin the back and sides solid and it will be like a rock.

+1. Use plenty of screws with the ply-wood would give you plenty of lateral force re-inforcement without using too many 2x4's. Check out the commercial cabinets, that's how most of them are built.
 
One more question. What kind of paint/sealent should I use inside the stand? I've been checking HD and Lowe's for some sort of thick waterproofing paint to no avail. What I'm picturing is a thick boat type paint, like something they use on the bottom of boats.

Not only do I want it to protect from spilled water but also from the inevitible humidity inside te sump.
 
Sounds like you're looking for an epoxy type sealer, you may want to look into West Systems epoxy, you can pigment it white, blue, gray, whatever you want. Check your local West Marine, they have all kinds of stuff to seal up your wood.
 
Back
Top