AndynotDrew
Guest
Overall Budget Goal: under 250
Ongoing Costs: $113/$500
Date Tank Cycle Began: 2/20/25
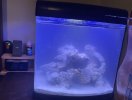
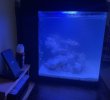
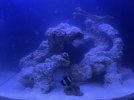
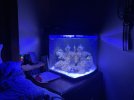
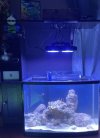
Tank: Nano Cube 24 (PIF from @ReyDeFarts )
Equipment List:
Light(s): included
Pump(s): included
Heater(s): HiTauing 200w ($28.00)
Wavemaker(s): n/a
Doser(s): n/a
Controller(s): n/a
Filtration: aio w/seeded rock & bio blocks from other tank
ATO: n/a
Sand: CaribSea ($30.00)
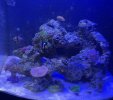
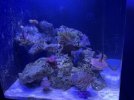
Rock: Marco (~20lb plus supplies $25.00)
Additional items: two “smart plugs” for the light and return pump ($15.00)
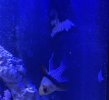
Clarkii Clown ($15.00)
Was shooting to have this running sooner but decided not to rush it. Baby number 4 slowed down the process a bit, and tightened the budget even more lol.
This all starts with a PIF nano cube I picked up from @ReyDeFarts a few months ago.
My wife actually wanted a tank in our room again, and be able to have shrimpies since they are on the puffer fish’s menu in my other tank.
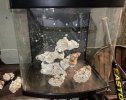
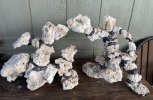
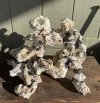
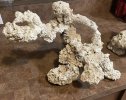
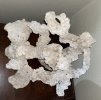
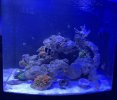
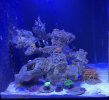
I bought about 120lb of rock for $25 a couple years ago from a guy on OfferUp so I had inventory to play with. I’ve drilled holes and used fiberglass rods for my other scapes, so I wanted to do something different. Decided to use some pond foam, then trimmed and covered the joints with rock dust. Think it worked out ok, and was budget friendly!
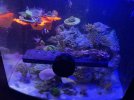
Didn’t stop to do my research and about a month ago I bought a Clarkii clown by mistake not realizing it would be funk on site with the clown in my current tank. Cheap impulse buy lead by my daughter lol. I’ve been keeping it segregated and finally threw it into this tank today along with a piece of green digi from the freebie table at the swap yesterday.
Looking forward to seeing how this progresses, and mostly being able to enjoy a tank on my nightstand every night!
Ongoing Costs: $113/$500
Date Tank Cycle Began: 2/20/25
Tank: Nano Cube 24 (PIF from @ReyDeFarts )
Equipment List:
Light(s): included
Pump(s): included
Heater(s): HiTauing 200w ($28.00)
Wavemaker(s): n/a
Doser(s): n/a
Controller(s): n/a
Filtration: aio w/seeded rock & bio blocks from other tank
ATO: n/a
Sand: CaribSea ($30.00)
Rock: Marco (~20lb plus supplies $25.00)
Additional items: two “smart plugs” for the light and return pump ($15.00)
Clarkii Clown ($15.00)
Was shooting to have this running sooner but decided not to rush it. Baby number 4 slowed down the process a bit, and tightened the budget even more lol.
This all starts with a PIF nano cube I picked up from @ReyDeFarts a few months ago.
My wife actually wanted a tank in our room again, and be able to have shrimpies since they are on the puffer fish’s menu in my other tank.
I bought about 120lb of rock for $25 a couple years ago from a guy on OfferUp so I had inventory to play with. I’ve drilled holes and used fiberglass rods for my other scapes, so I wanted to do something different. Decided to use some pond foam, then trimmed and covered the joints with rock dust. Think it worked out ok, and was budget friendly!
Didn’t stop to do my research and about a month ago I bought a Clarkii clown by mistake not realizing it would be funk on site with the clown in my current tank. Cheap impulse buy lead by my daughter lol. I’ve been keeping it segregated and finally threw it into this tank today along with a piece of green digi from the freebie table at the swap yesterday.
Looking forward to seeing how this progresses, and mostly being able to enjoy a tank on my nightstand every night!