Kessil

Richie's 30gal lagoon frag tank (Was: Richie's 15.5G Combo Tank with Up Sump: The DIY / 3d Printed Extravaganza)

richiev

Supporting Member
This is a little fun project I've been doing in my home office. It started out as a little coral quarantine tank (which I've had multiple bouts of issues with), and slowly has evolved into a project tank because I enjoy looking at it at while working.

Humble Beginnings
Initially this was just a bare bottom 10 gallon with an extra AI Prime I had, a little HOB Aquaclear with some seeded ceramic media, a Jebao powerhead (SW-20 maybe?), and an Eheim Heater. I used it to quarantine a couple frags, and some fish. To give the fish a hiding place I started with some random plastic plants in there. You also can sort of see in the back of the tank a plastic water jug I was using to culture some pods.

PXL_20220130_013106057.jpg


Frags and Robo-Tank / Reef-Pi DIY Controller

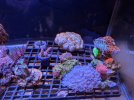
Eventually I tossed in a LifeRock and used it to hold a big mess of frags I got from @H2OPlayar. Sooo many frags:

PXL_20220206_213554576.jpg


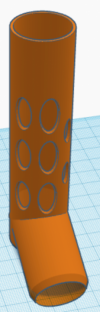
I also had 3d printed a little frag holder stand, which was a huge PITA to use. It was too flimsy, floaty, and not really useful, but I used it anyway. Most of those frags are actually doing great in my main tank now, though the green and yellow plating montis I just cannot keep happy.

PXL_20220206_230611714.jpg


Next up I made some upgrades. I swapped the underpowered, leaking water, Aquaclear HOB with a Tidal 35 I got off FB Marketplace along with 2 fish and a rose bubbletip anemone all for $20 or so.

I also finally gave in and decided to try my hand at a computer, so I bought a robo-tank setup and began playing with reef-pi. The main reason was because I always wanted to DIY a controller back in the day when I first was in the hobby. The secondary reason was I wanted to monitor the temperature with a graph, because that office gets cold at night and can get really hot during the day. The third reason was given it's so small, and was going to hold corals, I really needed an ATO. I figured all-in, the reef-pi would be not too much more expensive than alternatives, and be a fun project.

PXL_20220331_040317030.NIGHT.jpg
518q9cFLlWL._AC_SX679_.jpg


Overall I'd say reef-pi is kind of janky, but it's an interesting little hobby toy. It could be better with some changes, and hopefully I'll get some time to submit some pull requests to help.

For ATO I initially was using some a cheap $16 ITTLLAB peristaltic pump from amazon powered by the reef-pi. I have an optical sensor in the tank. When it stops detecting water the reef-pi sends power (+24v currently) to the peristaltic pump, which is pulling water from a jug. These pumps are garbage, but it does what I need. I also have a mechanical float switch which in theory is a backup to disable the pump, but recently I tested it and it's always on, so I need to replace it with another backup.

Almost Disaster
I did have an almost disaster once, where I had a lot of whitening than bleaching. Well, it turns out using an old Kh solution bottle as your top-off isn't a great idea. Not because it had anything in it, but because then it looks exactly like your Ca solution bottle. Guess which of these two bottles I was using for a week as a top-off.

269212628_520096349444851_5293543300139681895_n.jpeg


So yes, I was topping off for about a week with Ca solution. I couldn't figure out why the heck everything seemed to be crashing. That was dumb. I still am using the Kh bottle to hold RODI for top-off, but I removed the label at least.

DIY Peristaltic Pumps
Jumping ahead, I started swapping out and DIY'ing things, trying channel @thesassyindian. First off, I started upgrading the peristaltic pumps I was using for an ATO. The cheapo ones I bought were super loud and had a lot of plastic on plastic drag so they could only run at high rpms. I looked around, and it turns out Kamoer both sells fancy dosing pumps and also sells their peristaltic pump motors for $10 on amazon. I bought one of those motors, and first put one in the INTLLAB box. That worked a lot better, so I decided to buy a couple more and create some DIY peristaltic pumps.

The case is 3d printed, with this version being a design I found online. I've since switched to a v2 case I designed which looks better. The pump is the Kamoer. There's a toggle switch for turning it on/off, and a PWM voltage controller for adjusting the speed. While this could be used for dosing through the reef-pi, since I'm right now just using it for ATO. It works pretty well, but it certainly isn't all-in cheaper than just buying one, especially if you do want it to dose and therefore you need a controller. Fun project though. I learned a lot.

PXL_20220331_043032979.jpg


To Be Continued
Next time I'll write up the steps that took me to the current state, and introduce the Up Sump. Here's a WIP shot of the current state, and a little video in case anyone's interested.

PXL_20220330_204137387 (1).jpg


Also, since my kids love blooper reels, I leave you with this collection of "5.5 gallon tanks are a nightmare to drill, thank goodness for Petco 50% off sales":

PXL_20220331_040402507.jpg
 
Need More Water
I don't enjoy keeping frags in a 10G, especially a bare bottom, frag tank style tank. It's very very easy to have large parameter swings. Especially when you take 10G and subtract out space for a piece of live rock, some equipment, needing to leave room for a water line so it doesn't leak everywhere when you put your arm in, ... I have to imagine there can't be much more than 7.5G actually in that tank. I also initially didn't have any fish in there, so there were no nutrients unless I dosed something like Reef-:. My experience is dosing Reef-Roids in a 10G like this is a total disaster; way too much nutrients, even though the coral initially love it.

To balance things out a bit I eventually added a Sapphire / Springeri Damsel, both to have something adding nutrients and also to act as a potential flatworm eater. I also added a peppermint shrimp since my research also says they eat flukes / ich / the eggs (I can't find the research paper right now). Both seemingly good things to want in a coral QT tank, though certainly there's merit in having no fish at all.

However, I really wanted to add a fuge for pods and nutrient export. My first fuge was this hack:

275742189_139319521915471_1710758779290978017_n.jpeg


I just put some chaeto in a mesh bag, tossed that into the edge of my Tidal HOB, and made sure the light shone on it. That actually worked somewhat. The chaeto was growing some, but it was a total hack job, looked awful, and made it even more difficult to clean the HOB out.

I then debated just buying a different aquarium. I really went back and forth on just getting a 40 breeder, or a frag tank on CL, but I really wanted to fit everything into a 24x24 area, and didn't want to spend a ton on this.

Upgraded to a 10G rimless
I waffled for quite awhile, and then I saw Petco had their 50% off sale going on, which got me thinking. First off, I went in and bought a rimless 10G (rimless meaning no top, still a bottom frame). I think that cost me ~$20. While there I also saw 5.5G rimless tanks for less than that, so I figured why not and grabbed one of those too. I did a quick switcheroo, and I went from a 10G plain to a 10G rimless. This didn't solve any of my problems really, but I liked the look. I also slapped together a quick little riser stand for it, so it was at least elevated slightly off the desk I'm destroying with water, giving me a place to put some misc equipment.

(terrible pic below)
276306873_646553649738679_9013511440017284332_n.jpeg


Learning to Drill
I still had the water volume problem, and the 5.5 gallon tank sitting there. I started thinking through how to connect all this, and I eventually decided my ideas of using a canister filter or a series of pumps were all doomed, and I either needed to give up on this or start connecting things. I initially looked at HOB fuges and HOB overflows, but I can't believe how expensive they are and it felt silly versus just buying a second hand AIO. Eventually I decided "how hard can it be" and picked up some glass drilling equipment.

Well, the answer to "how hard can it be" is "really fricking hard" on these little tanks. I had read that was going to be the case, especially on these rimless ones, so I decided to start by drilling the 5.5G. I drilled, and drilled, and drilled and didn't get a hole. Eventually I drilled more, and got all the way to the point where water was going through and the hole was almost ready and then CRACK. Big crack along the backside to the edge. So I decided to just drill a bunch more holes to get my anger out and test it. All the other holes were totally successful. FML.

Refusing to fail, I then jumped in the car, drove 5min to Petco, and bought another 5.5G. I had just proven I can do this, so I brought that home and went to town. I used my new found knowledge to then repeat the exact same failure on that one. I couldn't believe it. I then drilled a couple more holes and again had no issue.

I swore a lot and gave up.

Days later I drove past the Petco again and said "F" and pulled in and got another one. This time I decided I was not going to take the chance trying to drill the back, and instead I drilled the bottom of the tank only, far away from the edges. I got home and drilled, drilled, drilled, and .... SUCCESS! I then showed my wife who thought I was insane.

As shown above, here's my failures:
PXL_20220331_040402507.jpg

Every bottom hole was successful, and about 50% of my back holes shattered it.

From this experience I decided there was no way I was going to try drilling the 10G, and the idea for the Up Sump solidified.

Up Sump / Up Fuge Origin
I really like drop-off style tanks, so I kept thinking about that idea. I like cubes as well, but for some reason the idea of just having a 24x24 cube by my desk seemed less appealing than something multi-level, drop-off'esque. I kept thinking of what to do, and eventually started thinking about stacking these aquariums versus putting the sump to the side. I measured out things, and it turned out with a bit of finangling I can fit a 10G and a 5.5G in the space I have, oriented so I can see them all from my desk.

Eventually for aesthetic reasons I ended up with the current setup in my head. I wanted the main tank in the front, down low, and the fuge/sump up-top. The reverse of the normal setup, which a friend of mine coined as an Up Sump. This however brings a big slew or problems, particularly with pumping the water.

I went through a variety of options, and finally decided the idea I felt the safest was to have the pump in the bottom tank, pushing water up into the top tank, and a drain going from the top back down. To get rid of the chances of floods, I first raised the pump near the top of the water line, and the return to the top, but that ended up meaning I needed the water line in both tanks to be pretty low, and was leading to a ton of noise. It also was ugly AF.

DIY Overflows
I couldn't get the pump high enough in the bottom tank without it looking ugly and taking a ton of room, nor could I get a good enough drain line in the top to avoid air getting pulled into the return line. If I just kept the water line super low, I could make it all work, but that was super ugly and killed the increase in water volume I wanted. I thought about just giving up and adding a 3rd bucket sump, but doing that right would require me drilling the 10G or adding a HOB overflow. The drilling was for sure going to lead to me breaking the tank, and the HOB overflow seems like it's asking for a flood and noise.

Eventually I started debating making overflows out of tupperware, or starting to make some Durso standpipes + low water levels + ... when I decided maybe I should go back to using my 3d printer again.

Making a longer-story short, I ended up designing some overflows. The first goes in the bottom 10G and houses the pump. I'm actually pretty stoked with how this one turned out. It perfectly fits the pump, and only uses a small amount of space in the tank. It attaches in a semi french-cleat style, where I'm using the tightness of the fit to hold everything together.

Pump overflow (hang inside overflow)
The first (left) picture is the hook that connects to the overflow, then goes over the edge of the tank and holds against the tank. When the tank is slid into that slot, it's impossible to unhook the overflow, so it's locked in place. The second is a better shot of the overflow, and you can sort of see the lip inside which the hook locks onto.

Super_Lappi___Tinkercad.png
Notification_Center.png


Doing it this way lets me avoid having a top-to-bottom overflow, which my printer wouldn't be able to do anyway (it can only do 5in tall prints). It's also better because it takes up less space, and most importantly, by having the overflow smaller it minimizes the amount of water the pump can pump if the top tank drain plugs. With this setup there's only about 2 cups of water in the overflow, so if the top drain completely plugged the bottom tank water level would drop, and the pump would get cut off from water. There's always the risk of the pump running dry, but that's a risk no matter what, and it's a 24V DC pump that'd still be in some water (since the pump line would always have some water).

Here it is printed, running, with the Jebao pump in it.

PXL_20220331_060707982.jpg


That worked really well actually, and solved the top 5.5G overflowing but I still was having problems with the return from the top to the bottom line.

Return overflow (stand pipe overflow, top tank to bottom)
Unless I kept the bottom 10G tank's water line down, I still had the chance that the 5.5G top tank was going to flood the bottom main tank. The only solution to that was lowering the water level in the top-tank to the level of the drain pipe, but that then leads to tons of air getting in the line, which is noisy plus bubbles plus ugly. I initially was thinking of doing another tupperware solution, or building a Durso standpipe, but I didn't have the parts, didn't want to keep buying PVC fittings at Ace Hardware, and generally found the idea annoying.

Eventually I decided this is trivial to solve with my same approach as the bottom tank. I just need to print another overflow.

I looked around online and couldn't find anything, so I decided to try and design it again. Eventually I came up with a pretty simple design, just going off my memory of simple standpipe overflows from back in the day. Effectively just put a cup around the return tube, with some slots/weirs notched into it. The cup lets you keep the return line far below the water surface, while minimizing the amount of water it at max could drain. The weir teeth I guess I don't really need, but it looks cooler and helps slightly with stuff possibly flowing back to the main tank.

The left is the raw tinkercad design with all the shapes + holes. The right is the combined result of it. The PVC standpipe just goes up through the center. I have it about half way through, and a strainer sitting on top of that.
3D_design_Standpipe_overflow___Tinkercad.png


Here it is printed:
PXL_20220330_202933996.jpg


For attaching the two, it's actually a very tight fit right now. However it's not fully water tight. I will admit right now, as I'm writing this, it's just friction fit. However I intend to rebuild it / pull it and do a combination of glue + silicone to hold everything together. The 3d prints themselves are fully, 100%, water tight, but the junction isn't.

That actually means between the time I post this, and later this week I will have a power outage, and slowly a trickle of water will flood the area by this aquarium. However it's effectively in my garage, so :shrug:, I'll take my chances.

And for fun, below is my current solution to keeping the chaeto in the area of the sump by the light, without needing to put a divider/screen in place. It's hard to see, but I wrapped it like a freshwater aquarium moss / riccia ball. It's wrapped with fishing line, and attached to a frag plug. I'm curious to see if strands stick as they grow out. I'm certain I'll need a different solution, but I'll deal with that at a later point, once I get it so I can adjust the pump output better to try and reintroduce a roll into it. Alternatively I'll just scrap the chaeto and do anchored sea lettuce along with the red ogo I have. it looks kinda cool though.

277188958_1489458878157101_8457875828654819521_n.jpeg


Recap and Next
With those I've solved my drainage problems. I can now raise the water line near the top of both tanks without a fear of flooding. It's also running completely silent, though this old Jebao pump has a whine. The current state of my hobbled together, would've been cheaper to just buy a used tank but less fun, setup:
  • Base is a 10G rimless Aqueon. Up Sump is a 5.5G rimless Aqueon.
  • Display light is an AI Prime I got from a friend, and fixed some water damage on. Fuge light is a 25W grow light (I'll likely replace this with something smaller).
  • ATO via the reef-pi & a semi-DIY peristaltic pump
  • Jebao DC pump harvested from a skimmer, maybe a DCS, I can't remember
  • Two overflows, designed and 3d printed myself preventing floods
  • Up Sump is on a simple stand I made out of some wood I got from Lowes' discounted pile (did you know that random wood pile with things colored purple is all significantly discounted?)
  • I have two heaters (200W total) set to ~79°F, also being monitored and controlled by the reef-pi. I had to use that many to avoid it dropping temp at night when I forget to leave the windows closed in there (it gets hot during the day if I don't). I also bought a DC fan I will use for evaporative cooling, since even last week when it got a bit warm in March the tank was nearing 81 due to the sun on that room.
    • The reef-pi has a temp probe, and I have it controlling plugs on a Kasa smart outlet. It keeps the temperature way more stable than the heater(s) alone were doing. I was surprised by that.
Up Next:
  • Make the standpipe overflow fully water tight
  • Clean up the ugly piping (that's the next 3d printing project)
  • Upload my files to thingiverse in case anyone else would find them useful
  • Possibly hang the AI Prime so that I don't have the flex mount in the way
  • Possibly replace the fuge light with something smaller, so I have less red light carrying over into the main tank. I don't want to run the fuge at night because of that.
  • Possibly setup the reef-pi and my peristaltics to act as an auto water change. Alternatively once everything is super stable I'll start dosing All-For-Reef with one of my pumps.
  • [possibly eventually, but likely not] add a second drain for redundancy. This would reduce the risk of that pump getting burnt out if the drain gets plugged, but I don't want to risk drilling that 5.5G again. I also don't think there's a high likelihood of clogging, since I only have dwarf snails in there.
 
Cleaned Up Return Lines

PXL_20220401_175713143.PORTRAIT.jpg


I cleaned up my Up Sump -> Display return line. Because it's the only line draining the sump, I didn't want to use a normal return head to lower the chance of the line getting plugged. However I also needed to control the direction and spread out the flow from it to avoid blasting the coral. I started by lining some PVC elbows up, and eventually I decided to go back to 3d printing parts and create my own return. This also worked out well because I printed it in black, making the tank look a lot cleaner.

On the left in this picture is the mount I made to hold the return pipe in place. On the right is the pipe. I put a bunch of holes in it so the water would spread out mostly in the direction of the back wall of the tank and down. It kind of looks like a hole'y inhaler
Cursor_and_3D_design_Return_Piping___Tinkercad.png
3D_design_Return_Piping___Tinkercad-2.png


This tank is doing surprisingly well now. I still need to seal up the top overflow to the pipe fully, but everything looks extremely healthy and is growing well. Even the leftover remnants of a recently fragged superman monti plug are showing visible growth. I'm super happy I went through the effort to build this stuff versus just buying it. I'm learning a lot.

Some frag shots to round this out below.

This shot includes a goniopora Gorgonian from @H2OPlayar and a frogspawn from @tankguy. The Gorgonian I've found to be really easy to keep. The frogspawn has been doing well.
PXL_20220401_180642241.jpg


This shot includes some cloves from @tankguy and a bunch of super cool looking ricordea that I'm planning to PIF/DBTC soon ( "like and subscribe for dibs" :) ).
PXL_20220401_181948638.jpg


Up Next
I still have some TODOs from above to complete. In addition to that my plans are to try and add a saltwater acclimated black molly to deal with algae, if I can get one to make it through the conversion. I'm also unsure if it'll be able to handle the flow in this tank, or if the Springeri damsel will fight it off, but I'm going to give it a try. If that fails I'll alternatively try some sort of blenny in and see if it'll eat the algae. I'm trying to avoid putting a lid on these tanks though, and not sure if blennies are jumpers.

I also need to get a new peppermint shrimp because post-conversion my top-off wasn't working and my tank spent a night blowing bubbles. The salinity didn't actually raise, but I woke up the next morning with tons of fine bubbles and a dead peppermint which I assume was because of that
 

Attachments

  • PXL_20220401_180630692.jpg
    PXL_20220401_180630692.jpg
    130 KB · Views: 90
  • 3D_design_Return_Piping___Tinkercad.png
    3D_design_Return_Piping___Tinkercad.png
    182.1 KB · Views: 100
  • 3D_design_Return_Piping___Tinkercad.png
    3D_design_Return_Piping___Tinkercad.png
    182.1 KB · Views: 93
Last edited:
So this weekend + this evening, using @Meshmez's stand and a 24x24x12 rimless tank I bought from Craigslist I tore down my frag tank and setup a simpler, AIO tank.

PXL_20221004_035550554.NIGHT.jpg


PXL_20221004_035525852.jpg
The other setup was kinda neat, and I loved the diy I did going into it, but it was also a pita. It was almost bullet proof, and had been very reliable recently, but occasionally the drain would get finicky after I'd turn the pumps off for feeding leading to the ATO running for a bit, and the water volume was really small. Worse though there just wasn't room to grow things and the water movement was poor. This new setup should be a lot more bullet proof, and honestly just looks a lot more polished.
 
Also yes, those pictures are terrible, but it's late and all the coral were pissed off from the move. I'll hopefully take a nicer one tomorrow!

Up next I'm in the midst of designing an AIO overflow box, and an in tank refugium box.

The refugium is a box shape with egg crate style bottom for water movement. The AIO overflow section will be a short/small overflow box on top, with a tube coming out the bottom. The tube will be connected to a pipe at the bottom of the tank, with outlets near the very very bottom.

The goal is to have as much of a stream as I can blowing directly along the bottom of the tank to the front, then getting blowing across the tank by a mp10 near the front, and then hopefully it'll all flow back to the overflow where I'm likely going to run some filter floss. The hope is I can reduce the amount of detritus on the bottom this time around.
 
Last edited:
Also yes, those pictures are terrible, but it's late and all the coral were pissed off from the move. I'll hopefully take a nicer one tomorrow!

Up next I'm in the midst of designing an AIO overflow box, and an in tank refugium box.

The refugium is a box shape with egg crate style bottom for water movement. The AIO overflow section will be a short/small overflow box on top, with a tube coming out the bottom. The tube will be connected to a pipe at the bottom of the tank, with outlets near the very very bottom.

The goal is to have as much of a stream as I can blowing directly along the bottom of the tank to the front, then getting blowing across the tank by a mp10 near the front, and then hopefully it'll all flow back to the overflow where I'm likely going to run some filter floss. The hope is I can reduce the amount of detritus on the bottom this time around.
Interested to see your new flow across the bottom. I am having an issue with detritus.
 
Well, this was a downer:

fragtankpi.png


Accidentally pulled the plug on my heater last night when finalizing my tank setup. There's a variety of things that look rather annoyed, but surprisingly everything seems relatively happy. Polyps extended, fishies swimming around, ...

Note to self: fix my email alerting so I catch this faster next time (I screwed up the email account credentials somehow)
 
Well, this was a downer:

View attachment 42485

Accidentally pulled the plug on my heater last night when finalizing my tank setup. There's a variety of things that look rather annoyed, but surprisingly everything seems relatively happy. Polyps extended, fishies swimming around, ...

Note to self: fix my email alerting so I catch this faster next time (I screwed up the email account credentials somehow)
Colder is always easier on the animals then over heating (greater DO potential). Most everything in your tank spent time at the temp in transit.
 
Regarding the detritus and bottom of the tank flow strategy, I'll share models and pics once I get it up and running. So far I just have ideas and a bunch more knowledge about how to use Autodesk Fusion 360, but nothing to actively show for it. If it works I'll happily share all the files, how-to, and print copies.

The quick summary though is not very sophisticated, I'll be 3d printing it, but it'd effectively be the same as having a pump attached to a pipe with holes in it:

'
Code:
        pump
        | |
=o=o=o=o===o=o=o=o

The benefit to the 3d printing is I can make it look better than just a drilled PVC, and adjust the shape / hole placement. I'm also debating if I could/should run this across more than just the back of the tank, to really cause a lot of flow along the bottom in multiple directions. I expect to power it through a small Jebao DCW pump I have.
 
Last edited:
I haven't posted an update on this tank in a long time. Through whatever combination of events, this tank is now the most successful coral tank I have ever had. Everything seems to be growing very well in it from SPS (montis, acros, torts, ...) to LPS (golden hammer, chalices, gonis, ...) and recently added a clam. The tank had issues for awhile, but since the past couple months it's been doing great. I've never had this much/fast growth of corals before.

PXL_20230828_163309498.jpg


Left to right, pics taken with a filter on the camera lens, but no other adjustments:
PXL_20230828_162532106.jpg
PXL_20230828_162543790.jpg
PXL_20230828_162551751.jpg


PXL_20230828_162602195-2.jpg


You can see one slightly bleached beach bum monti in the last pic, which has been that way since adding it. You also can see in various pics dead tissue or gaps in the sps, which was from issues a couple months back.

The clam has had full expansion ever since I got it. It seems to like being nestled up against that rock circle, and the Xenia doesn't bother it at all. That Xenia is one of my nutrient removal techniques, and I purge about half of it every couple months.

Current dosing/feeding

For pH I'm dosing Kalk, mostly at night, along with the refugium and skimmer on a night schedule. Kalk helps a ton on this small sized tank for stabilization. You can see in these pics when I've failed to refill my Kalk container and the pH drops majorly. My kalk setup is 5 gallon jugs that I mix kalk into and then dose every 5 minutes at night with a peristaltic doser.


fragtankpi.png


For other nutrients I am using All-For-Reef. I've had a lot of success with it. I don't measure the amount in ml I'm dosing, but it's 5 seconds worth 4 times a day during the day. I still don't understand how other people are blowing through AFR so fast. Maybe I should be striving for even faster growth rates, but I'm highly confident even with all this coral I'm doing < 20ml per day.

For food I am still dosing EasyReef Sps Evo. A couple ml, 4 times a day, half during lights on and half right around lights out. I also started manually dosing AB+ which I've seen great success with. I thought AB+ was likely going to be overrated, but since starting dosing it I've seen major gains. My SPS went from hardly visible polyps to constantly extended. I've also seen much much faster chalice growth rates. The is correlation not causation, but highly correlated. I'm a major AB+ and EasySPS Evo fan.

Equipment
  • MP10
  • Jebao DCP return
  • a ton of heaters since it's in an uninsulated garage (most of the heaters in the sump, one in the tank, just in case)
  • cooling via a dc fan (not quite enough for the hottest days recently)
  • diy automatic filter roller
  • a bunch of diy peristaltic dosers
  • reef-pi controller
  • a uv sterilizer that I constantly leave running. No real reason why, but I'm not changing anything given how good it's all going
  • an in-tank skimmer that I don't pay much attention to, but I like the aeration (I'm considering removing this though)

Livestock
Warning the fish list is liable to trigger some folks
  • small tomini tang
  • still relatively small biota rabbit fish (this guy is growing fast, so I'll either swap him for another or move him to the main tank)
  • an urchin (or two, I can't remember)
  • a bunch of snails
  • a bunch of corals
  • clam
  • chaeto in the fuge (would love to get some dragons breath or ogo again to use as feeding)
 
What sort of temp swings do you see in the garage? Mine is also uninsulated and gets pretty hot during the day (probably 100+) and then really cool again at night. I've wondering about the feasibility of running a small tank out there but not sure how effective fans are at cooling...no experience.
 
I have a crap ton of heaters in that tank, so cold isn't a problem besides my electric bill. Cooling wise, I think 5-10 degrees relative to the air temp is manageable, and at the higher end or above is ok if it's a short period.

For instance I target 78. My office gets really hot, it's normally in the mid to high 80s on the afternoon, even when it's 70s outside. At those temps the fan can basically hold it at whatever temp I target. When it gets 90+ in there I have to take more drastic measures. Even putting a bunch of giant house fans pointing at it the tank can still start climbing up and up.

My solution is I have an in room AC unit I got from a friend. For the hot days, I have it turn on and blow air at me and at the tank. The room itself doesn't really cool down, but the tank is stable because it does cool the air around it.

I think for it to be electric efficient, if the only value to the cooling is avoiding frying your tank, buying a dedicated chiller seems to be the better solution. For me the AC unit works because I also don't want to be sitting in 98° air.

Also regarding cold weather, my plan this winter is to insulate my stand and the back of my tank that should help a little bit. I've also considered putting a cover over the top, at least at night, which would be a huge electric savings.
 
Back
Top