Update Part 2
It probably would have been slightly eaiser to use the old pipes that came with the overflow.
Yet after having the plumbing guru @Srt4eric assist me (mostly me watching him work if I'm honest lmao) plumbing a few of my tanks. I decided to prove to myself that I learned something at least and go with fancier with matching pipes, and mostly all hard plumbing.


I also had to drill a few holes into the back of the stand to run the pipes through to the sump.


I decided to run dual return pumps this time around. After reading tons of posts on different fours I came to the conclusion it's better to run one return pump to each side of the tank verse trying to merge them into a single pipe running to both sides.

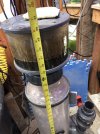
I plan to run a in line Uv on one of the pumps drawing water from the sump and returning the sterilized water back into the display through the return line on one side.


I ran out of pretty red pipe so got a temporary white one to run the plumbing to the left side of the tank, further away from the return pumps. (My current speculation is if I add a uv I would likely tap into the longer return pipe and maybe add a inline flow meter and a gate valve for fine tunning the uvs flow.)
None of the drain lines were glued.
So far I've only glued a few of the return plumbing most is only dry fit. Pending feedback and assuming I screwed something up in my amatuer 2.0 plumbing attempt that may need to be adjusted.
Still many other projects I'm needed for this tank. Yet once my plumbing is approved, I can glue the return pipes up and proceed to leak testing.
Always open to feed back or observations especially if you see a potential screw up or issue on my diy plumbing.
*** the return lines will be cut tighter to the tank stand on the bottom tried to leave extra room for the pipes going further into the fittings once glue is applied.
It probably would have been slightly eaiser to use the old pipes that came with the overflow.
Yet after having the plumbing guru @Srt4eric assist me (mostly me watching him work if I'm honest lmao) plumbing a few of my tanks. I decided to prove to myself that I learned something at least and go with fancier with matching pipes, and mostly all hard plumbing.
I also had to drill a few holes into the back of the stand to run the pipes through to the sump.
I decided to run dual return pumps this time around. After reading tons of posts on different fours I came to the conclusion it's better to run one return pump to each side of the tank verse trying to merge them into a single pipe running to both sides.
I plan to run a in line Uv on one of the pumps drawing water from the sump and returning the sterilized water back into the display through the return line on one side.
I ran out of pretty red pipe so got a temporary white one to run the plumbing to the left side of the tank, further away from the return pumps. (My current speculation is if I add a uv I would likely tap into the longer return pipe and maybe add a inline flow meter and a gate valve for fine tunning the uvs flow.)
None of the drain lines were glued.
So far I've only glued a few of the return plumbing most is only dry fit. Pending feedback and assuming I screwed something up in my amatuer 2.0 plumbing attempt that may need to be adjusted.
Still many other projects I'm needed for this tank. Yet once my plumbing is approved, I can glue the return pipes up and proceed to leak testing.
Always open to feed back or observations especially if you see a potential screw up or issue on my diy plumbing.
*** the return lines will be cut tighter to the tank stand on the bottom tried to leave extra room for the pipes going further into the fittings once glue is applied.
Last edited: