
You are using an out of date browser. It may not display this or other websites correctly.
You should upgrade or use an alternative browser.
You should upgrade or use an alternative browser.
Cilyjr's 470 gallon display
- Thread starter Cilyjr
- Start date
Sweet I made it to page 2.
Ok at this point the stand and canopy were done, at one point my wife thought it would be nice if we could repaint. My reply was it's now or never.
She wanted an accent wall behind the tank so that got a dark gray, while the rest of the room got a lighter grey, but that had to wait until everything was in the new aquarium and the trashcan reef was disassembled.
I guess I should talk a little bit more about the aquarium itself.
We had a discussion about the absolute largest we could fit in there. Initially I was thinking about 12 ft but ended up going down to 10. I was thinking about butting it directly to the two walls, one on the left hand side and then the one behind it but ultimately decided I needed a little bit of space between that left hand wall just for purposes of working in the aquarium.
I also thought I would only have one large open though in that area, and one return. The thinking was I would use the exact same drain system and return system to get from the shed back to the aquarium so I didn't have to cut any new holes ,but after talking with Joe or maybe Silas, I decided that two overflows would be better for surface skimming. Going through the wall looked like this

Shed side is this

Ok at this point the stand and canopy were done, at one point my wife thought it would be nice if we could repaint. My reply was it's now or never.
She wanted an accent wall behind the tank so that got a dark gray, while the rest of the room got a lighter grey, but that had to wait until everything was in the new aquarium and the trashcan reef was disassembled.
I guess I should talk a little bit more about the aquarium itself.
We had a discussion about the absolute largest we could fit in there. Initially I was thinking about 12 ft but ended up going down to 10. I was thinking about butting it directly to the two walls, one on the left hand side and then the one behind it but ultimately decided I needed a little bit of space between that left hand wall just for purposes of working in the aquarium.
I also thought I would only have one large open though in that area, and one return. The thinking was I would use the exact same drain system and return system to get from the shed back to the aquarium so I didn't have to cut any new holes ,but after talking with Joe or maybe Silas, I decided that two overflows would be better for surface skimming. Going through the wall looked like this
Shed side is this
Alexander1312
Supporting Member
Fascinating to see the amount of effort that you had to put into all of this, and how well planned everything was. Also, very impressed by your DIY skills.
Curious to read in your next update what happened to the fish when transferring them over. It seems like keeping animals in a temporary holding bin is a big risk in this process (there is a separate recent post on this). Your acros did not like this apparantly, which seems understandable, as they tend to need a more established tank to thrive, and you had them in there for 2+ months. Did you run carbon and/or UV in that temporary setup?
Also, I assume you do not have a crawl space or anything under the house and it sits on solid ground?
Sure, and I'll go more into this in a bit but,Fascinating to see the amount of effort that you had to put into all of this, and how well planned everything was. Also, very impressed by your DIY skills.
Curious to read in your next update what happened to the fish when transferring them over. It seems like keeping animals in a temporary holding bin is a big risk in this process (there is a separate recent post on this). Your acros did not like this apparantly, which seems understandable, as they tend to need a more established tank to thrive, and you had them in there for 2+ months. Did you run carbon and/or UV in that temporary setup?
Also, I assume you do not have a crawl space or anything under the house and it sits on solid ground?
The holding tank had all the bells and whistles of my main system, I have 1 spare apex piece of every module I use in a box. Because I'm too reliant on it at this point. So when I set up the "trashcan" reef I had an entire 2nd apex at my disposal. A buddy joked my temp system was more complicated than his regular system. The temp system was 100% of the water and rock from the 320 and I had no problems for about 3.5 weeks. And never had any problems with my smaller acro cuttings. The STN began on the larger colonies about then though. I remember telling my wife when pulling the big 16 inch plus pieces they likely would not make it, hence the cuttings.
I did not account enough for the fact that when I moved it, growth stopped. And although I went to only 2 part at a very reduced dose, What ended up happening was too many alkalinity spikes and dips.
I'm not sure about the fish which I will talk about later. But 100% of the fish were fine when they went back into the new aquarium. Those problems started about a week later. More on this later.
Ty for reading BTW
Thanks, I hope this will be a good reference point for me to remember what worked and did not and I hope it may spark an idea on others how read through it.I must say insane job on filling in the back story far beyond what I expected to see (a few more pictures)
Appreciate your over the top effort. Awesome build process.
Sure all I did was cut a 2x4 to length and screwed it in to the vertical beams. Because I was not going to put the skin along the back, I was not going to have a true torsion box without extra diagonal supports there.Can you take a pic and explain how you connected the diagonal braces in your stand? I want to add some and wasn’t sure the best way to screw them in.
There is one on the right and 2 in the back from the middle to the next row of supports
Feel free to PM me if you'd like more info. I'm happy to help if I can.
The part of The house with the aquarium sits was at one time an outdoor patio that people long before us built a room on. So it is solid concrete that it is sitting on. The downside was because it was outside slab. At one point the slope was pretty atrocious at .25 fall per foot. Great if you're a plumber, crappy if you're leveling something.Also, I assume you do not have a crawl space or anything under the house and it sits on solid ground?
HankDean V
Supporting Member
how big are those outflow pipes ?
Drains are 6x 1.5 inch and returns are 2x 3/4 pipes.how big are those outflow pipes ?
I have worked in both plumbing and HVAC. I am now at a large company where I do all of the buying. So sales reps go out of their way to give me cheap/free stuff. My joke with my wife is I never need to buy a new tee shirt or hat or hoodie so long as I'm ok with them saying, Nortiz, Navian, Trane, or the likes. Lol
For example, those inch and a half Spears gate valves cost me 36 bucks each. This has been a big help for me in my reefing that said, there is nowhere in either commercial or residential plumbing that even comes close to the weird manifolds and pipe running I have done in the reefing hobby.
Kensington Reefer
Supporting Member
Manifolds......booooo
")
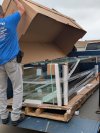
I think I am to aquarium delivery day. The manufacturer would only ship to a shipping dock, in my case FedEx. We had to have a speciality moving company come in to move the tank and although I have a super duty with a lift gate he preferred to pick up the tank in his own vehicle. Which was a pretty cool trailer that would drop to the deck on hydraulics.
Note to anyone moving a large tank, do NOT move in a simple trailer with leaf springs it MUST have an air ride suspension or you resk a disaster when hitting a bump at speed.
At no point did any of us physically lift the aquarium. We scooted it on the ground then when in the house we used a 1500 lb high lift to get it on the stand. I purposely did not put any trim on stand at this point, then we used spa gliders to slip it on the stand.
Attachments
I did a bunch of rock work assuming what would be in the display would be mostly new stuff. With a lot of the old stuff in the some and a few structures from the old aquarium in the new display. Giving me about 60/40 ratio of new to old rock. I think as far as microbiome was concerned that was good enough to keep everything going.
Of course, once I had my fish disaster I had to pull all of the rock back out to get all the fish out. Turns out it was a blessing in disguise. I'm actually much happier with the rocks now.
Here's a before fish removal fts

Of course, once I had my fish disaster I had to pull all of the rock back out to get all the fish out. Turns out it was a blessing in disguise. I'm actually much happier with the rocks now.
Here's a before fish removal fts
One thing I should have thought a little bit more about was the placement of the return lines. Because I only have room for a 75 gallon sump. It was very important to me to make sure during the power outage what siphoned off the top of the aquarium fit into the 75. My return holes were too low for that.
For this solution I opened up fusion 360 and designed a siphon break that would also raise the level of the water a little bit. Also, I had to deal with the challenge of printing it as one solid piece. I probably didn't necessarily need to do that, but sure aesthetics sake. I ended up finding a way. The trick was the pill shape of the interior.
No overhangs allowed for the printer to build without any supports on the inside.
While syphon break air inlet sits about a quarter of an inch below the water line. Now the entire system drains less into the sump during a power outage than my 320 did. That is in part due to the external overflow boxes having less volume in them than the large intake overflow that was in the 320.
Kensington Reefer
Supporting Member
Have you tested them?One thing I should have thought a little bit more about was the placement of the return lines. Because I only have room for a 75 gallon sump. It was very important to me to make sure during the power outage what siphoned off the top of the aquarium fit into the 75. My return holes were too low for that.
For this solution I opened up fusion 360 and designed a siphon break that would also raise the level of the water a little bit. Also, I had to deal with the challenge of printing it as one solid piece. I probably didn't necessarily need to do that, but sure aesthetics sake. I ended up finding a way. The trick was the pill shape of the interior.
No overhangs allowed for the printer to build without any supports on the inside.
While syphon break air inlet sits about a quarter of an inch below the water line. Now the entire system drains less into the sump during a power outage than my 320 did. That is in part due to the external overflow boxes having less volume in them than the large intake overflow that was in the 320.
View attachment 75183View attachment 75182View attachment 75181
Yes. I'm super happy with them The siphon hole is large enough that a small snail would not be able to stop it up. That said, I have some turbo snails that are the size of baseballs.Have you tested them?
Here's my Dr Seuss connection to the plumbing rough. I used a bit of spa flex to make my connections in case of a little ground shake.
Having done so much plumbing for so many years, you'll not see any unions, I see them as failure points. If I need to redo something I will just cut it and use a socket coupling.
PSA : spa flex these days comes with different ODS. Make sure you get the thickest or it will not glue into a standard PVC socket fitting.