
You are using an out of date browser. It may not display this or other websites correctly.
You should upgrade or use an alternative browser.
You should upgrade or use an alternative browser.
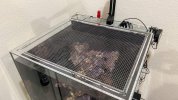
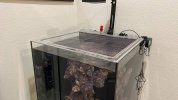
Custom lid for 40 gallons
- Thread starter Beanju
- Start date
That looks awesome. Did you use window spline to attach the netting as well?
I made one with 1/4” acrylic and it definitely warped. I anticipated it and just decided to flip it every week or two. If I was to do it again, I’d probably go with 3/8” polycarbonate. I had extra material from building a sump though so decided to use it up.I was thinking of doing this as well. How did you attach the mesh? Did you just build a channel and use a gasket?
What size acrylic? From others I've seen it seems people use 3/8th, but I don't know what's required to avoid warping and sagging.
I've made one with polycarb before - still warped unfortunately. Might be better with thicker material?I made one with 1/4” acrylic and it definitely warped. I anticipated it and just decided to flip it every week or two. If I was to do it again, I’d probably go with 3/8” polycarbonate. I had extra material from building a sump though so decided to use it up.
View attachment 34643View attachment 34644
Naive diy question, does this require a cnc or could the channels be done with a laser cutter? I may have access to a laser cutter but not a cnc.
I know laser cutters can etch, but not sure if you can control the depth of it.
Asking instead of googling because I'm not sure if the gotchas of laser cutting apply to something like this.
Also, in case anyone's ever interested, I am friends with the people who run Inventables (X-carve is their cnc, easel is their cnc design software), so I might be able to coordinate something with them. Unfortunately they're in Chicago so no easy access to their facilities.
I did mine with a router by hand. I made a full sized template out of MDF first and then just used a flush trim bit. Then used this bit to make the groove. I put the groove in the edge of the 1/4” acrylic so because the bit is 1/8” tall, there was only 1/16” of material on the top and bottom. I should also note that the bearing that the bit comes with yields a depth of 9/16”, but I swapped the bearing out with one that was only 3/8” deep.Naive diy question, does this require a cnc or could the channels be done with a laser cutter? I may have access to a laser cutter but not a cnc.
I know laser cutters can etch, but not sure if you can control the depth of it.
Asking instead of googling because I'm not sure if the gotchas of laser cutting apply to something like this.
Also, in case anyone's ever interested, I am friends with the people who run Inventables (X-carve is their cnc, easel is their cnc design software), so I might be able to coordinate something with them. Unfortunately they're in Chicago so no easy access to their facilities.
First step, have steady enough hands to build a proper template by handI did mine with a router by hand. I made a full sized template out of MDF first and then just used a flush trim bit. Then used this bit to make the groove. I put the groove in the edge of the 1/4” acrylic so because the bit is 1/8” tall, there was only 1/16” of material on the top and bottom. I should also note that the bearing that the bit comes with yields a depth of 9/16”, but I swapped the bearing out with one that was only 3/8” deep.
") . I wish I trusted myself that much.
. I wish I trusted myself that much.That would be a set of fun toys to get, but with my low freehand skills I'm guessing I just need to either order pre-made, buy a frame kit, or just wait until I have access to a cnc or depth capable laser cutter.
That's great. I tried using my router on acrylic before but i could not get a nice cut on the acrylic. The acrylic tends to melt. So, I tried it on a dremel with an acrylic bit but i did not have much success either.I did mine with a router by hand. I made a full sized template out of MDF first and then just used a flush trim bit. Then used this bit to make the groove. I put the groove in the edge of the 1/4” acrylic so because the bit is 1/8” tall, there was only 1/16” of material on the top and bottom. I should also note that the bearing that the bit comes with yields a depth of 9/16”, but I swapped the bearing out with one that was only 3/8” deep.
What kind of rpm we are looking at on these?
Perhaps my feed rate (I am doing manually) is too fast?
I don’t recall my rpm, but a faster feed rate would be better than slower for melting. Slower means more revolutions cutting less material. I think the slowest my router goes is 12,000 rpm but I usually only use that setting for my largest router bits (3-1/2” diameter).That's great. I tried using my router on acrylic before but i could not get a nice cut on the acrylic. The acrylic tends to melt. So, I tried it on a dremel with an acrylic bit but i did not have much success either.
What kind of rpm we are looking at on these?
Perhaps my feed rate (I am doing manually) is too fast?