Reef nutrition

IM 50 Christmas Special Tank

Kenzo

Supporting Member
So I've been meaning to make a tank journal for a while to document my tank's progress and hopefully provide someone else some guidance along the way if possible.

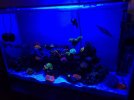
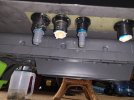
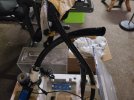
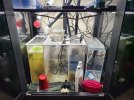
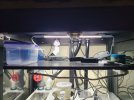
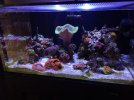
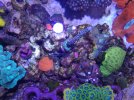
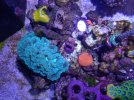
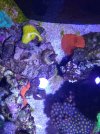
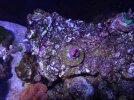
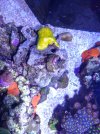
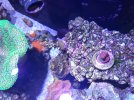
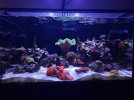
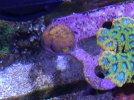
For this build, I upgraded from a standard 29G which I've had set up for almost 4-5 years, can't remember if I set it up in January of 2020 or 2021. Plenty of downs with some ups, the first 2-3 years weren't great but things stabilized over the latter 2-3. Fast forward and the tank was pretty mature at that point and served as a really helpful learning experience which I'm hoping to build off of with this new tank.

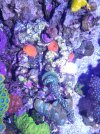
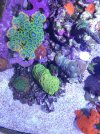
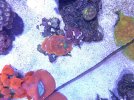
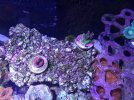
Attached are some pictures with the 29G.
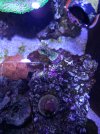
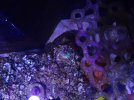
 

Attachments

  • 20230106_160042.jpg
    20230106_160042.jpg
    79.8 KB · Views: 62
For this new setup I was able to find someone who was very generously selling their IM 50 INT Lagoon for $1! A real Christmas miracle. I made my way over to him and crammed the tank, stand, sump, and various extras into my car which all barely fit.

Everything was well loved but required a bit of cleanup so I spent the next couple of weeks cleaning the tank, replumbing, and preparing the new space for the tank. Thankfully I was setting the tank up in a different space than my old one so I wasn't rushed in that sense.

Previously I had run an Aquaclear 70 on my tank and have never had a sump and never set one up. In all honesty I wasn't intimidated, but looking back I think I should have been. It was more work than I had considered and there was a lot to set up since I needed to replace basically everything that was involved with plumbing. After it was all said an done, I don't think I'd ever go without one again and I look forward to setting up my next sump. Putting all the plumbing together wasn't bad, it was gathering the correct supplies that was the tough part.
 

Attachments

  • 20241221_134153.jpg
    20241221_134153.jpg
    166.9 KB · Views: 46
  • 20241221_134157.jpg
    20241221_134157.jpg
    102.3 KB · Views: 49
  • 20241221_141352.jpg
    20241221_141352.jpg
    109.9 KB · Views: 45
  • 20241221_141412.jpg
    20241221_141412.jpg
    107.9 KB · Views: 45
  • 20241221_153405.jpg
    20241221_153405.jpg
    108 KB · Views: 43
Now that I had everything fitted and connected, time for water! One piece of advice I'd give to anyone doing this for the first time, make sure you test your overflow area is water tight first. I unfortunately filled the tank area with water before I found a leak in a couple of my bulkheads. FORTUNATELY, they just weren't tight enough and that fixed the issue. However, I had set the tank up in it's final spot up against a wall and it was a PITA to tighten these bulkheads.

This is what we have right now under the tank. The cabinet doesn't have much space and my cable management is non existent right now but I plan to fix this up when I have the time. I'm struggling to figure out where to put the power strip, any suggestions are welcome. To those of you who can hide all your cables and make nice controller boards, my hats off to you.
 

Attachments

  • 1000014077.jpg
    1000014077.jpg
    153.9 KB · Views: 38
  • 20250221_175436.jpg
    20250221_175436.jpg
    124.7 KB · Views: 36
This brings me to where the tank currently stands. Everything was pulled from my 29 and transferred over with the addition of some new rock and a few celebratory acro frags. I'm planning to shift my focus onto sps with this new build as much as I can. I've currently got 6 frags in the upper area of the tank which are not dead yet, so I'm taking that as a victory.

With this upgrade I also purchased a few Hanna checkers to help me be more aware of my tank parameters. So far they've been a game changer for testing and I wish I had them sooner.
 

Attachments

  • 20250227_160344.jpg
    20250227_160344.jpg
    153.7 KB · Views: 53
  • 20250227_155248.jpg
    20250227_155248.jpg
    107.9 KB · Views: 51
  • 20250219_162357.jpg
    20250219_162357.jpg
    133.6 KB · Views: 46
  • 20250219_162320.jpg
    20250219_162320.jpg
    173.9 KB · Views: 55
  • 20250219_162323.jpg
    20250219_162323.jpg
    183.5 KB · Views: 50
  • 20250227_155300.jpg
    20250227_155300.jpg
    114.9 KB · Views: 53
  • 20250219_162713.jpg
    20250219_162713.jpg
    196.7 KB · Views: 54
Last edited:
I'm using AFR for dosing right now, I'm happy with how it's been going although my calcium is a bit high around 530, I don't think it's much of an issue. Parameters as of my last testing around
Temp - 78
Salinity - 1.026
Alk - 8.3
Calc - 537
No3 - 1.4
PO4 - 0.03

One thing I'm really monitoring is nutrient levels. They seem in the optimal range which I think most of us shoot for, but I've had really bad experiences with them bottoming out in my last tank. So to combat this I'm trying to feed pretty heavily with LRS and ROE with benepets once a week or so.

I'm running filter socks which I think I've been swapping out too often as my levels have been slowly coming down over the last 2 months. Also currently running a nyos 120 (love it, it's been doing a great job) but I don't want to turn that off. I'll continue to monitor but I think I just need to my socks sit longer than a week. I also just became aware to apparently a lot of reefers who run no mechanical filtration. Seems crazy to me, but I'm starting to see the merit.

Equipment:
Lighting - Kessil AP9X
Flow - 2x Nero 5, 1x Nero 3
Return - tunze 1073.050
Skimmer - nyos 120
Heating - inkbird controller w/ 100W & 150W eheim Jager
Ato - Tunze osmolator
Sump - fiji cube 20
 
Last edited:
Looking great!!! What a steal for the tank and setup.
Thank you, yeah I couldn't believe it, great guy up in the north bay named Mark. Tank, stand, skimmer, return pump, bunch of filter socks and silencers, a complete CUC of trochus snails, a tuxedo urchin, and I'm not 100% but looks like a minch conch, 300W titanium heater, spears gate valve, AND the opportunity to plumb my first sump. I'm also probably forgetting some stuff.

He said if no one came and got it, he was going to just set it out on the curb for the garbage truck

Now that I list that all out again, I think I need to send him a thank you card haha. Absolutely blessed.
Yeah that is absolutely insane for such a bad ass set up.
 
Recently picked up a black leopard wrasse from AC. She's been eating everything and fits right in with the tank mates.

I also picked up a kamoer f1 dosing pump and have been having issues with it "back siphoning" (I think that's whats happening) into the dosing container. Hope to get that figured out.
 
Keep hose ends that drain the solution above the water line?
The output lines are above the waterline. The dosing liquid (AFR) is draining back into the dosing container after dosing and creating a gap of air in the input line.

I tried looking for holes or anywhere for air to leak in and can't find anything. The dosing tube is also going directly into the dosing container. Also used zip ties and still having the issue.

Image

I'm guessing what is happening to me is not "back siphoning" haha
 
Sometimes the tubing inside the motor housing (the white tubing in your picture) can get pinhole leaks which may cause the effect you are seeing. This happened to me with an Ecotech dosing pump a couple years back. I replaced the tubing which fixed the issue.

I am not sure if kamoer offers a replacement head for sale for that model. If you can't find a replacement but find yourself passing through Livermore, hit me up and I can leave a replacement head on the porch for quick easy pickup. I have one that I do not plan on using.
I appreciate the insight, that was what I was figuring the issue to be after process of elimination. The unit actually wasn't even working initially. I needed to be disassembled and massage the tubing before it would pull liquid. So it makes sense that may just be faulty overall.

Thank you for the offer, I'll reach out to kamoer and see if they can do anything about it first.
 
A FTS and some top down pictures.

I've seen the most growth in this tsa Bill Murray so far, lots of white tips popping up. All other acros have been mostly still encrusting. Pink Cady has started to color up a bit and has been coming back from being brown.

Also finally have another head forming from this CB holy grail echinata maxima I've had for almost 3 years now.
 

Attachments

  • 20250413_093537.jpg
    20250413_093537.jpg
    125.4 KB · Views: 7
  • 20250413_093522.jpg
    20250413_093522.jpg
    146.6 KB · Views: 7
  • 20250413_093506.jpg
    20250413_093506.jpg
    156.3 KB · Views: 7
  • 20250413_093437.jpg
    20250413_093437.jpg
    239.7 KB · Views: 7
  • 20250413_093422.jpg
    20250413_093422.jpg
    209.4 KB · Views: 7
  • 20250413_093417.jpg
    20250413_093417.jpg
    203.3 KB · Views: 6
  • 20250413_092441.jpg
    20250413_092441.jpg
    145.8 KB · Views: 6
  • 20250413_093651.jpg
    20250413_093651.jpg
    132.4 KB · Views: 7
Back
Top