Our mission

Chappati's 120g Tank Journal. Finally.

OK, finally time to start my tank journal. I've been a on again off again supporter of the club for years. I originally got into the hobby "way back" in 2009 and kept a sumpless 75g for a couple of years. I gave the whole setup to someone from the forum in 2011 when my wife and I got serious about looking for a house and starting a family since I just didn't have the time to devote to the hobby. I told myself that once we settled in, and our kid got a little older I'd get back into it when I could dedicate the time.

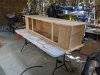
Right around three years ago an old friend of mine was getting ready to retire and wanted to travel so she decided to break down her 120g. It was an older, scratched up tank so she decided to give it away along with the original stand and equipment rather than trying to sell it. I decided I would make a project out of it and try to engineer away all of the mistakes I made with my old 75. I figured I would take my time and set it up for the long hall.

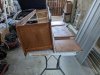
I painted the back of the tank a dark blue, drilled it for a ghost overflow along with two returns, resealed the silicone in the corners, cleaned it inside and out, and spent a week or two sanding and refinishing the outside of the stand and painting the inside with several layers of Killz. It was originally unfinished wood and was showing it's age.
IMG_20180131_145223023_HDR - Copy.jpg
IMG_20180131_145227767.jpg
IMG_20180208_100704685.jpg
IMG_20180119_133958063 - Copy.jpg

IMG_20180205_151834425.jpg


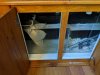
At this point I went ahead and leak tested it on my side yard for several weeks before I started thinking about the plumbing and trying to figure out what kind of sump I wanted to use. The stand it came with is pretty short, but I like it because the tank is in my home office and it puts the tank right at head level when I wheel over to in from my desk. The size of the stand makes for some interesting challenges. By the time I was feeling comfortable with the silicone job I did it was February of 2018. At that time a very nice gentleman by the name of Xcaret out in San Francisco was offering a pretty good sized acrylic tank on the "pay it forward" forum that would make a great sump. I had to cut it down a little to got it to fit and ended up with a huge 40-50 gallon sump that barely fits into the stand. Ultimately I turned that into a three section sump, one for the overflow, filter socks when I run them, and protein skimmer, another for an oversized refugium, and a third for the return/drain pumps.

With that and a bunch of plumbing bits I went to town, I setup the tank in the middle of my room, knowing I was going to empty it again before I was done, and this way I was able to get all the plumbing setup for a bean animal drain, and adjustable returns and correct all my mistakes without having to fiddle about in the few inches between the tank and the wall. I filled it up right there in the middle of the room and let it run while I figured out all the mistakes and corrected any leaks and stuff.

IMG_20180302_071806118.jpg
IMG_20180302_071817315.jpg


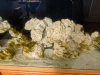
I left it running there for at least a week or two getting all the kinks out of things. I also went ahead and 3d printed a couple of return flow randomizer things I found on Thingiverse at the time:
1607909086408.jpeg


After this testing, I drained everything, cleaned it, and put the tank against the wall in it's permanent home. All I needed to do was figure out the lighting and how I was going to mix salt... Should be ready for saltwater in a couple o months?

Fast forward to September of 2020 when my now 8 year old child walks into my office and asks, "Daddy, are you ever going to put any fish in that fish tank?"
 
After staring at this empty 120 gallon tank in my office for about 2 years and receiving a bit of a hard time from my kid, I decided to get started on the "last couple of things" to get this setup.

First up, back when I was running the 75 I was living in a second floor condo and had no place to mix my own salt. Further I was too cheap (well short sited) to buy an RODI unit so I was not just hauling buckets from room to room but actually driving to my lfs and buying 5 gallon buckets of saltwater and rodi then carring them from the parking lot to my condo before changing water. You can imagine how often I did water changes. This is one of the first things I wanted to solve with this tank: Minimize the number of buckets I have to carry.

To that end I decided to setup a mixing station in my garage. Interestingly, the location where the tank sits is only about 15 feet from the garage and I have a reasonably sized crawl space so the plan was to run some 1/2" hose from the garage to the tank location. Now, I live next to open space so we get a lot of vermin. I couldn't just run the hose under the house. To protect the hose, I decided to use 2.5" PVC plumbing, also I figured this would make it easier if I ever need to replace the these hoses.

PXL_20200919_184804712.jpg
PXL_20200919_184821247.jpg
PXL_20200920_165249898.jpg
PXL_20200920_165308729.jpg


The PVC is sloped so that it will drain into the garage if there is ever a leak inside. Of course, as soon as I got into the crawl space I found that a sewer elbow holding everything that drains from the second floor master bathroom had flexed enough in the last 30 or so years of house settling to crack the elbow. Found a nice puddle of sewer water that had been collecting. Not fun to replace, but probably the best way I could've discovered it since there were no signs it caused any issues in the surrounding area yet. Never would've seen this before hacing major problems if I hadn't been down there for this project.

I finished both ends of this run with orange low voltage plate holders and drilled holes in a blank electrical cover before passing the hoses through that(someday I'll paint my garage but for now it's not a priority).:

PXL_20201214_180919944.jpg


Once that was finished, it was time to setup the mixing station.I made this out of some spare 2x4 and leftover 3/4 plywood. Basically following the old DIY tank stand plans that you'll find around reefcentral. The plan was to make water changes as simple as possible. Luckily my laundry room is between the office where the tank is and the garage, so I had easy access to a drain. I ran three 1/2 hoses between the tank and the garage:
  1. Brings fresh saltwater into the sump area
  2. Brings RODI water into the sump area
  3. Takes waste saltwater OUT of the sump area
The dirty waste saltwater hose runs straight into the drain in the laundry room along with the RODI waste line. I use two Brute trash cans to store 28 gallons each of mixed saltwater and RODI water. An old Eheim return pump as a transfer. Lastly a cheap VivoSun pump in each Brute will pump water into the sump area and another in the sump to push the waste water out.

PXL_20201014_195704432.jpg
 
I have two cats that will jump on top of just about anything, between not wanting to find the cats thrashing about when they fell inside and preferring to hide the glare of the lights a canopy was a must. I built this using 1" furring material and 1/4 plywood. All in I think I spent more on the paint and finish material than I did on components. Pretty sure you can tell, but it works for my purposes.
PXL_20201015_003453217.jpg
PXL_20201016_161305629.jpg
PXL_20201017_202926790.jpg

I originally planned on making this either hinge upward or hold in magnetically, however I found that with just the right amount of varnish the front panels stay on without needing a fastener. I like being able to remove the entire front of this and set it aside when I'm cleaning or rearranging things. My general theory in this (and most projects) is to assume no matter what, electronics are going to eventually either die or get upgraded I'd much rather have two cheap pieces of equipment on hand for easy replacement rather than a single expensive one. Further, tend to favor equipment I can take apart when / if I want to and it's always easier for me to stomach taking something apart when it's cheap.

To that end I'm using some black box lights off Ebay. I went with ones from a company called PopBloom which are dead simple, it comes as two 36" lights with a separate controller. I hung the lights inside using cables that the seller included. I drilled holes through the top of the canopy used rivets to strengthen the hole, and fed the cables through the top. This setup lets me easily adjust the height of the lights without too much trouble. I currently have the lights mounted about 14" of the water, I turned the lights on and raised them until I could just see light splashing on the back of the canopy then lowered them just a hair. So far I'm liking these lights because they are super modular, each 36" long panel has a separate power supply, but the two panels are daisy chained together and then to the controller. I opened up the controller and determined that the cable which connects all three pieces together consists of a power rail from the light panels to provide power to the controller and four 0-10v channels which control the intensity of each channel on the panels. The reason this is important to me will become relevant later when I get into setting up my controller (I'm using an excellent pseudo DIY one based on the Rasberry PI). This is all a long winded way of saying while these lights are cheap, they also suit my needs for technical reasons as well as you know, providing reasonable light.
 

Attachments

  • PXL_20201014_194239043.jpg
    PXL_20201014_194239043.jpg
    170.7 KB · Views: 157
  • PXL_20201016_161313666.jpg
    PXL_20201016_161313666.jpg
    153 KB · Views: 145
Last edited:
I picked up 130 pounds of dry rock online, broke it down into more easily managed pieces, then made some shapes I liked out of it using a combination of super glue and e-marco-400 reef cement. Using dry rock meant I could spent a few days building the structure, first taping off the front of the tank into thirds and placing a table in front of the display so I can kindof see how things would look. My aim was to give balance between as much open space for fishies to swim, hiding places for them to feel safe in, and places to grow out coral when the tank is ready. I'm not very good with visualizing things, I kindof need to build something, take it apart, and move it around until I'm happy with it. This process made that possible. In order for me to try to keep some perspective, I put a working table in front of the tank and taped off the front panel into sections:
PXL_20201003_215803863.jpg
PXL_20201003_215829792.jpg
PXL_20201004_172245409.jpg
PXL_20201004_172248337.jpg


At this point I started laying things out in sections and seeing what I did and didn't like. Another consideration I had was that I'm going with a sand bed both because I like the way it looks and also because I want to keep a couple of different types gobies that need sand. This process was slow took a lot of back and forth before I was actually happy with it.

Eventually I ended up with this for a layout:
PXL_20201004_174757014.jpg
PXL_20201004_174914611.jpg


I have a video walk around of the tank at this point as well that gives a bit of perspective on the rock work, I don't think this forum will allow them but if there is interest I'll find a way to post a link. All and all I'm pretty happy with how it turned out. There are three distinct pieces that connect reasonably well. More than enough room on all sides to clean the glass. Everything is super stable, and there should be more than enough room to both hide and swim around depending on the critter's preference. My Engineer Gobies will have several obvious choices for their caves, though I'm certain they'll choose one facing the rear of the tank.

The rock is all very well connected, before placing them in the tank I grabbed them from various angles and shook them to make sure the joints were solid and nothing was going to come apart. My only regret is that I ordered the wrong reef cement color, I accidentally ordered the pink stuff and didn't want to bother returning it and waiting for new stuff to ship. I figure it'll be covered in algae / coraline before too long anyway. I also took the time to cover as much of it as was feasible with super-glued sand so it's less obvious.
 
Last edited:
So, with the lighting figured out, the mixing station built, and the rock work finished. It's time to order the rest of the equipment, figure out how I want to control everything, and clean everything up. If it's not obvious yet, I like to tinker with stuff. I've been repairing electronics as a side thing since around 1984 and I've worked in IT my entire career. When I started this project I assumed I would save up and pony up for an Apex and that would be that.

As I was working through the initial stages of this project I found out about a new (at the time) project from a local reefer called the ReefPi. Not sure how folks here feel about linking to other forums so I'll add a link later to that project if / when I find out that's OK to do. It's an open source software, open hardware design reef controller based on the RaspberryPi platform. At the time I first ran into it it didn't do much without a lot of effort, two years later it's become a pretty robust solution and is pretty easy to use. Most folks who do use it build their own hardware and use the software that Ranjib started. Rather than building the controller hardware myself, I opted to buy a prebuilt kit from one of the forum members over there. I love that the platform is extensible and provides an easy way to control just about anything if you have a little electronics knowledge. The controller can use hardwired electronics switches but I opted for using an off the shelf solution. TPLink makes these 'smart' power strips that the ReefPi can control. With these I can control as many plugs as I want, using macros, timers, or various switches as inputs. Better yet if I have a need to control more devices I can just pick up another power strip, plug it in anywhere that I have WiFi access and it's controller by the reef controller. Currently I'm using it to control 18 plugs, a couple of exhaust fans in the canopy and sump area, a couple of magnetic float switches, two laser water sensors, and two temperature probes. All in I spent a little more than $350 and I bought spares of most parts. With a few dollars more (when I care to buy the probe) I can monitor PH. If it's not obvious I'm a pretty big fan of this platform it suits my needs perfectly. For instance, besides doing everything I can to minimize the chances of a random overflow in either the sump or the display (running a bean animal drain and regularly shut off the return pump to test that the sump can hold all the drain water) I also have the two above mentioned float valves setup. If the water in the display reaches high enough to trip the float valve, the return pump will shut off and send me an email and a text. If the sump starts to overflow the reefpi will turn off power to anything that can fill the sump and also turn on the pump I use to drain the sump for 10 seconds. It's a nice piece of mind and one more thing that has to fail before I end up with a disaster in my office.

The second piece of monitoring I spent some money on was a Seneye. I decided to buy a few slides and use it to monitor during the initial cycle and for a few months after I begin adding fish. After the four or so slides I purchase run out, it'll become a nice easy Par monitor that I can take out when I add coral.

Rounding out the equipment list I went with two 200 watt heaters, a Jeboa Gyre, and an oversized Jeboa return pump, and a Tunze Comline DOC 9012 DC skimmer . I've got spares for everything but the skimmer, plus the eheim return pump I'm using as a transfer pump in the garage can work in a pinch as well.

With that it was time to finally put saltwater in this saltwater tank.


PXL_20201022_171925078 (2).jpg
PXL_20201022_171948068.MP (2).jpg
PXL_20201022_172309784.jpg
PXL_20201022_172301309.jpg


With the saltwater in I let the tank sit for about a week with no lights and got my water change macro setup and working properly with the ReefPi. I do daily water changes of a little more than 2gallons rather than one big one. I actually do this in kind of a funny way. Since I don't trust check valves (everything fails eventually), I prefer to run the return chamber a bit lower than I imagine most people do. This gives me enough room in the sump to be able to turn everything off and drain all the standing lines back into the sump with about 10% space left after everything drains. I also setup two water sensors in the return area. The first one is set at the normal water level (this is also the sensor I use for ATO) the second is two gallons higher than that normal level. The macro I run (manually for now) first fills the tank to the higher level then waits 5 minutes for the return pump circulate the fresh saltwater throughout the tank. After 5 minutes my drain pump sends waste water down the drain until it hits the low water mark then runs for 5 seconds longer. Finally I run a second ATO for the next 5 minutes with Saltwater rather than fresh to allow the level to settle to the correct amount before turning the original freshwater ATO back on with that sensor.

According to the seneye, I started the cycle on October 12 2020, a week later I dosed with Fritz ammonium chloride and brought the tank up to toxic levels of ammonia (no fishies where harmed during this initial cycle). I also dosed with with Dr. Tim's and waited a week with no water changes and an attempt at patience. After a week I added a bottle of Bio-Spira and one week after that a bottle of Fritz's for good measure. On November 1 the cycle completed when the Ammonia dropped to zero and I was able to measure nitrate with my test kits. I went ahead and added a bit more ammonium chloride and watched the levels drop back to zero in the morning.

After a nice big 20% water change the next day it was time for fish. First critters into the tank were a pair of midnight clowns from Bay Bridge Aquarium's new store:

PXL_20201110_145240547.jpg
PXL_20201110_145233868.jpg


at this point I'm running the fuge light for a couple of hours a day just to test the timer on the reef pi and get some algae growing in there. Tank lights are off unless I just can't stand it and I want to see what everything looks like with the lights on.

November 13th I added 5 blue/green Chromis. The little guys appeared to be getting along at first, but unfortunately the group kept singling out the smallest no matter how much I fed. Over the next two weeks they bullied the smallest until there were only two left. By November 27 there were only two left in the tank along with the two healthy and happy clowns.

By November 28th a fair amount of brown algae was beginning to grow in the tank and making a pretty good carpet and just the faintest bit of green hair algae had started to crop up. This day I ordered the two fish I'm most excited to keep again (I had one in my 75 years ago): Engineer Gobies and a small cleanup crew from LIve Aquaria. This was my first time ordering livestock online and i had a pretty great experience. Now when I say small, I mean small. I bought a 5 pack of Turbo snails, and emerald crap, and 10 Hermits. By the time I got everything into the tank the Green Hair algae has started to out compete the brown stuff and I've started to see a fair bit of Algae bloom in the water column. I've started turning the lights on for a few hours a day to let things start growing a bit more to and begin to establish a bit more equilibrium. and Now I'm realizing how much a need to get a filter for my phone so these pics don't look so crazy blue...
PXL_20201202_220640165.jpg
PXL_20201202_224359401.jpg


The turbo snails are really going to town and cleaning everything off these rocks as they go, I'm hoping I didn't buy too many at this point since where they've gone has returned to pristine white and I don't want them to starve. That's the last major change I've made to the tank at this point. I'll post some current pics tomorrow of the messy overgrown tank to show how it's progressing.

My plan is to let things continue to settle in for the rest of the month with just regular feeding and water changes. I've been feeding a mix of frozen mysis and live freshly hatched Brine Shrimp. Next week I plan on adding some coraline algae the mix and start encouraging that to compete for nutrients. After Christmas I'm going to start cultivating Phytoplankton and see about encourage some Copepod growth until the 'ugly' phase is over. Truth be told, I'm actually enjoying watching as things slowly change and equilibrium gets established. Eventually I'd like to add a yellow tang, possibly a watchman/pistol pair, and depending on how things work out maybe Blue Tang or something similar that'll do long laps. I'm kind of waiting until after I've added all the livestock before I start adding coral, but that'll probably change once I have the algae under control and once I know whether or not dino is going to be a problem in this tank. My plan is to take this at a glacial pace setup this tank up as a 10 plus year reef.

So far this is a weird experience as compared to the 75 I had. That tank had so many extra challenges since I had no idea what I was doing. I mean the tank I bought was like you'd turned a standard one on end; it was something like 2 or 3 feet tall and not very deep or long as a result. The rock work ended up being a kind of bizarre ladder trying to create some open space and let the fishies have some room to swim. Not that I'm any kind of an expert these days but back then I hadn't developed an obsessive relationship with researching everything I can about this hobby online nor was I stuck working from home and having nothing but free time on weekends. This time around I have a lot fewer pests to deal with since I started with dry rock and dry sand, but I also have a lot fewer nifty hitchhikers to look at right now. That 75 gallon got started largely with Live rock that came out of someone's well established tank. I also poured a handful of sand from several friend's tanks just to add a bit more diversity. The sand in that tank had billions of critters and everywhere I looked was something totally unrecognized. I honestly don't know which way I prefer, except that I'm a little more hopeful this time around that I'll be able to establish a healthy environment over time and not be constantly battling with every little thing. I think I may have ended up with every pest you hear about in this hobby in the two years I ran that old tank.
 

Attachments

  • PXL_20201022_172301309.jpg
    PXL_20201022_172301309.jpg
    101.8 KB · Views: 150
  • PXL_20201215_032710776.jpg
    PXL_20201215_032710776.jpg
    159.8 KB · Views: 148
Last edited:
Parameter updates:

Phosphates: 0
Nitrates: 10
Alk: 6.9
PH: 7.92

Everything is progressing through the first two months pretty well. Taking a pretty hands off approach, although I did a pretty lare cleanup yesterday the back glass was covered in algae that I finally went ahead and pulled out. Running felt filter socks, protein skimmer, and just added carbon filter yesterday as well. No large changes, still have a pretty low bio load for a tank this size, I have two juvie Clowns, two Blue Green Chromies, and two Engineer Gobies. I may add a Yellow Tang next and increase the size of the cleanup crew by adding a few more turbos. Currently only 5 Astrea Turbos, 4 hermits, and an Emerald Crab. Adding cleanup slowly as I increase bioload.

Here are some shots:

PXL_20201223_190827848.jpg
PXL_20201223_190811505.jpg


PXL_20201223_190837446.jpg
 
Parameter updates:

Phosphates: 0
Nitrates: 10
Alk: 6.9
PH: 7.92

Everything is progressing through the first two months pretty well. Taking a pretty hands off approach, although I did a pretty lare cleanup yesterday the back glass was covered in algae that I finally went ahead and pulled out. Running felt filter socks, protein skimmer, and just added carbon filter yesterday as well. No large changes, still have a pretty low bio load for a tank this size, I have two juvie Clowns, two Blue Green Chromies, and two Engineer Gobies. I may add a Yellow Tang next and increase the size of the cleanup crew by adding a few more turbos. Currently only 5 Astrea Turbos, 4 hermits, and an Emerald Crab. Adding cleanup slowly as I increase bioload.

Here are some shots:

View attachment 22705View attachment 22707

View attachment 22706

Rock work looking good.


Sent from my iPhone using Tapatalk
 
You should get that phosphate up to detectable levels.

Also, if you’re planning on having several tangs, you may want to plan it out and add them together - or at least not one at a time.
 
Good advice about those tangs I'll put some thought in that.

I'm having a bit of a time with phosphates, I've been overfeeding for two weeks trying to get it up a little but it's not budging. No fuge and nothing for this export, but I can't seem to get the kit to register. Any suggestions?

Sent from my Pixel 3 XL using Tapatalk
 
Salifert. I'm loathe to spend it on the test kits, but I've been considering Hanna just to confirm I'm not having trouble reading the color.

Sent from my Pixel 3 XL using Tapatalk
 
With larger tanks there's a lot more momentum/inertia keeping parameters the same or moving in a certain direction. I'd just give it some time
 
Salifert. I'm loathe to spend it on the test kits, but I've been considering Hanna just to confirm I'm not having trouble reading the color.

Sent from my Pixel 3 XL using Tapatalk

Buy the Hanna kits. Trust me.

It feels dumb to spend a few hundred bucks on test kits but if you’re really in it for the long game, you’ll test more frequently with Hanna than others if you’re stretched for time like a lot of us.

Makes keeping logs easier, less guesswork, and then a smoother reefing experience.


Sent from my iPhone using Tapatalk
 
Thanks Rostato!
Just a quick note here to future self: 12/26/2020, the initial bacterial/algae bloom that was clouding up the water column has finally subsided. It was really cloudy starting early December. I left it alone for two or so weeks to se how it would progress. The back glass at the time was covered in hair algae, I was generally trying to take hands off approach to things for the first two months to see where that got me, during this time the water was cloudy enough that I couldn't see from end to end on the long way across the tank and if I focused on the water just in front of the rock I could see the cloud as it deflected around things. It was crazy thick.

Around December 14th, I cleaned most of the algae off the back glass and pulled as much off the rocks as I could, running it through a 300 micron filter sock (which didn't catch everything unfortunately). Two days after the big cleaning, I started running carbon through a brs filter. that didn't help much, but starting December 21st I ran a 50 micron filter sock. That cleared the hell out of it but clogged after about a day, I switched it out for another 50 micron filter on the 22nd, then again on the 23rd. That third sock has yet to clog three days later and the water is the clearest I've seen it. The water is so clear I stop and gape at it every time I walk by the tank.

Parameters are still right about the same as before, no big movement and I still don't register any phosphate even though I'm feed way heavier than I think I should be. I'm starting to think the hair algae is just taking everything I throw in and I'm considering backing off on feed a little and just do less frequent water changes for a little bit. Since I've got the auto-water change setup, thus far I've been doing about 2.5gallons every day rather than one large one every week or two. I may bump that back to once every two days, and feed closer to what I think would be normal for these fish: 1/8 cube of frozen in the morning, a pinch of flakes at night.
 
One more thing: Just to give myself something to tinker with, I'm starting up a phyto culture station, eventually to include raising brine shrimp and copepods in the same setup:
PXL_20201228_215538776.jpg
PXL_20201228_165219743.jpg
 
Tank updates!
I went ahead and took Borker's suggestion and picked up Hannah kits for Calcium, Alk, and Phosphate. I don't regret buying them, but wow that's quite a bit to spend on test kits. Work fantastic and It's a lot easier to feel confident about the reading when I'm not trying to guess between shades of blue/purple. Tank inhabitants are happy, though the engineer gobys are growing slower than I expected. They're still juvies and it's weird having them swimming up in the water column rather than creating caves. I'm waiting on a Yellow Tang to finish quarantine at Bay Bridge Aquarium, I'll hopefully be able to pick him up in the first week of Feb.

I've been manually removing some hair algae / small patches of what I believe is bryopsis for the last week or two and finally picked up an appropriately sized gravel vac. I've been slowly working through getting the hair algae contained a little to make room for coral. I've also been trying to keep the sand from turning into a mat / carpet of algae while I'm waiting to pick up some nassarius snails in a couple of weeks. If these Gobys don't start growing faster I may have to start thinking of adding some other inhabitants to keep the sand moving a bit.

Lastly, I've added a few coral owing to the graciousness of BAR members, So far I've picked up a large Frogspawn from Eugene as well as some giant Monti, Pink Birdnest, and a very interesting looking Photosynthetic Sponge from JVU. Thank you to both of you, your generosity is incredible. I'm still working out where everything is going to live, it's hard for me since I have a hard time visualizing how things are going to look as they grown in so any suggestions are very welcome.

I'm open to suggestions for placement of anything here I'm new to this and still trying to visualize what things will look like as they grown in.

Now for the pics:
First the full tank shot, I don't see a lot of unnatural decorations in most tanks, but Groot is kindof a big deal in my house and the 8 year old loves it. I'm hoping the train the frogspawn to take over most of the head.
PXL_20210117_211239371.jpg

PXL_20210117_211332010.jpg
PXL_20210117_211327388.jpg


This bird's nest is the thing I'm most unsure where to place. I kindof want it toward the top of this structure, but I'm not exactly sure where I'm placed in a couple of spots here and it seems to like the flow / lights in any place.

PXL_20210117_211355091.jpg


PXL_20210117_211214490.jpg


I think this monti looks happy? I honestly am not that familiar with how they should look while acclimating, this has been in tank for about 24 hours, I just turned the lights up from 20% this morning. It doesn't appear to be bleaching the spots haven't grown and the edges look aproximately the same color as they did when I received it. Again, I'm not sure about the placement, I'm going back and forth between this center structure and the one on the right. Mid tank has slightly more gentle flow, it's where the two big pumps at the end overlap and while more 'gentle' it's very random and still moving quite a lot.

PXL_20210117_211221290.jpg


PXL_20210117_161842032.jpg


Last the Sponge, when I picked it up JVU mentioned that it does well almost anywhere in his tank so I though this would be kindof an interesting place for it as it grows in, this spot has Gyre flow, no direct power head on it but still quite a bit of motion.

PXL_20210117_211228269.jpg


Thank you again to both of you that gave me my first corals I'm pretty exciting to be getting started on this part of the journey.
 
I'd recommend that you place the red monti cap low on your rock work. As it grows, it forms plates that over lap and continue to grow. This will end up shading light from anything that is under it. It can form plates that are 10 to 12 inches in diameter. This, in turn, will lead to a large space under the monti cap that will not recieve much light. These montis don't require much light or flow. They are easy to grow and can adapt to almost any light of flow conditions.
 
Good to know Dochou, I will rethink the placement. I knew they got to be pretty wide but it didn't occur to me to think about the shadow it would cast. I'll find somewhere that the shadow will be cast on the sand more than anywhere else.
 
Back
Top