Kessil

Felicia's 30 Gallon Seahorse Tank - Seahorses have arrived!!!

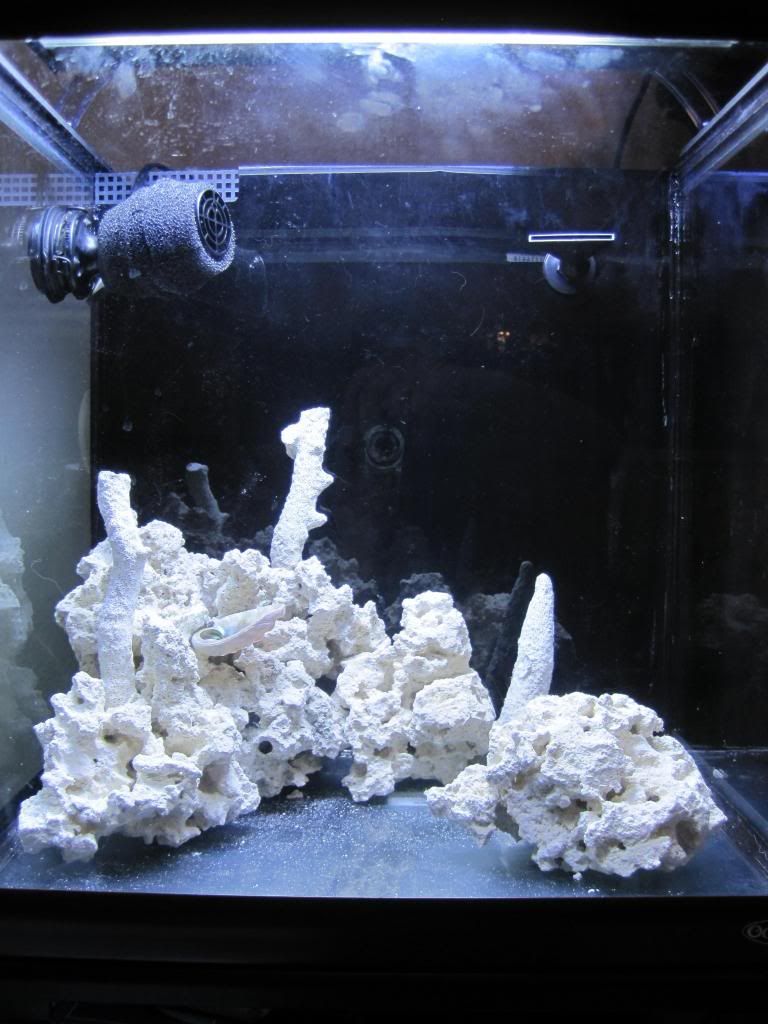
Whew! I just finished making a ton more progress on the build. The silicone is all done...I hope. I still have to do a leak test before I can say that confidently. I can put water in the tank in 48 hours, so that will be Wednesday night. Everyone please keep your fingers crossed that everything is water tight!

Also, I cut a piece out of the bottom grate of the AC110 media basket and glued that in place on the overflow. It seems like it should serve well to block fish or snails from ending up in the back chambers. I also finished making the screen lid for the tank and organized a bunch of the equipment, timers, powerstrips, cords, etc.

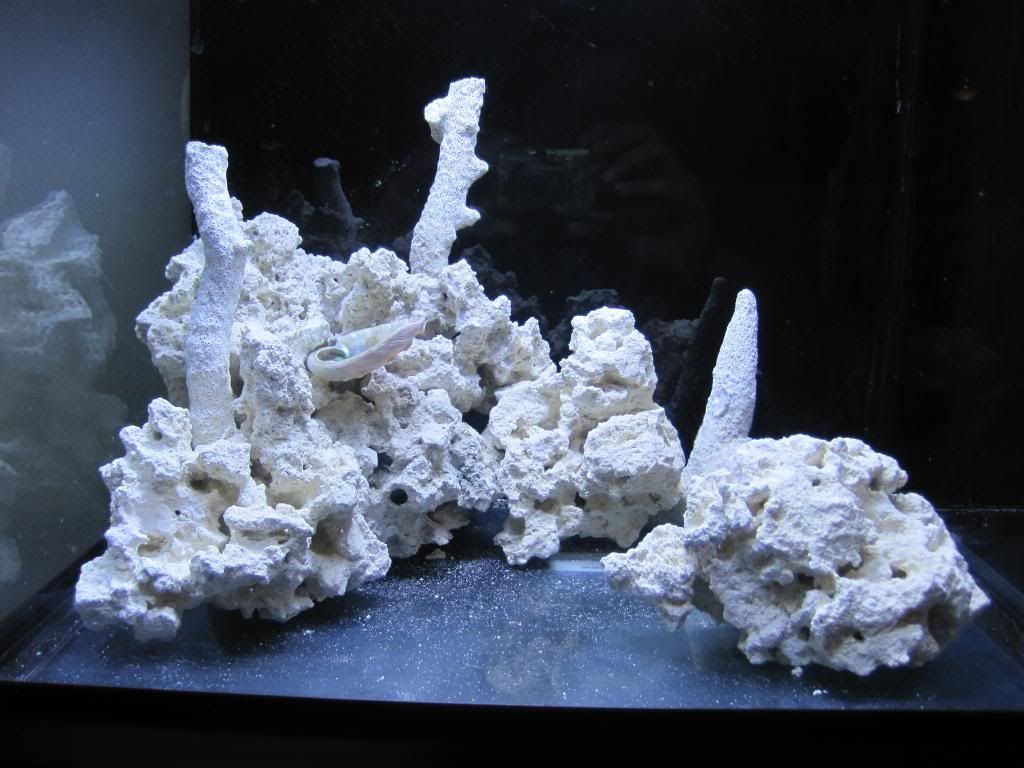
Tomorrow I'll probably won't get much done on the tank because I have my kickboxing class in the evening and need to do some work on the other tanks, which are being neglected. Wednesday I'll do the water test, work on the rock scape, and build the media basket for the first chamber out of black eggcrate. That should be the last of the DIY work. If it passes the leak test, then I'll plan to get salt water, sand, and rocks in the tank on Thursday.
 
Ok, so I played around with scaping the rocks last night and here's what I came up with. Keep in mind this is 15 lbs of rock. Let me know what you think. (Ignore the smudgy glass-it will get cleaned up soon, but doing all the work on it just keeps getting it smudgy).

IMG_3342.jpg


IMG_3345.jpg


So its basically a rock pile in the left back corner of the tank that extends out along the back wall and left side. I didn't want to go too high with it so that I can put gorgs on the rocks and let them get nice and tall. I also wanted plenty of swimming space for the seahorses. The rock in the front right will be a mushroom island or something. Also, you can see the abalone shell feeding station in the middle of the rock pile. I want to add like 5 more pounds of live rock, but now I'm not sure where I'd put that. Its always hard working with a combo of dry and live rock, IMO. The dry rock scape needs to be set up so I can put water in there and not have to scape underwater. Once the water is in there, then I can go get some live rock to throw in, but it needs to fit in with the scape.
 
It looks pretty good to me as is. Do you have water movement behind the left back corner, enough to move detritus?

Thanks! I'm not sure yet how the flow will be. I want to get the water in there and then play with adjusting the return nozzle and that powerhead to get it all right. I need some areas with low flow for the seahorses to be able to sit still and rest, so getting the flow all perfect is going to be difficult. I may have to turkey bast around in some of the lower flow areas during my weekly water change to remove detritus. I also plan to have a hefty CUC (snails and hermits) to clean up any leftover food bits from the seahorses.
 
I just got a box full of ricordea!
omgomgomg.gif
I am seriously impressed with this ebay seller. They paid for guaranteed overnight by 12 pm shipping with insurance and that was included in the $109 for the 10 ricordea. They were packaged very well and all of them arrived in good shape! Also, I made some color requests of the seller and he was prompt in answering me and gave me what I wanted even though it was supposed to be colors of their choice. Very good ebay experience!


My official box inspector takes her job very seriously.


"Ok, this box has passed inspection. You can open it now."


This is what a bag full of ricordea looks like.
IMG_3354.jpg


Here they are in the tank. I ended up throwing them in the main tank so I'd have an insane ric garden for the time being. So many rics in there! Not the best pic since the glass is a bit dirty and they hadn't had a chance to open yet, but you get the idea. I requested a yellow ric and a pink ric. The big multimouth ric on the far left is STUNNING. Its bright yellow with lime green trim. The one in the back middle is a nice bright pink.
IMG_3362.jpg
 
Wowza weeza (Borat voice). Those look awesome. I really do like the aquascape. I love all the places for them to hang onto and hang out on!

Also, not trying to be a creeper (LMFAO) but you can totally see your address and your shippers address in the photos. Might wanna blur that out ;) Sorry I just think that way, too much time on the interweb!
 
Wowza weeza (Borat voice).... Also, not trying to be a creeper (LMFAO) but you can totally see your address and your shippers address in the photos. Might wanna blur that out ;) Sorry I just think that way, too much time on the interweb!

Creeper!! Lmao jkjk ;) haha but he's right Felicia. Maybe crop it out or blur it a bit just in case tr1gger comes over to visit the ric garden ^.^

Totally teasing Dan. Couldn't resist, it was too much of an opportunity ^.^
 
Wowza weeza (Borat voice). Those look awesome. I really do like the aquascape. I love all the places for them to hang onto and hang out on!

Also, not trying to be a creeper (LMFAO) but you can totally see your address and your shippers address in the photos. Might wanna blur that out ;) Sorry I just think that way, too much time on the interweb!

Oops! I totally didn't even think about that. Good point guys! I don't need any of you creepy BAR members stalking me or anything :p I'll blur it out when I'm near my computer later today. Seriously, thanks for pointing that out though.

I'm glad you like the scape! I was trying to keep it low and with plenty of places for the seahorses to hitch. I like those tonga branch rocks for that purpose. Now I just gotta figure out where to stick the live rock in there.
 
I say boost up as many of those pieces off the bottom to help with flow and call it good. PVC or acrylic can work well to make a support or rocks to get them off the bottom. Can't remember if you're doing sand or keeping bare bottom? Either way you will want the flow to get around the bottom as much as possible. Feeding station should help, but they poop a lot too. No dead spots is important.
 
I say boost up as many of those pieces off the bottom to help with flow and call it good. PVC or acrylic can work well to make a support or rocks to get them off the bottom. Can't remember if you're doing sand or keeping bare bottom? Either way you will want the flow to get around the bottom as much as possible. Feeding station should help, but they poop a lot too. No dead spots is important.

Good point. I'll use some of the leftover eggcrate under the rocks.
 
I water tested the tank last night and everything is working great! The seams between the glass that I redid are water tight! I was relieved to not have any water end up on my floor. I did however notice some slow leaks with the acrylic partition and baffles, so they aren't sealed perfectly. Once I got the water in there and everything running though, those slow/small leaks don't seem to matter at all. The water is flowing through the baffles following the path I designed, and the water level in each chamber is just where I wanted it to be. I am so excited that it is working! I actually ended up turning the return pump down to almost its lowest setting to get the water level where I wanted it, so the flow through there is actually not the full 300 gph of the pump. I'm guessing its closer to 150-200 gph, which is just fine. It also took a bit of tweaking of the flow to quiet the overflow. Also, the filter floss under the cascading water helps reduce the trickling water noises. Its not silent, but its very quiet now. I made my media basket tonight out of black eggcrate. It slides right down into the first chamber, under the overflow. The first shelf is filter floss, the second will be Purigen, and the third will be ChemiPure Elite. The heater is sitting under the media shelves. The controller for the heater is mounted on the back left side of the tank and has a digital read-out of the temperature. I've got it set on 74F for now. The skimmer isn't running yet because there's nothing to skim. The water level in its chamber turned out perfect! Its low enough that the skimmer sits way down in the chamber so that you can't even see the collection cup from the front of the tank. Ok, that's enough detail for now! Here's a video showing the full AIO design with water flow! The powerhead and skimmer are both turned off for now. Also, I removed the skimmer collection cup so you can see the skimmer chamber better. Oh, and please ignore the cat hair. Lily had to "help" me with this whole project so her hair is everywhere. It will all get filtered out in a couple days.
Here's a photo showing what the skimmer looks like with the collection cup on. You can see it sits all the way down in the chamber so its hidden from view. I would hate to look at skimmate in the collection cup over the lip of the tank! Also, here's my finished screen lid. It extends just past the partition and then the back chambers are uncovered for me to access easily. All the equipment is now set-up except for the AIO, which I will set up tomorrow. I have to figure out which chamber to put the float switch in. It will probably go in the fuge since that has a stable water level and no other equipment. I will also try to get salt, rocks, and sand in the tank tomorrow. I filled the tank with RO/DI water tonight so that if it passed the leak/flow test, I could just add salt and it would be ready to go.
 
Sorry for all the text running together in the last post. Something is going on with the way it lets me reply and I can't leave spaces. Its all in crazy HTML code now for me instead of the way it was before.
 
I gave up on the dry sand because it was way too dusty. I removed it all and decided to start over with live sand. Here's the finalized scape right before I added the new sand. Its all murky now after adding the sand, so hopefully it will be clear tomorrow and I can take some better photos. I picked up some pieces of tonga branch live rock to incorporate in the scape and hopefully help seed the dry rock with bacteria and coralline algae. Look at the colors on the live rock I got :) Ok, so here are my 2 new bags of live sand. I decided to get two different grades and mix them together. I got 20 lbs of the finer aragonite and 16 lbs of the coarser aragonite. I figured they would look nice mixed and mean that there would be enough big pieces mixed in for the jawfish to construct their burrows. When I was buying the sand, I also picked up a yellow fiji leather for the seahorse tank. I want some nice pops of yellow in that tank so encourage the seahorses to stay brightly colored. Its polyps are in because I couldn't get a decent photo of it without picking it up so it was PO'd. You can see the polyps are yellow though. It looks much more yellow in person, but the white balance on my camera wasn't set, so it picked up a lot of the blue.
 
Back
Top