I'm barely getting started. I'm planning on documenting the journey here, and hopefully tap into the collective wisdom of the community. This is my first reef tank. Had a pair of breeding clowns for >15 years. I tried unsuccessfully to safe the eggs but that's another adventure.
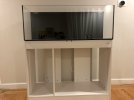
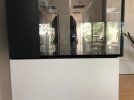
Due to delay in shipping, my new tank (Waterbox 65.4 AIO) should arrived on Monday 1/16. Here is what i have plan so far:
Equipment:
Tank: Waterbox 65.4 AIO
Return Pump: Varios 2
Flow pump: 2x NERO3 + Sicce Nano (if needed)
Lights: 2x Reefi UNO (still waiting for shipment)
Skimmer Tunze 9004 DC
Heater2x 150W Fluval M heater 1x 300W Aqueon Pro
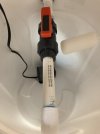
ATO Tunze 3155
Controller Hydros 2 with additional water level sensor
Top/Cover RedSed DIY mesh top
Aquasape 25lb macro shelf, 15lb foundation, 10lb nano shelf (completed fishless cycle in a tub - soaking since early Dec)
Sand None. Going bare-bottom
Setup:
Failsafe:
ATO: 3155 comes with 2 sensor, optical and a float switch. Plan to use Hydros optical sensor as the final fail safe. In case the ATO sensors fails ON, hopefully the third and last optical sensor will shut off the pump.
Heater: Similarly, Hydors will serve as the failsafe for the 2x 150W heater. The heater have build in thermostat. Hydros is for in-case the heater decided to cook the tank. Buying a separate (additional) ATO sensor, and heater controller is another option. But i like less equipment (less wires).
Water Change:
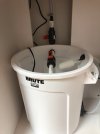
Going to run RO line from the kitchen (shared RO filter) to the tank. will add DI for the tank line. RO will be connected to water mixing bucket (10G brute) and ATO container (likely another 10G brute, but i am not going to fill-up to the top. Second brute will come handy to mix large amount of saltwater when needed. One limitation of my setup i'm limited to 48x20 footprint of the tank. This means, i have to store everything under the cabinet. This is the agreement with the wife. I would love to get a bigger tank, but got worried about the weight and foundation support. My home is >60yrs old, and still have settling movement (very minor) resulting in hairline crack on the drywall.
The tank is also back to interior wall and on the other side of the wall is the laundry room. I'll run a drain line from the laundry room to the tank.
Water change should be effortless. I can pump (or even just gravity siphon) water from the tank to drain and pump fresh water from the brute under the cabinet back to the tank.
Battery backup:
Haven't put too much thought into this. It will be a research project for later.
Qt:
I have to admit. I have not ever Qt any fish ever. For this new setup (also my biggest tank) i'm going to start off the right way. Bought a Fluval EVO 13.5 tank for Qt. Stock setup.
Livestock:
2x 1.5-2" chromis + 2" neon dottyback in my existing 15g tank.
5 4x 1" chromis in QT since 1/9
2x 1" clown in QT since 1/9
2 Azure Damsel
Next batch plan for Qt:
Kole tang
(maybe) Flame angel or ??
Purple Tang (sorry Tang police)
I understand the risk of Flame Angle. So this still TBD. A lot of members gave good feedback on alternative and the risk of the angel in reef tank I would like 1 more brightly color fish. The neon is behaving really well so far ~6month, and i am very well aware things can change in a moment. Combability with Neon maybe a challenge.
Coral:
No idea yet. I don't really care for fancy names or rare corals. As a newbie, i would be happy to have a tank with bright, colorful corals. There is a few corals i don't care for such as duncan, and xenia. Zoa.. I loves the color, but i have 2 concerns: 1. palytoxin - i know a lot of ppl have zoas and never have issue. I know can be a klutz and rather not risk it. 2. with barebottom, the risk of zoa spreading uncontrollable. Same for GSP.
I do like acan, torch and monti to name a few.
The plan is to get the tank to mature maybe 4-5months before adding corals. One thing being older, is i have patient. its a journey and I'm planning to enjoy every bit of it.
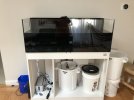
I'll post pictures once i receive my tank.
Due to delay in shipping, my new tank (Waterbox 65.4 AIO) should arrived on Monday 1/16. Here is what i have plan so far:
Equipment:
Tank: Waterbox 65.4 AIO
Return Pump: Varios 2
Flow pump: 2x NERO3 + Sicce Nano (if needed)
Lights: 2x Reefi UNO (still waiting for shipment)
Skimmer Tunze 9004 DC
Heater
ATO Tunze 3155
Controller Hydros 2 with additional water level sensor
Top/Cover RedSed DIY mesh top
Aquasape 25lb macro shelf, 15lb foundation, 10lb nano shelf (completed fishless cycle in a tub - soaking since early Dec)
Sand None. Going bare-bottom
Setup:
Failsafe:
ATO: 3155 comes with 2 sensor, optical and a float switch. Plan to use Hydros optical sensor as the final fail safe. In case the ATO sensors fails ON, hopefully the third and last optical sensor will shut off the pump.
Heater: Similarly, Hydors will serve as the failsafe for the 2x 150W heater. The heater have build in thermostat. Hydros is for in-case the heater decided to cook the tank. Buying a separate (additional) ATO sensor, and heater controller is another option. But i like less equipment (less wires).
Water Change:
Going to run RO line from the kitchen (shared RO filter) to the tank. will add DI for the tank line. RO will be connected to water mixing bucket (10G brute) and ATO container (likely another 10G brute, but i am not going to fill-up to the top. Second brute will come handy to mix large amount of saltwater when needed. One limitation of my setup i'm limited to 48x20 footprint of the tank. This means, i have to store everything under the cabinet. This is the agreement with the wife. I would love to get a bigger tank, but got worried about the weight and foundation support. My home is >60yrs old, and still have settling movement (very minor) resulting in hairline crack on the drywall.
The tank is also back to interior wall and on the other side of the wall is the laundry room. I'll run a drain line from the laundry room to the tank.
Water change should be effortless. I can pump (or even just gravity siphon) water from the tank to drain and pump fresh water from the brute under the cabinet back to the tank.
Battery backup:
Haven't put too much thought into this. It will be a research project for later.
Qt:
I have to admit. I have not ever Qt any fish ever. For this new setup (also my biggest tank) i'm going to start off the right way. Bought a Fluval EVO 13.5 tank for Qt. Stock setup.
Livestock:
2x 1.5-2" chromis + 2" neon dottyback in my existing 15g tank.
2x 1" clown in QT since 1/9
2 Azure Damsel
Next batch plan for Qt:
(maybe) Flame angel or ??
Purple Tang (sorry Tang police)
I understand the risk of Flame Angle. So this still TBD. A lot of members gave good feedback on alternative and the risk of the angel in reef tank I would like 1 more brightly color fish. The neon is behaving really well so far ~6month, and i am very well aware things can change in a moment. Combability with Neon maybe a challenge.
Coral:
No idea yet. I don't really care for fancy names or rare corals. As a newbie, i would be happy to have a tank with bright, colorful corals. There is a few corals i don't care for such as duncan, and xenia. Zoa.. I loves the color, but i have 2 concerns: 1. palytoxin - i know a lot of ppl have zoas and never have issue. I know can be a klutz and rather not risk it. 2. with barebottom, the risk of zoa spreading uncontrollable. Same for GSP.
I do like acan, torch and monti to name a few.
The plan is to get the tank to mature maybe 4-5months before adding corals. One thing being older, is i have patient. its a journey and I'm planning to enjoy every bit of it.
I'll post pictures once i receive my tank.
Last edited:
 i took the cover off to dome some maintenance, and only realized a chromis jump out when i stepped on it. Poor fish. On the other hand, the picky clown is eating more now.