Kessil

How to build a dual stage CO2 regulator for your ca reactor!!!

Hi All,

I'm new to the reef community. I have been building custom CO2 systems for planted tanks. I want to start off by sharing my knowledge with you guys on how to build a quality CO2 system to use with the calcium reactor. There are commercial CO2 systems that anyone can purchase. However, there is a DIY route. We can build a high quality industrial grade CO2 system with a few parts for the same price.

The parts you will need are:

1) Regulator
I suggest using a dual stage regulator as some single stage regulators will most likely to experience end of tank dump. When your CO2 tank is full, everything works as expected. End of tank dump occurs when the tank gets near empty and the pressure drops. This causes more CO2 to get into your tank and will suffocate your livestocks. You will need a dual stage regulator that has a working pressure at anywhere between 15 PSI to 100 PSI. Higher working pressure will also work but it's a little harder to adjust because the output pressure gauge is more sensitive.

2) CGA 320 nipple and nut
CGA-320 is the American standard thread found on Co2 tanks. Most regulators you find on Ebay or surplus sites will have different CGA connection. To make it work with your CO2 tank, you will need a CGA 320 nipple and nut. Your local welding place is a good source or online stores.


3) Fittings
There are many ways to put together a CO2 system. These are the fittings that I normally use.
-1/4 male NPT x 1/4 male NPT hex nipple (Swagelok cross ref. SS-4-HLN-200 or 150. 200 is 2 inches. 150 is 1.5 inch)
-1/4 female NPT x 1/8 male NPT elbow (Swagelok cross ref. SS-4-RSE-2)
-1/8 male NPT x 1/8 male NPT elbow (Swagelok cross ref. SS-2-SE)


*The SS in front of the Swagelok part # stands for Stainless Steel. Substitute it with a B if you want brass.

5) Burkert 6011 solenoid (1/8 NPT) and Clippard solenoid
These are the most reliable solenoids and is proven by the hobbyists.

6) Metering Valve
Metering valve is the most vital part. A good unit will provide you with a precise and constant CO2 reading.
There are a few good metering valves such as Swagelok S series, Ideal V54-1-12, Hoke 1300 series and etc.,. Bear in mind that not all metering valve will work. We only use medium flow and low flow valves for our purpose. The metering valve I'm using is a Hoke 1300 series. This valve required tube fitting reducer 1/4 in. x 1/8 in tube OD (Swagelok SS-400-R-2) to mount the CO2 tubing.
 
Last edited:
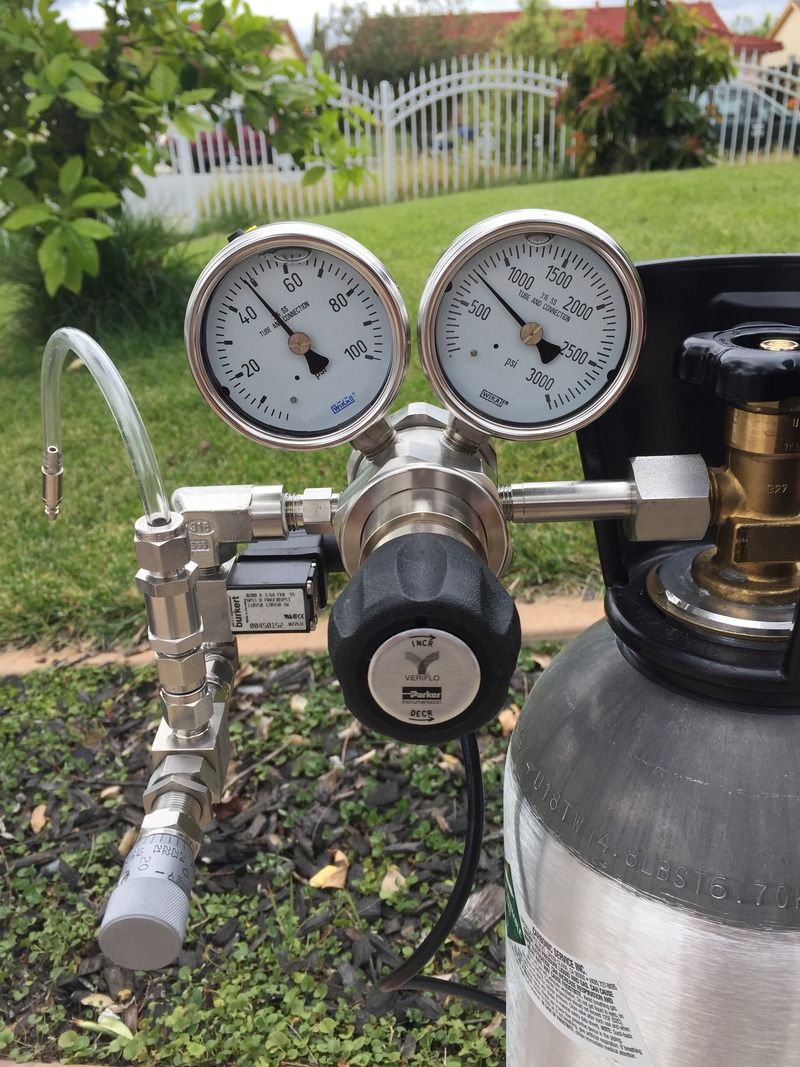
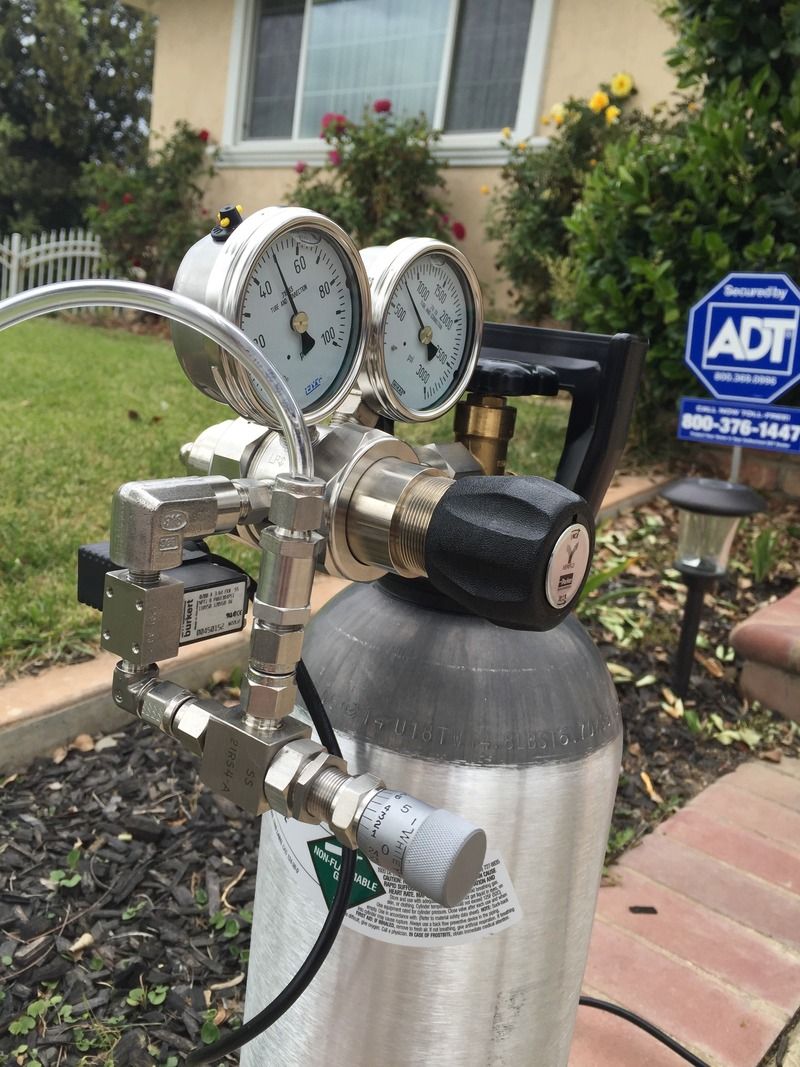
Here are some of the regs I have built.
493f34042ebed6755bab8eeab20f6a19.jpg

9edbcf2e84ebc719a166f28e50eecaf4.jpg

3d9b7eb60be40359039c382036aeb4ba.jpg

9424694cd879294d5d0df7d119e0a29c.jpg

d3d52ceb58af817f38a7bc3089a5d2ab.jpg


Sent from my iPhone using Tapatalk
 
This is my personal regulator. The system is full stainless steel. Regulator is a Parker IR6000. Solenoid is a SS Burkert. Needle valve is a Swagelok 22 series. This valve was made in the 60s. I bought it from this old guy on craigslist. The valve has been sitting in his garage for 40+ years. These parts are industrial grade. They are designed for laboratory use. It's overkill for our purpose but hey wouldn't you want one?

C8D4CE5A-62B0-4065-A80B-73568ABDD91A.jpg


4F2D64F5-923E-41A3-8AED-5389573DEF3C.jpg
 
Last edited:
Hey Alan, wondering if you can help. Think I got the wrong metering valve. Picked up a Hoke 1666G2YA. It has 1/16" hose fittings on both sides. Is there a way to adapt it to the 1/8" fittings?

Description says they are 1/8" Gyrolock but they look smaller than the 1/8" thread fittings I got from Swagelok.


Sent from my iPhone using Tapatalk
 
Hi All,

I'm new to the reef community. I have been building custom CO2 systems for planted tanks. I want to start off by sharing my knowledge with you guys on how to build a quality CO2 system to use with the calcium reactor. There are commercial CO2 systems that anyone can purchase. However, there is a DIY route. We can build a high quality industrial grade CO2 system with a few parts for the same price.

The parts you will need are:

1) Regulator
I suggest using a dual stage regulator as some single stage regulators will most likely to experience end of tank dump. When your CO2 tank is full, everything works as expected. End of tank dump occurs when the tank gets near empty and the pressure drops. This causes more CO2 to get into your tank and will suffocate your livestocks. You will need a dual stage regulator that has a working pressure at anywhere between 15 PSI to 100 PSI. Higher working pressure will also work but it's a little harder to adjust because the output pressure gauge is more sensitive.

2) CGA 320 nipple and nut
CGA-320 is the American standard thread found on Co2 tanks. Most regulators you find on Ebay or surplus sites will have different CGA connection. To make it work with your CO2 tank, you will need a CGA 320 nipple and nut. Your local welding place is a good source or online stores.


3) Fittings
There are many ways to put together a CO2 system. These are the fittings that I normally use.
-1/4 male NPT x 1/4 male NPT hex nipple (Swagelok cross ref. SS-4-HLN-200 or 150. 200 is 2 inches. 150 is 1.5 inch)
-1/4 female NPT x 1/8 male NPT elbow (Swagelok cross ref. SS-4-RSE-2)
-1/8 male NPT x 1/8 male NPT elbow (Swagelok cross ref. SS-2-SE)


*The SS in front of the Swagelok part # stands for Stainless Steel. Substitute it with a B if you want brass.

5) Burkert 6011 solenoid (1/8 NPT) and Clippard solenoid
These are the most reliable solenoids and is proven by the hobbyists.

6) Metering Valve
Metering valve is the most vital part. A good unit will provide you with a precise and constant CO2 reading.
There are a few good metering valves such as Swagelok S series, Ideal V54-1-12, Hoke 1300 series and etc.,. Bear in mind that not all metering valve will work. We only use medium flow and low flow valves for our purpose. The metering valve I'm using is a Hoke 1300 series. This valve required tube fitting reducer 1/4 in. x 1/8 in tube OD (Swagelok SS-400-R-2) to mount the CO2 tubing.
H
Hi All,

I'm new to the reef community. I have been building custom CO2 systems for planted tanks. I want to start off by sharing my knowledge with you guys on how to build a quality CO2 system to use with the calcium reactor. There are commercial CO2 systems that anyone can purchase. However, there is a DIY route. We can build a high quality industrial grade CO2 system with a few parts for the same price.

The parts you will need are:

1) Regulator
I suggest using a dual stage regulator as some single stage regulators will most likely to experience end of tank dump. When your CO2 tank is full, everything works as expected. End of tank dump occurs when the tank gets near empty and the pressure drops. This causes more CO2 to get into your tank and will suffocate your livestocks. You will need a dual stage regulator that has a working pressure at anywhere between 15 PSI to 100 PSI. Higher working pressure will also work but it's a little harder to adjust because the output pressure gauge is more sensitive.

2) CGA 320 nipple and nut
CGA-320 is the American standard thread found on Co2 tanks. Most regulators you find on Ebay or surplus sites will have different CGA connection. To make it work with your CO2 tank, you will need a CGA 320 nipple and nut. Your local welding place is a good source or online stores.


3) Fittings
There are many ways to put together a CO2 system. These are the fittings that I normally use.
-1/4 male NPT x 1/4 male NPT hex nipple (Swagelok cross ref. SS-4-HLN-200 or 150. 200 is 2 inches. 150 is 1.5 inch)
-1/4 female NPT x 1/8 male NPT elbow (Swagelok cross ref. SS-4-RSE-2)
-1/8 male NPT x 1/8 male NPT elbow (Swagelok cross ref. SS-2-SE)


*The SS in front of the Swagelok part # stands for Stainless Steel. Substitute it with a B if you want brass.

5) Burkert 6011 solenoid (1/8 NPT) and Clippard solenoid
These are the most reliable solenoids and is proven by the hobbyists.

6) Metering Valve
Metering valve is the most vital part. A good unit will provide you with a precise and constant CO2 reading.
There are a few good metering valves such as Swagelok S series, Ideal V54-1-12, Hoke 1300 series and etc.,. Bear in mind that not all metering valve will work. We only use medium flow and low flow valves for our purpose. The metering valve I'm using is a Hoke 1300 series. This valve required tube fitting reducer 1/4 in. x 1/8 in tube OD (Swagelok SS-400-R-2) to mount the CO2 tubing.


Whoa thanks for the detailed post! Will definitely reference this if I decide to switch to calcium reactors.
 
Hey Alan, wondering if you can help. Think I got the wrong metering valve. Picked up a Hoke 1666G2YA. It has 1/16" hose fittings on both sides. Is there a way to adapt it to the 1/8" fittings?

Description says they are 1/8" Gyrolock but they look smaller than the 1/8" thread fittings I got from Swagelok.


Sent from my iPhone using Tapatalk
Yes you can use 1/16 x 1/8 adaptor. However 1/16 tube is too small and fragile. Just return it and get 1/4 OD tube or 1/8 mnpt valves.


Sent from my iPhone using Tapatalk
 
Depends on how much you can get the various parts for. My Reg was $100, the solenoid was around $50, metering valve was $80. Various other fittings were close to $100 (I went stainless).


Sent from my iPhone using Tapatalk
 
Had a pretty bad experience with co2art regulator so I got a reg for my freshwater tank from Alan. It is much easier to get support when you know where he lives!:D

20160205_225542.jpg
 
Question, What is the difference between the liquid filled and non-liquid barometers(?)/indicators ?
I see yours is filled with liquid since I spot bubbles inside.
 
Question, What is the difference between the liquid filled and non-liquid barometers(?)/indicators ?
I see yours is filled with liquid since I spot bubbles inside.

It does not make a difference for our purpose.

Source:Wika
Liquid Filled vs. Traditional Gauges
The primary reason for gauge failure is vibration. In traditional dry gauges, delicate links, pivots, and pinions are prone to damage from vibration, leading to inconsistent performance. In a liquid-filled gauge, the fluid fill effectively dampens system pulsation, making the gauge pointer easier to read.

Likewise, humidity and moisture pose problems for dry gauges. Condensation can make a gauge difficult to read or, in some cases, can cause failure due to icing. Liquid-filled gauges, though, are sealed to prevent internal condensation, and by keeping moisture out of the system, gauge movement is protected during icing conditions.

The choice of fill fluid is based on the application, but glycerin is typically used for room-temperature applications and silicone oil is commonly used for extreme temperature applications, especially when icing is a problem. An oil with insulating properties is ideal if the system has exposed electrical contacts.

Why Liquid Filled?
Liquid-filled pressure gauges offer a number of advantages over traditional, dry case pressure gauges:

Liquid-filled gauges have longer lives than traditional (non-hermetically-sealed) gauges because of their viscous fluid filling. Over time, this design advantage results in costs savings due to lowered instrumentation costs as well as lessened unscheduled downtime.
Internal liquids protect against severe temperature fluctuations and vibrations—major factors in the breakdown of regular gauges. Because they dampen temperature spikes and vibrations, WIKA’s liquid-filled gauges are easier to read, allowing for greater accuracy and process control.
In traditional gauges, condensation build-up results in visibility issues. This can be a crucial (and costly) flaw in high-humidity environments—an unreadable gauge is a worthless gauge. A solution to the impact of high humidity situations, WIKA’s liquid-filled gauges are designed to prevent moisture from entering not only the body casing but also the inside of the case lens.
Because they are sealed and constructed to meet rugged specifications, liquid-filled gauges are commonly used in highly corrosive chemical processes or in manufacturing or refining processes, and where products must be transported, stored, or handled in extreme temperature conditions.


Sent from my iPhone using Tapatalk
 
Just finished mine.

112a78e2609e1569cab9eee02a8c8aa6.jpg


So found out something interesting as I was testing for leaks. None that I found.

My inlet pressure gauge shows 700psi on a full tank. Is that right?

Main regulator is weirdly backwards for the pressure. I guess it makes sense but it's counter clockwise for decrease and clockwise for increase. So to turn off the gas at the reg, do I turn it fully clockwise like a normal knob and screw in or turn fully counter clockwise to fully decrease the outlet pressure till it says 0?


Sent from my iPhone using Tapatalk
 
Back
Top