Welcome to BAR - the Bay Area's premier saltwater hobbyists hub!

IM EXT 200 Peninsula Aquarium w∕ APS Stand - White

Supporting Member
Joined
Feb 3, 2008
Messages
8,496
Wow that’s some kinda over engineered
IMHO, of course

Looks like fun
May it bring your system success
And you very much joy
I’m sure you paid righteously
 
Guest
Joined
Nov 28, 2020
Messages
284
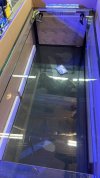
The tank arrived today !!
I have to figure out leveling.
I guess I will have time as I just lost my job this morning …
EC09F5AB-508F-4E66-B519-924F0C7EFE2C.jpeg
 

Attachments

  • 44E1D2F2-487B-49CD-8767-EF62D0F07E24.jpeg
    44E1D2F2-487B-49CD-8767-EF62D0F07E24.jpeg
    53.2 KB · Views: 341
  • 42518D91-5E0C-44B7-A54D-5948837461DF.jpeg
    42518D91-5E0C-44B7-A54D-5948837461DF.jpeg
    57.7 KB · Views: 381
Supporting Member
Joined
Apr 15, 2010
Messages
2,490
Ahhh Fudd. Were you from one of those tech companies that have mass layoffs? Damn bad timing.
 
Last edited:
Supporting Member
Joined
Feb 3, 2008
Messages
8,496
Ouch
That’s a kick in the balls!
Sorry to hear
 
Guest
Joined
Nov 28, 2020
Messages
284
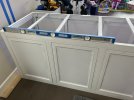
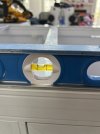
I am struggling to level the stand !
I had to add a 3/4” thick piece of wood on one hand to be level . But it create such a gap everywhere ! Anyone leveled similar tank ?
I am located in redwood city if anyone wanna take a look.
Thank you
 

Attachments

  • ED06ED77-E7A1-4154-9B10-BC211F141E00.jpeg
    ED06ED77-E7A1-4154-9B10-BC211F141E00.jpeg
    107.5 KB · Views: 405
  • 1CAD14E4-5F9A-4774-94B0-8A6E9B72B0F9.jpeg
    1CAD14E4-5F9A-4774-94B0-8A6E9B72B0F9.jpeg
    110.9 KB · Views: 389
  • 8C771740-D6C2-4604-A1B2-CDD9EEBDD0D3.jpeg
    8C771740-D6C2-4604-A1B2-CDD9EEBDD0D3.jpeg
    45.4 KB · Views: 371
Guest
Joined
Aug 20, 2016
Messages
3,975
I am struggling to level the stand !
I had to add a 3/4” thick piece of wood on one hand to be level . But it create such a gap everywhere ! Anyone leveled similar tank ?
I am located in redwood city if anyone wanna take a look.
Thank you

Yeah, super annoying that IM doesn’t have any leveling feet of any kind. I was lucky and my floors are level and didn’t have to shim anything on my IM75.

I’d suggest making sure everything is tight and straight. It’s pretty easy on that stand to tighten it and not have one side the same height as the other side.
 
Guest
Joined
Jul 9, 2020
Messages
686
I am struggling to level the stand !
I had to add a 3/4” thick piece of wood on one hand to be level . But it create such a gap everywhere ! Anyone leveled similar tank ?
I am located in redwood city if anyone wanna take a look.
Thank you
I had to do this with my 112g IM INT. Both before and after the tank was on the stand. I had help from someone that could lift the entire side a bit (tank on) to put in more shims where needed. It was extremely frustrating and difficult. I almost caved and built a 2x4 base to sit under it that had leveling feet on the corners but that would have added 3-4 inches to the height.

I did talk to IM about the need for them to have available some sort of insert for the vertical legs that has a leveling foot built into it but who knows if they’ll ever do that. You could have something made by someone with a CNC but that would not be cheap. I love their tanks but I think if I bought another I’d have a custom stand made instead if I had to deal with an uneven floor.

All I can say is get a good friend with strong hands and keep at it. Also I recommend using composite shims vs wood unless you’re waterproofing the wood.

You’ll get it level. It will just take some work. Test your level diagonally as well with a very long level. A short one will not be as accurate.


PS Add shims under the lower horizontal bars to prevent them from bending when you add the weight of your sump. There’ll be a decent gap under them with 3/4” plus shims at the corners.
 
Guest
Joined
Nov 28, 2020
Messages
284
update on the leveling. I tried with shims, and it was too tricky, too much work to get it right enough, and also knowing that when the glass will be on top, probably have to re level again.
My good friend @Srt4eric came to have a look to get a second opinion and he agreed with me, self-leveling underlayment is the way to go.

so I went to HD after Eric's visit, monday evening before they close and bought what I needed.
I made a frame with 2x4 ( the painter's tape on the wall is where I have the studs.
IMG_5918.jpg


Then I put a 3mil plastic sheet under. ( I don't want the self leveling under layment to stick to my floor, so my wife doesn't kill me, and protect the floor.)
I caulk the bottom and angles so it doesn't leak. tried to make it as perpendicular as possible to the wall

IMG_5919.jpg


I mixed 2 bags and used almost all of it,

IMG_5921.jpg


I had the shop vac ready in case somethign was going south , vacuum and limit damage, but I got lucky.


IMG_5922.jpg


4 hours later it was dry to walk on, and 16h later it's supposed to be cured. I demolded this it this morning, very easy.
I am not trimming the plastic yet so I can paint it easily ( not sure yet ). Waiting a bit and will put the stand on it this afternoon


IMG_5924.jpg
 
Guest
Joined
Jul 9, 2020
Messages
686
update on the leveling. I tried with shims, and it was too tricky, too much work to get it right enough, and also knowing that when the glass will be on top, probably have to re level again.
My good friend @Srt4eric came to have a look to get a second opinion and he agreed with me, self-leveling underlayment is the way to go.

so I went to HD after Eric's visit, monday evening before they close and bought what I needed.
I made a frame with 2x4 ( the painter's tape on the wall is where I have the studs.
View attachment 44854

Then I put a 3mil plastic sheet under. ( I don't want the self leveling under layment to stick to my floor, so my wife doesn't kill me, and protect the floor.)
I caulk the bottom and angles so it doesn't leak. tried to make it as perpendicular as possible to the wall

View attachment 44855

I mixed 2 bags and used almost all of it,

View attachment 44856

I had the shop vac ready in case somethign was going south , vacuum and limit damage, but I got lucky.


View attachment 44857

4 hours later it was dry to walk on, and 16h later it's supposed to be cured. I demolded this it this morning, very easy.
I am not trimming the plastic yet so I can paint it easily ( not sure yet ). Waiting a bit and will put the stand on it this afternoon


View attachment 44858

Clever solution! As I wasn’t pulling carpet for mine it never even occurred to me to use a mold like you did.
 
Supporting Member
Joined
Aug 29, 2016
Messages
16,464
brilliant idea! i will save this idea if i ever comes back to big tank in future.
 
Top