Jestersix

Marc's ADA 60P build

Lastly what's that little black dohicky on the outside of the sump wall, next to the cord of the return pump? Is that some sort of auto-top off device? I ask because if you have it set too refill the sump water too high, when you get your "power out" situation there may not be any room left in the sump for the drain water.
 
Me again. Reread your post and wanted to add...

If you do add another BH, consider doing a weir type overflow box like Fidel showed above. Easy to make with dark glass and some black aquarium sealant. This is a great way to get excellent surface skimming.

All this is FULLY covered in the BeanAnimal thread on Reef Central. There are more posts in that thread than Gimmito's build thread! :)
Thanks! She loves water!

I would put the second hole next to the existing one and same height then adjust the PVC height wherever you want the water level to be, of course the overflow box here would have to be at the right height as well, beauty with doing this on glass is you can redo the silicone if you get it wrong the first time.

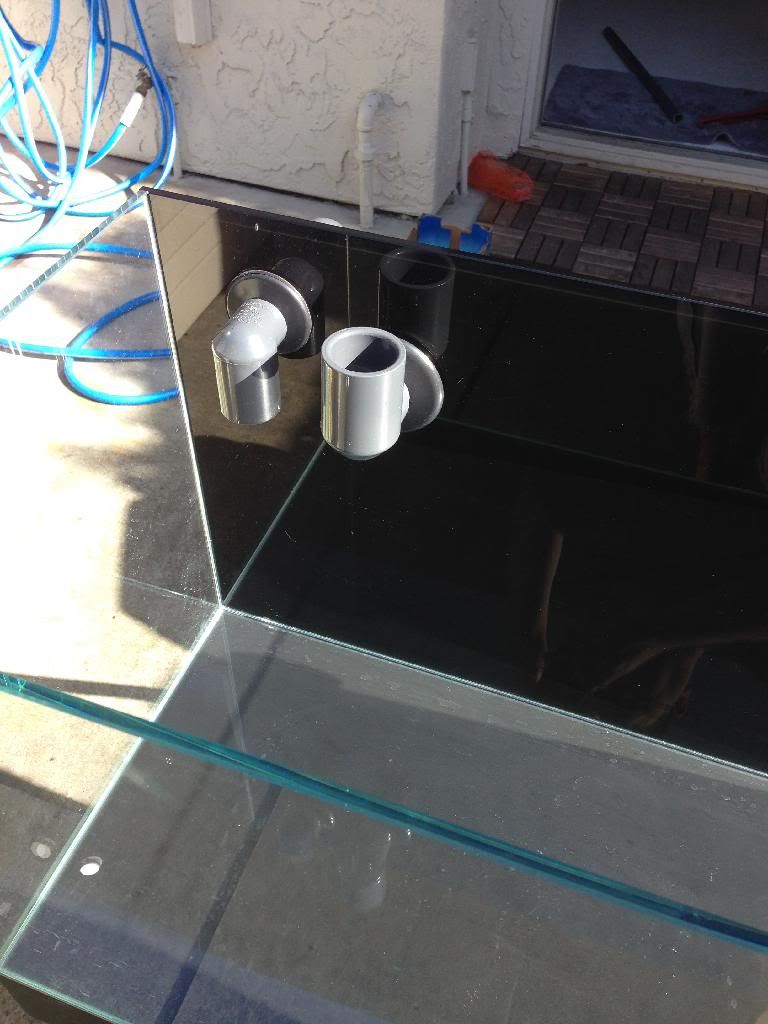
An overflow box in this context would be a very very strong recommendation because with this design now you will be staring at PVC plumbing sticking out of the back of the tank without the box. To answer your question more directly yes it can work without the overflow box but it can not work without the PVC 90 elbow & piece of straight PVC pipe sticking up from the BH, that's the emergency pipe, the full siphon pipe would have to be a 90 elbow pointed down, some people point them facing downward at a 45 degree angle because when the pump comes back on it will achieve full siphon more quickly. All of which would be visible without a box.

The durso part of your drain would have to go, you would have 90 elbows on the inside & outside so essentially your full siphon tube is doing an upside down U through the back panel.


I'm drilling mine as high up as I can go that way I can have the shortest overflow box possible, I'm going to try to pull off 3" from the surface & 3" from the back.
I too plan to angle my full siphon elbow at 45 since the bottom of it will practically touch the bottom of the box :)

I'm going to stare at my tank a little more tomorrow and decide if I'm going to do the box ;)...But it definitely sounds like I'll be doing the second drain. I'll have to place an order at BRS.

I would suggest a second drain, however if you do might want to go up a pipe size or two. Your inverted ell will work instead of an overflow box, you might get some gunk build up on the water surface though because there's really not much surface area to skim from.

So if I understand your correct. Bump up the second drain to 1" for example, put a slip elbow with the hole facing up? Whats the principal with a larger second drain?

Lastly what's that little black dohicky on the outside of the sump wall, next to the cord of the return pump? Is that some sort of auto-top off device? I ask because if you have it set too refill the sump water too high, when you get your "power out" situation there may not be any room left in the sump for the drain water.
Yep its the magnets for the float switches for the tunze ATO. I just stuck them on there. I now realize that I have to fine tune my sump so to speak. So it doesn't over flow.
 
Okay I don't have a really problem with a second drain for emergency, it will probably be better because I can fill the sump with slightly more water.

My follow up question - do I still need an over flow box? Can I simply stick a slip street elbow on the second drain and stick the opening up and put a screen on the main original drain? And if this does work, it sounds like I have to plug that durso vent closed?

Also where is the optimal location for the second drain? Same level or higher than the main okay?

Sent from my iPhone using Tapatalk


I'm not sure what you mean in 'it will probably be better because I can fill the sump with slightly more water'. The emergency drain keeps the tank from flooding if the main drain gets blocked.

You don't absolutely have to have an OF box. There are huge advantages to having one and it's easy to do when the tank is dry. Much harder to add after the tank is running.

As Mike pointed out, it gives a place to hide some plumbing. More important is the addition of surface skimming. Without a OF box the main flow (full siphon) is always below the surface. It doesn't collect any of the surface layer of scum. This is similar to using a canister filter on a FW tank. In SW the scum is more of an issue. It's where all the organics go. It's the crud you want to feed to your skimmer so it can be removed!

Also the OF box reduces the chance of creatures being sucked into the drain.

All of the above is discussed in detail many places on the web. The OF box extended across the tank is known as a coast to coast OF or a Calfo coast to coast. Get yourself a tall beverage and let google be your guide! :)
 
I think I missed a post or two for the last reply! Mike (sfsuphysics) and I are giving you slightly different advise because we are talking about systems with different priorities. Hope you are not getting too confused!

For me personally, quiet is the first design goal. Next in no particular order is safety, reliability and ease of use/maintenance. On my 120g build I'm using a modified coast to coast with a BA drain. It is absolutely silent. The only noises from the tank are the hummmmmm of the return and skimmer pumps and the whirrr of the LED fans. There is no water flow noise!

Because there is no air trapped in the drain flow, there is very little/no bubbles introduced to the sump and very little salt creep. Also because the main drain is full siphon, it easily supports 800gph flow using about half the capacity of a 1" drain line.

The same silence can be had with a herbbie. Because it uses the second drain as both for the extra flow not taken by the siphon and an emergency, it's not quite as safe as the BA.

If you are ordering another BH, also get one of the good quality gate (best but $$) or ball valves to tune the siphon drain. As you found out with your tests, the siphon can handle more flow than the return pump can supply. The valve lets you balance this.
 
I think I missed a post or two for the last reply! Mike (sfsuphysics) and I are giving you slightly different advise because we are talking about systems with different priorities. Hope you are not getting too confused!
Correct, my main goal is safety/redundancy. While I would put quiet into the mix, I'm not terribly concerned with making it dead silent.
 
If you drill a second hole for the emergency drain you should probably make it bigger than the full siphon drain, as Aqua-nut mentioned Herbie has less precautionary redundancy therefore oversizing the emergency drain is a good idea that way even if something got in it there is a better chance that it can still drain even if the full siphon drain becomes completely clogged.

One (or more) of us should probably have a phone or in person (at the frag swap?) conversation with ya that way any questions can be answered within the context of the conversation, I'd be up for this :) and maybe later today I'm going to pull all the overflow/drain related links from my favorites and give them to you, you might be getting sick of reading but knowing more now is better than learning after the thing is built.
 
So I'm going to agree with some of the comments thus far, and then buck the trend on others.

The 3/4" overflow is too small to operate as a gravity/durso overflow. The problem is that the small diameter tends to create a constant flushing effect as the water fills the tube and then empties. If you went up just a bit to 1" bulkhead and drain line you wouldn't have that problem.

If you up size your overflow and add something to make sure snails and fish don't wonder in, then I'm not sure you need an additional hole. Herbie or bean animal overflows are great on larger tanks, but since nanos have much lower flows and less real estate it might be overkill. Looks like you have a tunze/sicce return pump, which is adjustable. You'll probably be in the 100-20o GPH on the return and a 1" overflow is more than adequate to handle that.

If you want to add an overflow box, you could check out glass-holes (http://www.glass-holes.com/Super-Nano-con-Dientes-Overflow-Box-Complete-Kit-ghsndienteskit.htm). Since you've already drilled a hole, you would have to contact them and see if that location would work. You'd definitely have to enlarge the 3/4" hole to a 1" hole. He might even be able to make you a custom box that would work with your hole location.
 
Last edited:
Phillip, I can't argue with any of the points you've made. I lost track of the fact this is a small tank! The GH suggestion is a good one.
 
Hey All!

Thanks for all the replies. I'm not lost at all HAH! But it does seem there are a couple correct ways to go about this drain...

Let me refocus what I'd like to get out of the tank and also what I am willing and not so willing to have on the tank as well. Philip, thanks for reminding everyone my tank is less than 20gals ;)

1) I'd like the drain the be silent as possible. I can live with a little noise but a constant toilet flushing isn't going to work.

2) I'm prepared to drill another hole for an emergency drain but not liking the idea of going up to 1" for either drains. Is this okay? Can I still achieve close to a silent drain? I'm not comfortable enlarging the area that has an existing hole and risk shattering the whole tank. BUT I can drill the second hole larger - that I'm comfortable with. I'm trying to minimize drilling holes in the tank. These rimless ADA tanks are thin!

3) I can live with looking at two elbows. One facing up for the emergency and one for the one facing down for the full siphon drain. I'm still on the fence with the over flow box. but it does sound like I can get away from not having one.

So here are the options I think I have.

option 1
Drill second 3/4 hole for emergency drain and fit and elbow on each drain. Gate or ball valve on full siphon drain.

Option 2
Drill second hole 1" for emergency drain and fit and elbow on each drain. Gate or ball valve on full siphon drain.
Maybe switch the emergency to the 3/4 drain and full siphon drain to the new 1" hole.

Do I have another option?

Fidel, I wouldn't mind some links. Searching through RC is overload for me.

John - What are you thoughts on true union ball valves? I've got one laying around at work.

Mike - I think I will go with a second drain just for the safety factor.
 
Hey Marc!

I can only speak from my experience with one brand of true union BV. My tank uses the BA system. The BV is on the siphon drain. I have the BV from BRS, Cepex, and it works great for me. The BA system is very forgiving on the siphon adjustment and the Cepex BV it is easy to make small adjustments. It's much more compact than an 'ununion' (made that up!) valve plus two unions.

I have two BVs on my system. The other is a cheapPVC valve. It will be replaced because it is so hard to turn compared to the Cepex. Whether or not you use ball valves, gate valves or true union valves - get quality! Every time I turn that cheap valve I am reminded how saving a few dollars can be a false economy!
 
Both your options are using full siphon drains in the tank as the primary, which means most of the water is getting sucked out of the tank from below the surface which probably won't be enough surface skimming. You might be able to adjust the siphon down so that some water goes down the secondary upturned elbow, but I'm still not sure it's going to be enough to accomplish surface skimming. I think I'd go for option 2, but I'd leave the 3/4 as the siphon and drill a new 1" as the emergency overflow. This will also give you some flexibility too. If you don't get enough surface skimming from this arrangement, you can switch it to make the 1" your primary and add a slightly higher upturned elbow to the 3/4" so that it acts as the emergency.

FWIW, all the water in my tank goes into the upturned elbow and I still occasionally fight with sludge on the top surface.
 
Haha! Sorry! With ADA tanks the number stand for length of the tank. In my case it's 60cm. Philips tanks is very similar to my tank except his is the "high" version. 60H.


Sent from my iPhone using Tapatalk
 
1/25/2014
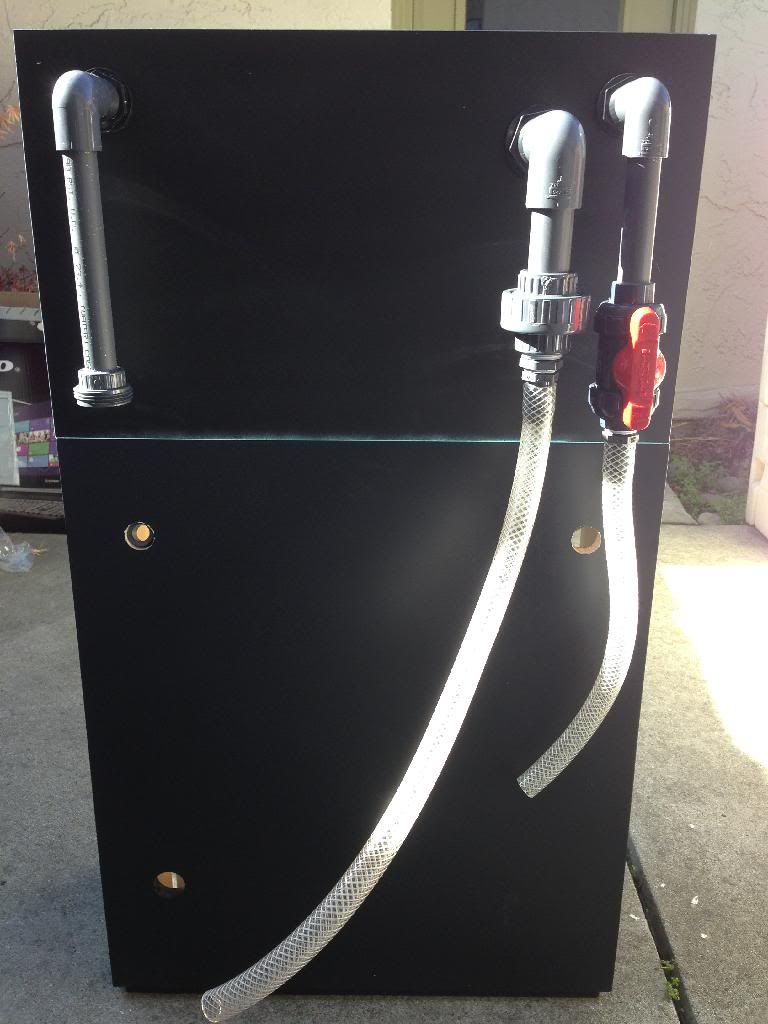
Got the plumbing complete! I also applied silicon to the inside edges of the stand to prevent any water from damaging the stand.

81D0AD34-9256-4FE8-B55E-6B26E8A12D2B_zpsphdkivtt.jpg

B82F34A8-BA32-484A-B2A0-45DEC67B68A3_zpsc3rpwfrc.jpg
 
1/29/2014
Quick update - Tanks been up and running since this Tuesday.

Couple question...

The CAD light skimmer is very sensitive and a little difficult to adjust. Is it normal not to have any skimmate at this stage of the set up? I ended up using RO DI water and mixed my own salt. I also used a 20# bag of live sand.

I tested ammonia and I'm not getting any reading. Is there anything else I should be testing for before adding fauna?

The drain has been working awesome and very silent. I am getting a hum from the pumps that seem to be resonating in the cabinet. Do you think foam between the sump and stand will help?
 
Fantastic!

Probably nothing to skim at this point. Also it takes some time for the skimmer to break in.

How are you cycling? I and others have used Dr. Tim's 'One and Only' successfully. In addition to the bacteria, you'll need a source of ammonia. A fish (some consider this cruel), chunk of raw table shrimp, or direct addition of ammonium chloride all work.

Hum? Yes add some foam under the sump. You might also add something where the return line goes thru the back of the stand. In one of the pics I see it looks like it's touching the back. Other good places are under the return pump and under the skimmer. Good luck with the hum hunt!

I found some cheap silicone hot pads that I cut up for padding/vibration suppression.

And finally, did you forget how to use a camera? :D

Where are the pictures???
 
The skimmer might simply be having a break in period, I wouldn't worry too much as long as the water level in the chamber the skimmer is in remains constant you should be fine. What I would do if lower the foam level just so it doesn't overflow too many times, let it break in with the rest of the tank since you don't have anything that really needs to skim out.

NO ammonia after how long? 24 hours? Not too surprising, you need to have the whole range of build up/break down of bacteria to get it. New tanks with no dead life in it at all? No ammonia is not surprising. Back in the day we used to use a damsel to cycle our tank because screw him it's $3.99 for a fish we get instant gratification and they're tough as nails... but nowadays we tend to think a little more... compassionate about the animals in our tank (plus we don't want to fish out a damsel later on if he starts bullying everything in sight!). Your live sand should kick off the cycle process since not everything in there actually survived I'm sure, it just might take a little while to get started.

The way you need to think about it is that every dry space that's touching water from the sides of the tank, all the plastic inside the pipes, every nook and cranny in the foam and filter socks need to get coated in bacteria. Now your live sand you added is a good source, however you also don't have much "food" for said bacteria in the tank, so some of that will die, which will make ammonia which will become food for other bacteria, which will etc... I've never used what John mentioned "Dr Tims" witch doctory in a bottle?? so I can't comment on how useful it is. I've had enough decaying matter on my "live" rock that there was plenty of ammonia to kick start the process.
 
Back
Top