Cali Kid Corals

Arin's Frag Tank Journal

phatduckk

Supporting Member
Hi folks,

I joined up way after my 2 displays were setup and my minor, recent changes didn't leave me much journal fodder but... I'm rebooting my frag tank and figured I'd document the process.

IMG_0035.jpg


Why the reboot:

There's a few reasons for the reboot. Let's go through them:
  1. The tank had some live rock I'd stashed in my DT's sump for over a year. I used that to help seed the cycle here etc. However - over time I started finding some vermetid snails on the rocks. Luckily I only found one or two on the frag plugs so those were easy enough to dispatch. However, I figure If I saw 10 of them on the rocks there was a bunch more out of site
  2. The tank initially served as an invert & coral QT. Because of the invert QT I had sand so the conches and nesaurius snails could be QT'd in there. They all graduated and have since moved to the DT and I'm not sure I want sand in my frag tank. It was a must for those inverts but now that my displays have enough I don't have an actual need for sand
  3. All my frags also finished their QT period so if I was ever gonna take the tank apart and clean it now would be the time
Equipment:

I'll probably keep 99% of the gear as is with one exception I'll discuss below...
  • Innovative Marine Lagoon 25 tank
  • IM Skimmer
  • Aqua UV HOB UV filter ran my an MJ1200 (I forget the wattage of the UV)
  • InTank filter cadges on both sides
  • Small reactor for carbon
  • Bashsea frag rank
  • a single Red Sea ReefLED 90 light
  • Apex EL (ph probe etc)
  • Neptune Dos
  • Neptune Trident
  • Smart ATO Micro with a basic 5g jug as the water reservoir
  • Mp10 power head
  • MightyJet DC Return pump with random flow generators on the output
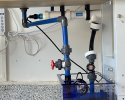
The one bit of gear I might swap out of the MP10. Its fine - it works & is easy to program with the WXM but I'm thinking a Gyre type pump would work better. It has a wider footprint which has its pluses and minuses... but the gyre flow would, in a sandless scenario, do a good job at helping keep detritus off the bottom. We'll see.

Current status:

I removed the last few CUC members a few days ago and added them to my desktop tank (you can see it in the reflection in the picture above) and I just added about 150ml of Clorox to the tank to begin sterilizing it. I'm keeping the pumps running to let the bleach do its thing on the internals.

My goal for this week is to get the bleach water out on Wednesday and refill it with tap water to begin the dechlorination. Hopefully, kids and wife permitting, I'll be able to get all the gear out and drag it to the yard for a hose down and scrubbing next Sunday; after that its just waiting for it to completely dry out and be inhabitant safe again.
 
Hope to see it flourish!
If you want to get rid of the mp10 I might be interested in it.

cool. I’ll keep you in mind.It works fine. I’m just trying to see if I really think a different pump would suit my needs better of if I’m just being a gear junky and looking for an excuse to buy stuff
 
Quick and boring update. I ran the bleach through the tank for 48 hours, filled it back up with tap water - ran that for 24 hours and now I’m getting it all drained.

image.jpg


I’ll fill it back up again and run it through with tap water for another 24 hours to make sure the bleach is removed from pumps’ internals.
 
Got it filled back up with tap water and dumped in a bunch of citric acid to get a head start on cleaning up the gunk buildup. So far, so good. The gross coating on the MP10 and other plastic bit is essentially melting away which indicates that the scrubbing I have to do tomorrow is gonna be a lot easier.
 
Last edited:
Alrighty. We’re back in business, well almost. Tank’s back indoors, leak tested, all cleaned up and filled with RO. I got the basic equipment back on, reorganized some of the apex outlets/programming and it’s time to dump in the salt.

another minor change is the addition of a gyre. I was driving by AC and, of course, I had to stop in “just to look”

the final decision I’m wrestling with is whether I want to setup an AWC or not. Changing out 10-20% is just a single bucket so it’s not hard to do it manually but a daily 1-2% is effortless and will keep things more stable. We’ll see.

9FB92C36-3469-4C10-8F95-EADD1B6FF88C.jpeg
 
Well, oops. I placed an order with an online coral vendor intending to set the delivery date for next week. I guess I messed up and they arrived today

62612300443__407212AD-3B97-480A-B254-66FF52BDB180.jpeg


Luckily I was having trouble sleeping on Sunday night and got everything ready. I grabbed a bunch of marine pure spheres from my DT's sump, added some fritz turbo start for good measure, dosed nitrate to 5 and PO4 to 0.03, put some new reagent in the Trident and here we are.

No CUC yet as I have nothing for them to clean but that's easy enough.

The main thing I'm struggling with is whether to add fish or not. I might acclimate some fresh water mollies as they cant bring any fish parasites and can serve as a good canary in regards to any fish bad guys coming in on the plugs.

We'll see...
 
OK I have neglected this build thread and there's a lot to update:

The IM Lagoon 25 is gone! I decided a new build would be a fun COVID project so I embarked on a larger frag tank build. The tank is all setup now but I'll submit a separate post for each "milestone" (hopefully I dont spam the feed too much).

I'll rattle off the Equipment first before I get started with the build pics.
  • Tank: 48x24x12 frag tank I bought from @Mr2KiEu
  • Exotic Marine Systems overflow
  • Trigger Systems 26 Sapphire sump
  • GW7 DC Skimmer
  • Cor-20 Return pump w/ Flow meter
  • AquaUV 25w UV
  • 2 MP40s
  • 2 ReefWav 25
  • Apex EL, Trident. modules: WXM, ATK, 2x FMM, PM2
  • 2x Neptune DOS: 1 for 2 part, 1 for AWC
  • 2x Neptune EB832
  • 2 BRS titanium heaters going into an InkBird, which goes into the Apex
  • BRS mini reactor ran off a PMUP
  • 2x Radion G5 Blues
  • Adaptive Reef cabinet to house most things
  • Adaptive reef board to mount misc stuff
  • Stand is a Gladiator workbench from HomeDepot
 
So the new tank was going to go on the table I used for working during the beginning of COVID. I had setup a nano tank on there so the first step was to get the nano tank moved away.

1626146894341.png


Here you can see the old frag tank's location (closest to you) and the large workbench in the back that held my nano and the new frag tank. The goal was to get the old frag tank into the yard (its still there!), move the nano over to where the old frag tank was & dedicate the long workbench in the back to the new 4ft'er.

It was one hell of the day, moving 3 tanks around and all that, but in the end I was able to get it all done without smashing anything & the frag tank's space was ready:

1626147097213.png


Here you get a look at the approximate, final layout. The cabinet is empty at this point but things are ready to start planning the plumbing & the light hanging.
 
So at this point I took an entire week off work to get the tank setup. My timeline breakdown was:
  • day 1: move the tanks (previous post)
  • day 2: mount the lights
  • day 3: plumbing
  • day 4: leak test
  • day 5: add salt & program the apex
The light mounting was pretty simple. Nothing really noteworthy ... or so I thought. The digital stud finder turned up nothing so I went old school and used one of the magnetic ones... fine. Strange, but, fine. I marked the studs and figured it would be a 10 minute job; drill drill, done, done. Nope!

There were no studs. WTF was the magnet sticking too? Had to be nails, right? Well, I have no idea... after drilling too many pilot holes I embarked on plan B. I bought some lumber from HomeDepot and figured I'd affix it to the ceiling with 3 toggle bolts... one in the center and one on each end.

I had my helper paint the lumber and got the wood solidly held up on the ceiling. For a minute I considered just mounting the little mounting nut things ping toggle bolts but figured the wood would give me some flexibility to move stuff around if I'd mis-measured of had to change something up.

1626147866981.png


I didn't really document the process of mounting the wood as I was mostly annoying about having sheet rock dust on my face. But... whatever. it worked out.

1626148092618.png


As you can see. I didn't mount the little nut things center... cuz, yup - I'd measured it incorrectly. Good thing I built in some wiggle room. Any further and I'd have to move the whole board (or bolt a second one right next to it). Even 5 XR15s are way, way under then supposedly weight limit of a single toggle and I used 3 of them so I I have no real worry of it "giving"
 
Looking good so far.
I like all the pink stuff you have....;) I have 3 daughters myself.
It's good you got them involved.
 
Looking good so far.
I like all the pink stuff you have....;) I have 3 daughters myself.
It's good you got them involved.
Lol yup. Everything’s pink! I have 2 girls: one’s 4 and the other is 5.5. I like getting them involved in all sorts of projects. They’ve “helped” me build guitars, work on the tanks and all sorts of stuff. Obviously their attention span isn’t gonna allow them to focus for 4 hours but they have fun for a bit then run off when they’re over it.
 
Lol yup. Everything’s pink! I have 2 girls: one’s 4 and the other is 5.5. I like getting them involved in all sorts of projects. They’ve “helped” me build guitars, work on the tanks and all sorts of stuff. Obviously their attention span isn’t gonna allow them to focus for 4 hours but they have fun for a bit then run off when they’re over it.
I have a pink/ red birds nest, as well as a pink monti with blue dots that they might like if pink is their thing. Once you get the tank stable, we can have a pink frag party!
 
OK so next up the plumbing. The main constraints here were:
  • The tank was drilled for 3/4" returns
  • the sump only takes a single drain line at 1"

I had a rough idea of how I wanted to plumb it but, since this was my first plumbing job, I figured I'd mess up a few times and over-bought PVC, fittings & unions. I'd hate to bring the project to a halt b/c I was missing a piece... so, I got a ton of stuff.

I ended up using blue PVC from BRS because it was on sale and it matched the sapphire sump. win, win. But - in order to not waste the blue stuff I did an initial dry fit using the standard white stuff from Home Depot.

1626321637481.png


Here you see most of the white pipe in place so I can figure out how I want to plumb this on the fly. I forget why I had one stretch in blue but whatever... The UV is actually the Twist model which lets you rotate the input & output unions independently. That was a huge help in keeping the plumbing simpler & straight forward. As you can see above the output of the UV is twisted so that making a run to the return's is pretty straightforward.

I got most of the layout sorted out and this was the rough draft. My goal was to have easy access and make maintenance pretty easy. More or less fit the bill - so, ship it!

1626321748441.png


A few things of note here.... 1 at this point I was only going to have a single drain... we'll revisit that later :p

On the return side I needed to get the plumbing reduced down to 3/4" for the return. So went from the Cor 20 to a 1" flow meter, then used flexible hose to the UV. The UV has a 2" input... so I kinda used it as the reducer: I plumbed in a 1" barb on the input side & on the output of the UV I used 3/4" PVC out and to the return bulkheads. In the end that looked something like this:

1626324599840.png
1626322232571.png

Next up was the leak test along with tuning the return pump's flow & the messing with the durso setup in the overflow box.

Luckily the leak test was a success - but, man, no matter how much I messed with it the durso was loud and annoying as hell. Again, first plumbing job so perhaps someone more experience could have sorted it out but I couldn't :p

I was kinda bummed out and annoyed but after a quick pep talk from Deven from ReefDudes I decided I had to stop being lazy/bummed, scrap the durso and implement a Herbie drain. Makes sense... plus its safer... ok fine. So I ran out to Aquatic Collection to buy a new bulkhead for inside the overflow and some more PVC b/c, as luck would have it, they had some blue in stock. woot.

So here's the Herbie:

1626322241419.png


Its not glued in at this point but it works! Yup, I know its crooked LOL

here's a quick tour:

So that's it. It's been running for about 3.5 months now...
And, yes, I finally glued in the emergency and put a union on it so I can adjust the angle to prevent it from being crooked & ugly.

At this point its just running w/o the controller... everything just into the wall. Up next is the cabinet & Apex/gear setup....
 

Attachments

  • 1626324478850.png
    1626324478850.png
    826.8 KB · Views: 129
Last edited:
OK so next up the plumbing. The main constraints here were:
  • The tank was drilled for 3/4" returns
  • the sump only takes a single drain line at 1"

I had a rough idea of how I wanted to plumb it but, since this was my first plumbing job, I figured I'd mess up a few times and over-bought PVC, fittings & unions. I'd hate to bring the project to a halt b/c I was missing a piece... so, I got a ton of stuff.

I ended up using blue PVC from BRS because it was on sale and it matched the sapphire sump. win, win. But - in order to not waste the blue stuff I did an initial dry fit using the standard white stuff from Home Depot.

View attachment 29802

Here you see most of the white pipe in place so I can figure out how I want to plumb this on the fly. I forget why I had one stretch in blue but whatever... The UV is actually the Twist model which lets you rotate the input & output unions independently. That was a huge help in keeping the plumbing simpler & straight forward. As you can see above the output of the UV is twisted so that making a run to the return's is pretty straightforward.

I got most of the layout sorted out and this was the rough draft. My goal was to have easy access and make maintenance pretty easy. More or less fit the bill - so, ship it!

View attachment 29803

A few things of note here.... 1 at this point I was only going to have a single drain... we'll revisit that later :p

On the return side I needed to get the plumbing reduced down to 3/4" for the return. So went from the Cor 20 to a 1" flow meter, then used flexible hose to the UV. The UV has a 2" input... so I kinda used it as the reducer: I plumbed in a 1" barb on the input side & on the output of the UV I used 3/4" PVC out and to the return bulkheads. In the end that looked something like this:


Next up was the leak test along with tuning the return pump's flow & the messing with the durso setup in the overflow box.

Luckily the leak test was a success - but, man, no matter how much I messed with it the durso was loud and annoying as hell. Again, first plumbing job so perhaps someone more experience could have sorted it out but I couldn't :p

I was kinda bummed out and annoyed but after a quick pep talk from Deven from ReefDudes I decided I had to stop being lazy/bummed, scrap the durso and implement a Herbie drain. Makes sense... plus its safer... ok fine. So I ran out to Aquatic Collection to buy a new bulkhead for inside the overflow and some more PVC b/c, as luck would have it, they had some blue in stock. woot.

So here's the Herbie:

View attachment 29805

Its not glued in at this point but it works! Yup, I know its crooked LOL

here's a quick tour:

So that's it. It's been running for about 3.5 months now...
And, yes, I finally glued in the emergency and put a union on it so I can adjust the angle to prevent it from being crooked & ugly.

At this point its just running w/o the controller... everything just into the wall. Up next is the cabinet & Apex/gear setup....
Nice video! Very clear, and great job getting it running!
 
This is skipping ahead a bit but as I’ve started revisiting this build I’ve realized that I regret not buying a larger sump.

hmmmmmm
 
Back
Top