FinalPhaze987
Supporting Member
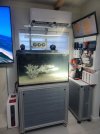
Alright....hopefully this is my last dry post for this build..seeing the year is coming to the end, it's only fitting I document where I'm at with it..
Since I couldn't fit the simplicity dosing container behind the ecoflow I hit up John from Advanced Acrylics to work his magic..

I picked up a dosing container to match the ATO reservoir I had built a while back. Quality is spot on and built solid.

I had concerns over fixing it to the wall with how much it weighed when full, but once it was all mounted up I knew it wasn't going anywhere.

Fired up the Apex and attempted to dive in with some coding...man was that a mistake...not something I'll be learning overnight..but with the holidays nearing the end, should allow some time for me to get acclimated to it.

All that's left is to affix the MP40s, level the stand out, and install a couple brackets and she's ready to go.
The plan was to finish before year end, but when doing a dry run with the equipment and simulating servicing, I found that too much wire management when the tank is fixed was a bad thing..things were just a PITA to get to and remove in case of cleaning or repair..so I had to tone it back some
Since I couldn't fit the simplicity dosing container behind the ecoflow I hit up John from Advanced Acrylics to work his magic..
I picked up a dosing container to match the ATO reservoir I had built a while back. Quality is spot on and built solid.
I had concerns over fixing it to the wall with how much it weighed when full, but once it was all mounted up I knew it wasn't going anywhere.
Fired up the Apex and attempted to dive in with some coding...man was that a mistake...not something I'll be learning overnight..but with the holidays nearing the end, should allow some time for me to get acclimated to it.
All that's left is to affix the MP40s, level the stand out, and install a couple brackets and she's ready to go.
The plan was to finish before year end, but when doing a dry run with the equipment and simulating servicing, I found that too much wire management when the tank is fixed was a bad thing..things were just a PITA to get to and remove in case of cleaning or repair..so I had to tone it back some