Agreed on all!Well there's going to be some level of bias any way you slice it. If you pay for it yourself, there often is a bias that because you paid good money for it that it must be better than it actually is, and you can very often see this when "fan boys" defend a products faults sure they may acknowledge they exist but damnit you need to be more reasonable in accepting that they work.
It's why I largely don't trust reviews/star ratings/etc anymore, people get broken down into 2 big groups 1) something went wrong and you're furious and the company must pay! or 2) It works fine, please stop bugging me for a review, ok here you go 5 stars it works fine. There very often is no middle ground. I was thinking about this the other day as I went looking for a chinese restaurant to get take out, and saw a review of one with over 6000 ratings and a 4.3... like bullshit, 6000 people did not give you a rating, and there's no way that the average rating is very good/excellent. (I didn't get food there)

You are using an out of date browser. It may not display this or other websites correctly.
You should upgrade or use an alternative browser.
You should upgrade or use an alternative browser.
GHL p4 unboxing and setup
- Thread starter ofzakaria
- Start date
Controlling CArx (or Controlling a doser based on alk teser like khg):
I need to setup my khg which uses ph port to report alk values. I want the controller to turn on/off my doser based on the khg reporting.
These steps are the same to control a calcium reactoe via ph reading..
Press the Menu icon
Select Control
select Sensors
Select the pH probe you will be using
In the description put the name if you like, as an example CaRx pH, or in my case "kh".
Enable measurement recording and specify how often to collect data. This will allow the P4 to record the pH levels in the calcium reactor which can later be viewed on a chart. Or in my case, it will record the kh values reported by my khg..
Set the target nominal value(the ph you want to target, or in my case the kh value I want to mantain).
Set the wanted Hysteresis
press SAVE
The above specified the function smd conditions.
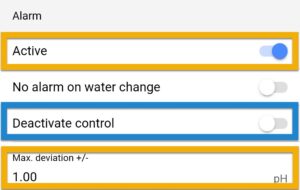
"Bonus, since the p4 have a built in audible and visual alarm, you can activate an alarm if values are wack, this is especially useful if you are controller a carx where you want to know of something went wrong. You can do that by: seting the alarm to ACTIVE then set the maximum allowed deviation.
If you want to turn OFF a solenoid when the pH reading goes outside the allowed deviation, ENABLE Deactivate control."
Now its time to assign this function to an outlet
press Menu,
Select Switch channels
Select the outlet that has or will have the solenoid connected to it (or in my case the outlet that the doser is connected to)
Type in a description (Solenoid (CaRx) or in my case "doser")
Set the function to pH value
select the probe to use
select Control downwards (Decrease), press SAVE
Done.
Now the outlet will turn on/off based on the reported ph value. If solniod is connected to it, it will control the solenoid based off the CArx ph value. And in my case it will control the doser based on the reported alk value by the khg..
Here is the link for this example
 www.aquariumcomputer.com
I need to setup my khg which uses ph port to report alk values. I want the controller to turn on/off my doser based on the khg reporting.
These steps are the same to control a calcium reactoe via ph reading..
Press the Menu icon
Select Control
select Sensors
Select the pH probe you will be using
In the description put the name if you like, as an example CaRx pH, or in my case "kh".
Enable measurement recording and specify how often to collect data. This will allow the P4 to record the pH levels in the calcium reactor which can later be viewed on a chart. Or in my case, it will record the kh values reported by my khg..
Set the target nominal value(the ph you want to target, or in my case the kh value I want to mantain).
Set the wanted Hysteresis
press SAVE
The above specified the function smd conditions.
"Bonus, since the p4 have a built in audible and visual alarm, you can activate an alarm if values are wack, this is especially useful if you are controller a carx where you want to know of something went wrong. You can do that by: seting the alarm to ACTIVE then set the maximum allowed deviation.
If you want to turn OFF a solenoid when the pH reading goes outside the allowed deviation, ENABLE Deactivate control."
Now its time to assign this function to an outlet
press Menu,
Select Switch channels
Select the outlet that has or will have the solenoid connected to it (or in my case the outlet that the doser is connected to)
Type in a description (Solenoid (CaRx) or in my case "doser")
Set the function to pH value
select the probe to use
select Control downwards (Decrease), press SAVE
Done.
Now the outlet will turn on/off based on the reported ph value. If solniod is connected to it, it will control the solenoid based off the CArx ph value. And in my case it will control the doser based on the reported alk value by the khg..
Here is the link for this example
How to setup Calcium Reactor control - GHL Advanced Technology
Attachments
-
 20200814_083044.jpg28.5 KB · Views: 270
 -
 20200814_083029.jpg17.1 KB · Views: 286
 -
 20200814_083016.jpg21.8 KB · Views: 253
 -
 20200814_082954.jpg29.1 KB · Views: 278
 -
 20200814_082929.jpg29.7 KB · Views: 279
 -
 20200814_082908.jpg26.1 KB · Views: 285
 -
 20200814_082839.jpg33.2 KB · Views: 287
 -
 20200814_082821.jpg31.5 KB · Views: 260
Last edited:
sfsuphysics
Supporting Member
So how is programming like for it? It looks to be a menu driven programming system, so you can't manually program it at all?
Yes indeed. No code and such. Just menue and switch knobs. You can do advance programing but so far (close to 2 years of usage and tinkering) i have not needed anything that I couldnot do from menu.So how is programming like for it? It looks to be a menu driven programming system, so you can't manually program it at all?
The control and functions are very intuitive especially once you realize you always want to define the functiom, then assign it to a hardware(outlet, doser, light, pump..etc)
The documentation for GHL product is one more thing that stands out. You rarely need to go look online or have to contact the CS only to get a one line responce "open a ticket on our forum"
Everything you need you can easily find on their knowledge base that you can find in the app or on their website...
I think this is one of the reasons you do not see alot of threads about the ghl control or programing online. Cause once you have it, the app do everything for you including the knowledge base
This is the knowledge base online
www.aquariumcomputer.com
Everything you need you can easily find on their knowledge base that you can find in the app or on their website...
I think this is one of the reasons you do not see alot of threads about the ghl control or programing online. Cause once you have it, the app do everything for you including the knowledge base
This is the knowledge base online
Docs Archive - GHL Advanced Technology
Attachments
sfsuphysics
Supporting Member
Well that's good to know that you can do advanced programming. My experience is when using menu driven systems you're limited to what they've already programmed in for you to do, which for a majority of things is more than enough, but there's always that odd ball thing that you wish you could manually do.Yes indeed. No code and such. Just menue and switch knobs. You can do advance programing but so far (close to 2 years of usage and tinkering) i have not needed anything that I couldnot do from menu.
The control and functions are very intuitive especially once you realize you always want to define the functiom, then assign it to a hardware(outlet, doser, light, pump..etc)
As I said so far, nothing i was not able to do. And believe me when I say, am advanced automator ha haWell that's good to know that you can do advanced programming. My experience is when using menu driven systems you're limited to what they've already programmed in for you to do, which for a majority of things is more than enough, but there's always that odd ball thing that you wish you could manually do.
One thing I like about the ghl app is that its actually an app not web interface that is packaged as an app.
That is why through the ghl app yoi can do both local connection (directly connect to the p4) or remote connection through the cloud.
So when there is an issue with the wifi, the internet or anything else, I do not need to go to a separate web interface rather f4om the same app you can do that.
The app as in the picture, you can choose to go to the p4 directly via your wifi or via the p4 hotspot itself. This case if you are home within your wifi, or if there is an issue with the home wifi or internet. You will still be able to access the product regularly
Or
You can choose to access the box remotely thru the cloud. This is when you are outside your home, or when you are not connected to wifi..
Attachments
GHL Doser Dosing setup
Required Equipment :
GHL stand alone doser
Or
GHL doser and Profilux 4 controller
Measuring device with 1mL accuracy (I used a graduated cylinder)
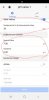
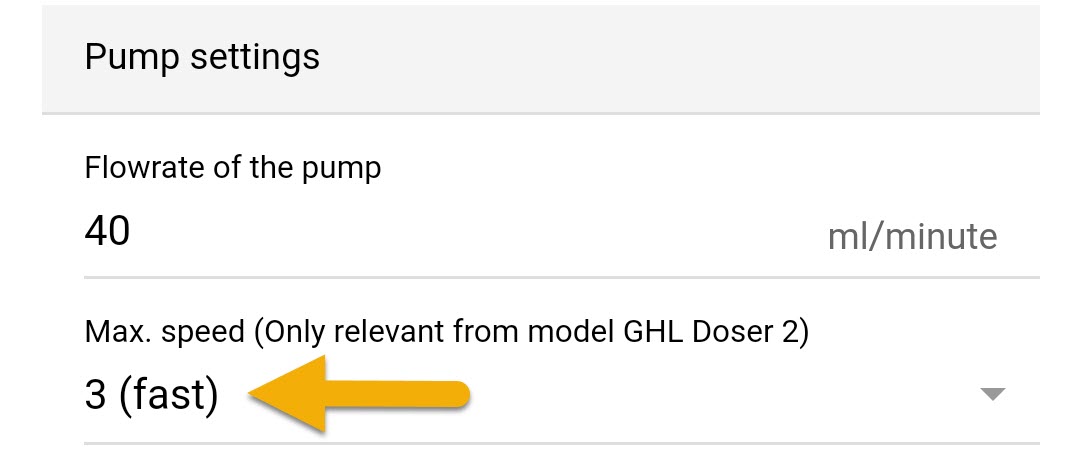
start by selecting on of the dosing channels, in this example I am setting up pump 2. I entered the product name in the description and set the manual dose button to dose at the max speed (I do this for priming the line later)

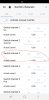
Then I set up the fill monitoring, I am just ‘trusting’ the pump speed to stay accurate in order to alarm me when it is time to refill. There are optical sensors but I won’t cover that now. I set the bottle size and when I want a notification to refill. I also set the speed to speed 0 which is designed to be 5mL/min. To confirm that I run the calibration, to do the calibration I prime the line by holding the manual pump button then set the doser up to the graduated cylinder and it will dose for 1min. Then you update the pump with the amount it dosed in that minute to have jt


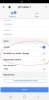
Once the pump has been calibrated I can now set up the dosing function. I will be using the dosing schedule, but there are also options to dose based on water level, I tried using this for ATO but it is not a fast enough pump to keep up with evaporations especially compared to a regular ATO, that would probably require the Maxi doser from GHL. Once the pump has been set to follow the dosing schedule I’ll go to the dosing schedule tab

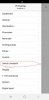
to set the dosing schedule all I do is enter the amount of doses and the volume to dose each time along with the time I want it to start automatically dosing, this is useful for alk so it can be set to start dosing when lights are ramping up and the alk intake is increasing

takes less than 5 min to set up when you aren’t screenshooting and writing it up while doing it, haha.
Required Equipment :
GHL stand alone doser
Or
GHL doser and Profilux 4 controller
Measuring device with 1mL accuracy (I used a graduated cylinder)
start by selecting on of the dosing channels, in this example I am setting up pump 2. I entered the product name in the description and set the manual dose button to dose at the max speed (I do this for priming the line later)
Then I set up the fill monitoring, I am just ‘trusting’ the pump speed to stay accurate in order to alarm me when it is time to refill. There are optical sensors but I won’t cover that now. I set the bottle size and when I want a notification to refill. I also set the speed to speed 0 which is designed to be 5mL/min. To confirm that I run the calibration, to do the calibration I prime the line by holding the manual pump button then set the doser up to the graduated cylinder and it will dose for 1min. Then you update the pump with the amount it dosed in that minute to have jt
Once the pump has been calibrated I can now set up the dosing function. I will be using the dosing schedule, but there are also options to dose based on water level, I tried using this for ATO but it is not a fast enough pump to keep up with evaporations especially compared to a regular ATO, that would probably require the Maxi doser from GHL. Once the pump has been set to follow the dosing schedule I’ll go to the dosing schedule tab
to set the dosing schedule all I do is enter the amount of doses and the volume to dose each time along with the time I want it to start automatically dosing, this is useful for alk so it can be set to start dosing when lights are ramping up and the alk intake is increasing
takes less than 5 min to set up when you aren’t screenshooting and writing it up while doing it, haha.
Setting up an email/text notification
This is the link from the ghl knowledge base:
 www.aquariumcomputer.com
Before you start you will need to decide if you want to give your email password to the app, or generate a random email password that you give permission to the p4 to use via Gmail as an example, using the 2 step verification procceas mail servers useually has.
I did not want to put in my password so I enabled the 2 step verification. Its easy 2 steps proccess
Ok now back to the app
Select menu
Select email notification
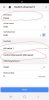
Fill in the following
Mail server (IP or domain): put down the SMTP server name of your email provider
Example (Gmail): smtp.gmail.com
Port: put the port number for your SMTP email server
Example (Gmail): 587
My name: put in the name that will be shown in the email
My email address: Your email address goes here
Username: Your email address goes here
Password: Your email password, or the password that you generated through the 2 step verification
Hit SAVE
Hit add to define when and to who you will send email notification
Fill in the email you want to send the notifications to
Fill in the subject of the email you wamtbto use.
hit save.
Done
This whole proccess took 2 min
One of the cool things about the p4 notifications, besides sending an alarm over txt or email. Is that you can setup a periodic email or txt to be sent to you daily or multiple times a day with status you look for. I, as an example, setup a twice a day status of my probs. So every 12h I get my probs reading in a text and an email.
This is the link from the ghl knowledge base:
How to setup email and text notifications - GHL Advanced Technology
Before you start you will need to decide if you want to give your email password to the app, or generate a random email password that you give permission to the p4 to use via Gmail as an example, using the 2 step verification procceas mail servers useually has.
I did not want to put in my password so I enabled the 2 step verification. Its easy 2 steps proccess
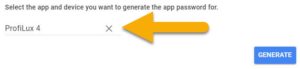
- Enable 2-step verification on your account by clicking here
- Add the ProfiLux as an app by clicking here
- Select Other, type-in ProfiLux, then click Generate
- save the password or write it down. You will use this password in the app.
Ok now back to the app
Select menu
Select email notification
Fill in the following
Mail server (IP or domain): put down the SMTP server name of your email provider
Example (Gmail): smtp.gmail.com
Port: put the port number for your SMTP email server
Example (Gmail): 587
My name: put in the name that will be shown in the email
My email address: Your email address goes here
Username: Your email address goes here
Password: Your email password, or the password that you generated through the 2 step verification
Hit SAVE
Hit add to define when and to who you will send email notification
Fill in the email you want to send the notifications to
Fill in the subject of the email you wamtbto use.
hit save.
Done
This whole proccess took 2 min
One of the cool things about the p4 notifications, besides sending an alarm over txt or email. Is that you can setup a periodic email or txt to be sent to you daily or multiple times a day with status you look for. I, as an example, setup a twice a day status of my probs. So every 12h I get my probs reading in a text and an email.
Attachments
Last edited:
Doser control
P4 "out of the box" can control GHL dosers
or
3rd party ON/OFF peristaltic dosers like the one from BRS.

 www.bulkreefsupply.com
This is great because you can turn any basic peristaltic doser(on/off based) in to a smart controllable doser at no added cost to the P4 controller
Here sequences is the control to do so.
 www.aquariumcomputer.com
P4 "out of the box" can control GHL dosers
or
3rd party ON/OFF peristaltic dosers like the one from BRS.
BRS 2 Part Doser - 1.1 mL per minute
Why does BRS recommend this? The BRS 1.1 mL dosing pump is a very cost-effective yet long lasting stand-alone dosing pump perfect for trace elements and 2 part. By hooking the pump up to a simple timer or aquarium controller they can be one of the most inexpensive ways to get into an automated...
www.bulkreefsupply.com
This is great because you can turn any basic peristaltic doser(on/off based) in to a smart controllable doser at no added cost to the P4 controller
Here sequences is the control to do so.
How to setup a dosing pump schedule - GHL Advanced Technology
Last edited:
Setting an ATO
Ok, now its time for the ATO setup. Yet another 5 min procedure to build a function in the GHL..
The P4 comes ready with ATO function out of the box. It can support optic based or flow based sensor for the ATO.
You can connect up to 4 level sensors(ATO and or leak detection)
Once you get your ATO sensora, choose if you will do 1 or 2 based sensors ATO(in my case am using 2 floats)
You will get a split cable that you can connect 2 sensors to each port on the p4.
You can also add extention module to gove u 4 more, for cheap iight add.
First:
Connect the sensor(float or optic) to one of the 2 connectors on the p4.
First use the top port. Then move to the lower port
Remember the color of the port you connects to.
Purple port: Level 1 and 2
Green port: Level 3 and 4
Note: If you are using a single sensor is connected directly to port, the Level sensor will be assigned to the first number of that Level-port.
Second: now we define the function (ATO)
Select Menu
Select Control
Select Level
Select an unused CONTROL CIRCUIT
Set the Operation mode to Auto Top Off, Min/Max control OR ATO w/ 2 sensors
Put in a description; ATO
Put in the Maximum on-time
"Select if you want the alarm to be reset automatically after being triggered. If enabled, the alarm will reset after normal conditions are detected."
"If you want to use the ATO 24/7, leave as-is. Which ia the case with me"
Select the sensor that will be used for this function
"
For example, if you are using a 1-sensor ATO and have it connected directly to the LEVEL 1/2 port, select (1)
If you are using a 2-sensor ATO and have it connected via a splitter cable to the LEVEL 1/2 port, select (1) and (2)"
Hit SAVE
Now function is ccreated.lets assign it to hardware(an outlet in this example)
Hit Menu
Select Switch channels
Select the Powerbar outlet that has the ATO pump connected to it
Put in a description; ATO pump
select the function to Fill water ATO only and select the Control Circuit number you used when you created the ATO function
Hit SAVE
Done.
5min, ATO function using 2 sensors is done.
Here is thw link from the knoweldge base
 www.aquariumcomputer.com
And here is the video for the 2 sensros based ATO
Ok, now its time for the ATO setup. Yet another 5 min procedure to build a function in the GHL..
The P4 comes ready with ATO function out of the box. It can support optic based or flow based sensor for the ATO.
You can connect up to 4 level sensors(ATO and or leak detection)
Once you get your ATO sensora, choose if you will do 1 or 2 based sensors ATO(in my case am using 2 floats)
You will get a split cable that you can connect 2 sensors to each port on the p4.
You can also add extention module to gove u 4 more, for cheap iight add.
First:
Connect the sensor(float or optic) to one of the 2 connectors on the p4.
First use the top port. Then move to the lower port
Remember the color of the port you connects to.
Purple port: Level 1 and 2
Green port: Level 3 and 4
Note: If you are using a single sensor is connected directly to port, the Level sensor will be assigned to the first number of that Level-port.
Second: now we define the function (ATO)
Select Menu
Select Control
Select Level
Select an unused CONTROL CIRCUIT
Set the Operation mode to Auto Top Off, Min/Max control OR ATO w/ 2 sensors
Put in a description; ATO
Put in the Maximum on-time
"Select if you want the alarm to be reset automatically after being triggered. If enabled, the alarm will reset after normal conditions are detected."
"If you want to use the ATO 24/7, leave as-is. Which ia the case with me"
Select the sensor that will be used for this function
"
For example, if you are using a 1-sensor ATO and have it connected directly to the LEVEL 1/2 port, select (1)
If you are using a 2-sensor ATO and have it connected via a splitter cable to the LEVEL 1/2 port, select (1) and (2)"
Hit SAVE
Now function is ccreated.lets assign it to hardware(an outlet in this example)
Hit Menu
Select Switch channels
Select the Powerbar outlet that has the ATO pump connected to it
Put in a description; ATO pump
select the function to Fill water ATO only and select the Control Circuit number you used when you created the ATO function
Hit SAVE
Done.
5min, ATO function using 2 sensors is done.
Here is thw link from the knoweldge base
How to setup ATO control with ProfiLux - GHL Advanced Technology
And here is the video for the 2 sensros based ATO
Attachments

I got the GHL fan today, and I do not like it. While its solid build its not as powerful as I hoped it to be. It would be good for indoor tanks, but for the extream heat am trying to address, this fan cannot keep up compared to other fans i got off amazon like the fan that @RandyC uses...
Controllability of the fan is really cool thu, the p4 control yhe RPM of the fans based on the temp to save on power snd reduce evaporation when cooling is not needed or not needed as much..
Controllability of the fan is really cool thu, the p4 control yhe RPM of the fans based on the temp to save on power snd reduce evaporation when cooling is not needed or not needed as much..
Attachments

How’s the noise on it? Pc fans have gotten really quiet so I’d want it to be silent, but I’m skeptical of products like this from GHL and Neptune where they are likely licensed designs instead of in house products and therefore don’t have the same quality as the main product line.I got the GHL fan today, and I do not like it. While its solid build its not as powerful as I hoped it to be. It would be good for indoor tanks, but for the extream heat am trying to address, this fan cannot keep up compared to other fans i got off amazon like the fan that @RandyC uses...
Controllability of the fan is really cool thu, the p4 control yhe RPM of the fans based on the temp to save on power snd reduce evaporation when cooling is not needed or not needed as much..
Dead silence...on that front its amazing, but I think thats also why they did not make it more powerful fearing the noise..thats my gut feeling.How’s the noise on it? Pc fans have gotten really quiet so I’d want it to be silent, but I’m skeptical of products like this from GHL and Neptune where they are likely licensed designs instead of in house products and therefore don’t have the same quality as the main product line.
With ghl am sure they sourced the fan but everything else is their design.
It look like regular computer fan or something similar, wrapped with aluminum housing and power controller..
Good to know. My tanks gotten up to low 80s so it might be good to add one of the 2 fan ones. I’ll consider it when I place the order for the P4 eventuallyDead silence...on that front its amazing, but I think thats also why they did not make it more powerful fearing the noise..thats my gut feeling.
With ghl am sure they sourced the fan but everything else is their design.
It look like regular computer fan or something similar, wrapped with aluminum housing and power controller..
Before you order ping me. Chances are I do not keep it cause I do not see it enough for me. I got the 5 fans one that is 20" long. Got the fan and the variable RPM comtroller.Good to know. My tanks gotten up to low 80s so it might be good to add one of the 2 fan ones. I’ll consider it when I place the order for the P4 eventually
So just ping me when its time