Supporting Member
- Joined
- Nov 15, 2023
- Messages
- 1,967
Looking good! I'm trying to convince my wife to let me setup a Qt/frag tank like this. Crossing my fingers...
How do all of you guys manage to "bottom out" nutrients? I'm fighting for my life to keep them down! Nitrate is rising, and while phosphate isn't an issue right now I'm sure it will become one at some future inopportune timePersonally, I think I'd stay away from a refugium. After seeing my nutrients bottom out so quickly without a refugium, because I've got so much rock in there, I'd be worried. I wonder where all that rock came from?! Hmmm
But I will need to find the link to "study" about various porous materials and their efficacy in filtration. Let's just say that a lot of those products out there for biomedia can be smoke and mirrors. I think it's tough to beat natural crushed coral (larger reactor media) for bacteria. Neptunes recently got a big shipment in.
And it's really hard to beat the K1 media! Enough surface area for bacteria to colonize and detritus doesn't get built up in it, making it easy to clean out. Gotta run, but if forget to get you the link to it, remind me.

In my display when I bottomed out and got Dino’s I think it was because I only had two clowns in a 45 gallon tank and I was “over cleaning” itHow do all of you guys manage to "bottom out" nutrients? I'm fighting for my life to keep them down! Nitrate is rising, and while phosphate isn't an issue right now I'm sure it will become one at some future inopportune time

Looks awesome any chance they had more black sheets in the scrap bin? I would love some racks like you made for my frag/ zoa and leather grow out tank.A little update
I ordered two cables to try to make the loose cable between the two lights less noticeable. I ordered a 1ft and a 1.5ft to see which is better. 1ft was too small and 1.5ft is a little too big but definitely less noticeable than all the hanging cord from before.
I have media in the sump already but also going to add 10lb of live rock I am buying from @t0mmy108 next week because he ordered extra. I’ll also be getting a pair of clowns from him as the first fish for this frag tank. Tank is already cycled so we’re good to start moving livestock in.
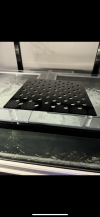
The acrylic pieces I got from Amazon that were 11”x14” were no good. They claimed it was cast acrylic but when I tried to drill it, it didn’t go well. I should’ve listened to the reviews. I picked up six 10”x10” pieces of acrylic from the $1 pile at Tap Plastics which was very easy to drill into. I used an 1/8” sheet and drilled the holes where I wanted them to go and used that as a guide. Then I drilled through 3 sheets of the 1/4” acrylic at a time using the template I made. Not the most even work in terms of hole placement but it’ll work. It took sooo long to make all the holes lol but I’m happy with how it came out. 10”x10” will do good at filling the width of the tank but will leave me gaps length wise. I would’ve done another two but I didn’t realize until I started attaching the acrylic legs that I had only made enough for 6 sheets
I went on Thursday and I think I took all the solid black ones in the 10x10 $1 pile. There was some semi-translucent black I left behind. I think there were some solid black in the 12x12” $2 pile but those were too big for what I needed so I didn’t really look there. The bit I used I got there as well. It was 1/2” bit. It was like $25 so if you plan on making some and want to borrow it you are welcome to it. I also have some spare weldon you can use. For the acrylic rods I went 2” and they charged me $1/pc for material and $1/pc for labor.Looks awesome any chance they had more black sheets in the scrap bin? I would love some racks like you made for my frag/ zoa and leather grow out tank.
I've used white egg crate cause it’s cheap but looks horrible after a few weeks.
Also what type and size bit did you use for the holes?
")
I went on Thursday and I think I took all the solid black ones in the 10x10 $1 pile. There was some semi-translucent black I left behind. I think there were some solid black in the 12x12” $2 pile but those were too big for what I needed so I didn’t really look there. The bit I used I got there as well. It was 1/2” bit. It was like $25 so if you plan on making some and want to borrow it you are welcome to it. I also have some spare weldon you can use. For the acrylic rods I went 2” and they charged me $1/pc for material and $1/pc for labor.
I should’ve gotten that I didn’t realize they’re a lot cheaper lol. Thankfully with the bit I used it didn’t crack. Only my guide cracked but I was too close to the edge, so on the final ones I avoided putting holes thereEvery TAP plastics is different from what they have in their scrap bin. If you don’t find it at one, you’ll probably find it at another.
I’d recommend you use a step drill bit. It’ll help you from cracking your acrylic when you accidentally use too much pressure. Using a 1/2” step drill bit, you can just drill all the way through as most plugs will fit in that size hole. Obviously, would be dependent on what plugs you’ll be using.
View attachment 59526
We would be shopping at the same one I'm pretty sure we aren't to far from each other.Every TAP plastics is different from what they have in their scrap bin. If you don’t find it at one, you’ll probably find it at another.
I’d recommend you use a step drill bit. It’ll help you from cracking your acrylic when you accidentally use too much pressure. Using a 1/2” step drill bit, you can just drill all the way through as most plugs will fit in that size hole. Obviously, would be dependent on what plugs you’ll be using.
View attachment 59526
Maybe something like this? I like the look but with 9” of height I can’t really do multiple layers. Tap Plastics also has different color acrylic rods if you don’t want clearThanks, I still have a mostly full tube of weldon. From my sump mod. Borrowing the bit would be very helpful.
My frag tank would be either a biocube 29/ or 32 not sure which I would specifically dedicated to the task. Currently I have all my overflow corals and zoas in the 29.
Sheets are very easy to cut, in straight lines. So the 12x12 might work as is. I have a usesble display space thats like 18×15
So I would only need 1 full sheet. Along with one extra sheet cut smaller at smaller sizes.
In the perfect image thrown together in my head "I would have one larger rack, one meduim size rack, and one smaller one all different heights to reduce shadowing. "
I will try to check them out this coming week and hope they still have a few black sheets left. Than go from there.
Yea thats kinda what I envision minusMaybe something like this? I like the look but with 9” of height I can’t really do multiple layers. Tap Plastics also has different color acrylic rods if you don’t want clear
Yes that’s the local one to me. I work in that area I can stop by Monday and see if there’s any left in the scrap bin and let you know that way you don’t have to drive there for nothing. They are closed tomorrowYea thats kinda what I envision minus
the height. I originally done something similar to the image with the egg crate I mentioned. Took hours and probably blew through 100 zipties doing it.
I'm assuming you went to taps on Alameda? Unless there is another nearby
I assumed sunday is a no go. Thanks that would be helpful.Yes that’s the local one to me. I work in that area I can stop by Monday and see if there’s any left in the scrap bin and let you know that way you don’t have to drive there for nothing. They are closed tomorrow
Did you end up finding some? If you did I have the bit for you and I can also pass the PAR meter onto you since I saw you got in lineI assumed sunday is a no go. Thanks that would be helpful.
Yes, I found myself near there today. Very happy I went in when I did. I was able to pick up all 5 sheets they had left of the typical acrylic frag rack thickness.Did you end up finding some? If you did I have the bit for you and I can also pass the PAR meter onto you since I saw you got in line
You could use one of your extras to make your template and then go through the rest of the sheets all at once. I did 3 at a time. If I would’ve gone 1 sheet at I time it would’ve taken forever. My hand already was feeling like it was going to fall off lol. Let me know whenever you have a chance to pick them up. You have my number or just pm meYes, I found myself near there today. Very happy I went in when I did. I was able to pick up all 5 sheets they had left of the typical acrylic frag rack thickness.
I saw the legs you used, but couldn't afford them, so I found a sheet of black 1/2 inch black Acrylic. That I should be able to peice together legs out of them. They gave me the later one free. So left feeling like I robbed them with 6 10×10 sheets for $5.
I have way more sheets I currently need, but good to have 2-3 extras for mistakes or to share.
Yes, I could also get the par meter from you.
Let me know when your done with the meter. I'm free tomorrow. How did you determine your hole placement on your template.You could use one of your extras to make your template and then go through the rest of the sheets all at once. I did 3 at a time. If I would’ve gone 1 sheet at I time it would’ve taken forever. My hand already was feeling like it was going to fall off lol. Let me know whenever you have a chance to pick them up. You have my number or just pm me
There is probably an easier way but I used a ruler and drew a grid with 1” spacing between lines running horizontally and vertically. I drew this while the paper was still on the acrylic and drilled with it on. Then I just drilled where the lines met. It didn’t end up perfect but it’ll work. If you want you can use the template I made. To drill the sheets at the same time, I clamped two corners together so they wouldnt move. You could also borrow the clamps if you needLet me know when your done with the meter. I'm free tomorrow. How did you determine your hole placement on your template.