High Tide Aquatics

Julius' CDA 150 Build

I have come around the emotional shock and will let them be.

On a different note, there have been bubble algae in my IM 20G quarantine tank. Unsuccessful to get rid of them for good. Decided to shut it down. If anybody interested in the corals there for free, pls let me know.

I am a beginner, so easy beginner stuff there. The thing I hate to lose most is the Duncan coral I got from xcaret as a good will gift. It has Doubled in size, and healthy.

You can also take the rock in there if you want. Pictures attached.
 

Attachments

  • 63926C8A-0B2D-4D0C-8342-40360A3CE832.jpeg
    63926C8A-0B2D-4D0C-8342-40360A3CE832.jpeg
    112.4 KB · Views: 244
  • D8890DE1-F4DB-4073-93ED-BA3D39A18658.jpeg
    D8890DE1-F4DB-4073-93ED-BA3D39A18658.jpeg
    77.1 KB · Views: 239
  • BDB399A8-28CB-4A8A-A7D6-2465960F1372.jpeg
    BDB399A8-28CB-4A8A-A7D6-2465960F1372.jpeg
    141.4 KB · Views: 236
Last edited:
I have a condition called bubble algaeforbia, and really scared they contaminate my main tank.

Boun suggests to try emerald crabs. I guess I will have to try that, so he is not disappointed at me. So the free offer is no longer at this moment.
 
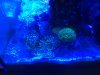
I have been trying to stop the Co2 bubbles build up in the Georeef cal reactor purchased used two years ago. Replaced circulation pump, hoses 3 months ago which helped a lot, but bubbles still accumulate after 3~5 days. I am running at PH 6.5 and effluent rate of 8ml/min.

Earlier today, got the following message from Georeef. I like to continue to use peristaltic pump. But before I spend money on a different reactor upgrade, does this Georeef message make sense?

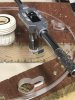
FYI - What I have is the old model, where the recirculated water flows to the top of the lid, via a union, onto where the effluent outlet is and onward back to the circulation pump. The new model of Georeef now has the in and out of re-circulation at the side of the chamber, while the effluent outlet is at the lid (higher up). I guess that means the CO2 bubble will flow up to the effluent outlet, instead of going back into the circulation pump.

" If you own a GEO calcium reactor that was built before 2009 (manifold connected to the lid via union) then this design was built to have pressure inside the reactor. Pressure was supplied to the reactor via small feed pump placed in your sump (MaxiJet/Colbalt 600 or Sicce 0.5) and the effluent control via micro ball/needle valve. These models went into production approximately in 1999 BEFORE continuous duty peristaltic pumps were being used in the aquarium trade. If you try to run a peristaltic pump ALONE on these models you will get a build up of CO2 since there is no pressure to compress the intoduced Co2 into the water column. Some users can get them to work normally if a high effluent rate and low Co2 dosing is used. The work around if you must use a peristaltic pump with these models, although we do not recommend this, is to use both a small feed pump (<125 gph) *****WARNING connections must be secure and O-Rings/Uni-seal in good condition******* and a peristaltic pump in the pull configuration. Yes the feed pump will be pushing against the peristaltic pump but at low enough pressure not to damage it. REMEMBER THIS IS AT YOUR RISK AND AGAIN THIS IS A WORK AROUND AND NOT RECOMMENDED BY GEO'S REEF. We do however recommend that you follow the original directions listed on our website with use of only a small feed pump. This pre-2019 design is proven for almost 20 years without any major issues. Our advice is to just use the feed pump. If you choose to use the equipment in a way that it was not designed it is at your own risk. "
 
I can't wait to do it, but the tap bit is delayed and won't be here until 8th ;-(

I tried the step drill bit today on starboard, which feels soft and pretty easy to drill. Wonder how different it is to drill acrylic lid. Did you feel danger of cracking when drilling?

BTW, is this the right bit? It says "Pipe Tap"?


That's the tap I got. If you go slow with the step bit, you'll be ok. A step bit in my experience is much, much more forgiving on cracking acrylic than a regular drill bit. I'm more scared of cracking when using a straight bit, even when starting from small bit to a big bit.
 
I think the two biggest concerns with cracking acrylic are overheating it and the drill bit catching an edge.

I think starboard is HDPE, which is softer and less brittle than Arylic.
 
I think the two biggest concerns with cracking acrylic are overheating it and the drill bit catching an edge.

I think starboard is HDPE, which is softer and less brittle than Arylic.
Yeah, the faster the drill bit spins the more friction builds up and you end up melting. Too much pressure and it will crack. It’s a balance so good to go slowly but with a sharp bit. It also helps to have a sacrificial piece under it to help support it evenly as you drill. Plywood works pretty good for this. Lastly is the positioning of the hole. Drilling closer to the edge is always more prone to cracking. If you have a practice piece I’d recommend practicing first. I’ve never used a stepper bit so it’s not necessary to be successful but I have also cracked my fair share of acrylic while drilling.
 
Dastaco fix the co2 build up by triggering a venting event once or more a day depending on the alk setting, which I think all ot is, is turning off the reactor for a short time to allow all the co2 bubble to get out...I think..
 
Done!

The acrylic lid feltmuch harder and “dry” when drilling and tapping. Hard to tell what is the optimal drilling speed. Step drill helped.

First time doing tapping. Difficult to keep the bit stable at the beginning before the bit catches the material good. Toward the end, resistance to turning is quite strong, i was worried I might crack the lid.

The 1/4 connector now extends slightly below the lid. This leads to a pocket of air remaining in the reactor. I may give it a shave next time so it flushes with the wet side of the lid.

These days new cal reactors have the circulation pump taking water from the side of chamber. Better design than mine.
 

Attachments

  • 3A2BC126-6C9F-4EA4-9533-511647617A69.jpeg
    3A2BC126-6C9F-4EA4-9533-511647617A69.jpeg
    63.3 KB · Views: 187
  • FF6ACEE3-BDED-4C95-9C1F-54C83DE6940E.jpeg
    FF6ACEE3-BDED-4C95-9C1F-54C83DE6940E.jpeg
    56.3 KB · Views: 193
  • 2284345A-9B93-409E-85FF-D0C6DB3438B1.jpeg
    2284345A-9B93-409E-85FF-D0C6DB3438B1.jpeg
    76 KB · Views: 207
  • A5662DB0-23E3-4D68-A0B5-D67DACAD97F9.jpeg
    A5662DB0-23E3-4D68-A0B5-D67DACAD97F9.jpeg
    65.3 KB · Views: 211
Done!

The acrylic lid feltmuch harder and “dry” when drilling and tapping. Hard to tell what is the optimal drilling speed. Step drill helped.

First time doing tapping. Difficult to keep the bit stable at the beginning before the bit catches the material good. Toward the end, resistance to turning is quite strong, i was worried I might crack the lid.

The 1/4 connector now extends slightly below the lid. This leads to a pocket of air remaining in the reactor. I may give it a shave next time so it flushes with the wet side of the lid.

These days new cal reactors have the circulation pump taking water from the side of chamber. Better design than mine.

You shouldn't need to shave down the 1/4" connector as long as the extension tube you add to the input of the recirculating pump is lower than the 1/4" connector. A little air in the reactor won't add to any noise as long as it doesn't get into the pump.
 
How did my apex codes for cal reactor ph probe allowed ph=5.9?
 

Attachments

  • 8409D034-C384-4DB0-813A-07F9B5EE5308.png
    8409D034-C384-4DB0-813A-07F9B5EE5308.png
    114.2 KB · Views: 203
  • 8EF42377-7242-48BF-8FD3-53ACAD1B322E.png
    8EF42377-7242-48BF-8FD3-53ACAD1B322E.png
    79.6 KB · Views: 213
How did my apex codes for cal reactor ph probe allowed ph=5.9?

“Fallback” is only the state set when the EB loses connection from the head.

“Set” is used for normal operation. You need to add a SET OFF. Without the set statement, I believe you are in a who-knows-whatever-state the outlet is in.
 
Back
Top